• Steel Soldiers now has a few new forums, read more about it at: New Munitions Forums!

  • Microsoft MSN, Live, Hotmail, Outlook email users may not be receiving emails. We are working to resolve this issue. Please add support@steelsoldiers.com to your trusted contacts.


Working on the M37

Keith_J

Well-known member
3,657
1,314
113
Location
Schertz TX
I wonder if we could put a fitting or something on it to apply regulated pressure to the system with your air compressor. that way we could visually inspect the lines to see if there's any slow leaks while it's all exposed like this.
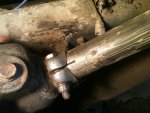
Brake lines run in the thousands of PSI. An air compressor is only 150 PSI. Besides, any leaks will show up as a really spongy pedal feel.

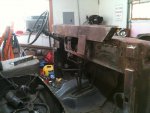
The real issue to replacing the lines is getting all the fittings and clamps loose without distorting the old lines. Having an accurate pattern for bending new lines is a real help. New spring armor might be an issue, it isn't needed since the truck won't see intentional off-road action. Forget the old armor, rust spawns new rust.

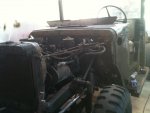
I'm not worried about the old fuel/vent lines. If these fail, the engine won't run since they are negative pressure lines, the pump is at the engine and powered by the engine. It isn't like a new vehicle with 50+ PSI from the in-tank pump.
 

mkcoen

Well-known member
Steel Soldiers Supporter
5,637
380
83
Location
Spring Branch, TX
I guess the "sand it a little with the DA and paint it" is out the window with all of the patch work planned.

I'm going to need a bigger boat...er, bigger can of paint.
 

Keith_J

Well-known member
3,657
1,314
113
Location
Schertz TX
I've got a spare, scrap aluminum computer heatsink we can use if you think it'll absorb enough heat without melting...
The bed frame rail rust repair was a bit of a kludge, the match cutting was offset due to the flange, grinding the patch to fit took a good bit of time.

With the bed, match cutting is easier since there is no flange so an even 0.040 root gap weld preparation will be perfect with pulsed TIG using filler rod lay-in. The filler is 0.0625 (1/16") which is enough volume to fill the 0.04" gap in 14 gauge using 1" filler for each 1" weld. Just lay the 1/16" filler on the gap and keep the puddle about 1/8" in diameter. The aluminum heat sink backing will keep the distortion minimal. 2" stitching just to be sure.

Adding: I got the little weld clamps from HF and also picked up a shade 8 for my helmet so the small TIG welds will be easier.
 
Last edited:

mkcoen

Well-known member
Steel Soldiers Supporter
5,637
380
83
Location
Spring Branch, TX
Here's a shot of the finished rear frame with the pintle reinstalled.

Tomorrow I start the finish work on the new front end. It's already been sanded and primed so just need to go over it lightly one more time and then wash with grease/wax remover and start shooting some color.
 

Attachments

Keith_J

Well-known member
3,657
1,314
113
Location
Schertz TX
Looking better.

I should have picked up a 40 grit flap wheel to level those spot weld fills on the tool box bottom. Andy can burn the old 80 grit flap wheel on that job. If he wants to learn to weld, he must first know how to grind/fit/clamp.

Sometime this week I'll have to make time to get that B-pillar straight, strong and aligned. You still have those short sections of 1-1/2" square tube for the weld repair?
 

mkcoen

Well-known member
Steel Soldiers Supporter
5,637
380
83
Location
Spring Branch, TX
Keith_J was out last week and did some major metal work on the cowl. Still a lot to do but things are getting in to shape.

The area under the windshield pivot point on both sides was completely rusted out. We pulled the pivot pin and it was missing about half it's diameter in one spot where it had rusted. Luckily we had some spare metal from where Keith patched the tool box for the bed and he was able to cut out the rust and put some real metal back in there. We still need to do the finish work on it but I feel a lot better about the windshield staying on going down the road now.

Next week:
1) Finish the tub metal work
2) Finish the bed metal work
3) Maybe start putting some of it back together

Pics:
1) After rust cut out
2) 1st patch clamped in place
3) 1st patch welded
4) How to hold a patch when clamps won't work? Stud gun!
 

Attachments

Last edited:

Keith_J

Well-known member
3,657
1,314
113
Location
Schertz TX
Stud welding for tacking was an inspiration out of the blue. I still need to make the patch panel patterns for the metal service center. A brother of mine had an "emergency" tree trimming job. "Emergency" is due to his having a shed built and the tree is in the way. Grrrr....


Oh, another trick was using the TIG torch to heat the sheet for hot working. Sounds odd but it works faster than oxy-fuel. Still need full hood as that plasma is bright.
 

Keith_J

Well-known member
3,657
1,314
113
Location
Schertz TX
Mesquite wood is tough. And it is hot. I burned 3 tanks of gas in the Stihl, burying the 17" bar in some of the wood. I stacked about a half cord, he wasn't even home.

I need a beer.
 

mkcoen

Well-known member
Steel Soldiers Supporter
5,637
380
83
Location
Spring Branch, TX
Mesquite wood is tough. And it is hot. I burned 3 tanks of gas in the Stihl, burying the 17" bar in some of the wood. I stacked about a half cord, he wasn't even home.

I need a beer.
Much less physical labor at my house and the beer is handy.
 

mkcoen

Well-known member
Steel Soldiers Supporter
5,637
380
83
Location
Spring Branch, TX
There are a lot of really rough panels on this truck. Take this one for example. It's the panel that goes between the grille and the engine cover on the right side. It has the hood hold down latch so sees a bit of stress. Those are not cracks in the paint in pic #1 but cracks in the metal.

I asked Keith what he thought about it and he went in to "let's figure this out" mode and was trying to decide how best to repair it when I suggested just replacing it with the panel I had already sanded.

He was not particularly amused (at first). This is where TexAndy or I would usually add "that's what she said." Quite the chuckle fest working at my place.
 

Attachments

Keith_J

Well-known member
3,657
1,314
113
Location
Schertz TX
I'll take the ribbing, it is painless. The mild case of rhabdomyolysis from 104 F chainsawing not so much.:cry:

I'm getting the patch panel for the bed front done properly with both flanges brake folded. There is a bit of flash rust on the cold rolled 1018, it should brush out. Just need steady hands.

We should have enough patch material with all of the trim-outs.
 

mkcoen

Well-known member
Steel Soldiers Supporter
5,637
380
83
Location
Spring Branch, TX
Well today TexAndy was by to help out a little. We finished taking the windshield off and the rest of the front sheet metal. I've been sanding the tub and the cowl and have taken about 5lbs off the weight of the truck just in paint.

The other thing we did was start cleaning up some of the front mechanicals. I really wish I had taken a picture of the steering box before we started but didn't remember until about half way through. The "before" picture does absolutely no credit to how much petrified grease and dirt (then paint over top of it) there was on this. The steering column is a little more illustrative.

Neither item is completely finished but light years ahead of where we started.

Pics:

1) steering box mid-way
2) steering box when we quit for the day (still not done)
3) steering column before
4) steering column after
 

Attachments

mkcoen

Well-known member
Steel Soldiers Supporter
5,637
380
83
Location
Spring Branch, TX
Work continues on the vehicle for the love of my life (although I may have to let my wife drive it occasionally also).

The majority of the paint has been removed and the next phase will be some serious metal work, then a little body work, some wiring attention, then primer and paint.

One of the surprises in store for my wife after it's put back together (which will be a surprise to her in itself) is the circular hole in the dash will now be filled with the correct defroster tube thanks to John at Midwest Military (and my VISA card). As soon as I say "these suckers are tough to find" someone will pipe up and say they've got ten of them in their attic but I had to go with what I could locate now.

Hopefully by the end of this week it'll start moving back together.
 

Attachments

mkcoen

Well-known member
Steel Soldiers Supporter
5,637
380
83
Location
Spring Branch, TX
[FONT=&quot]And when you do that replace your master with a Chevy c30 master cylinder, did wonders on my old m37. [/FONT]
Sorry, different thread: http://www.steelsoldiers.com/m37/71788-m37-brake-wheel-cylinders.html

I already replaced the MC with an original style NOS master. This truck will be doing parades and shows only with VERY little road time so I'm not too concerned with stopping from it's max speed of 45mph. However I will be replacing the hard lines (and all 4 wheel cylinders) simply because it'll be easier to do it now with the bed and front end off than it would be later.
 
Last edited:
Top
AdBlock Detected

We get it, advertisements are annoying!

Sure, ad-blocking software does a great job at blocking ads, but it also blocks useful features of our website like our supporting vendors. Their ads help keep Steel Soldiers going. Please consider disabling your ad blockers for the site. Thanks!

I've Disabled AdBlock
No Thanks