-
Steel Soldiers now has a few new forums, read more about it at: New Munitions Forums!

Working on the M37
- Thread starter mkcoen
- Start date

More options
Who Replied?Keith_J
Well-known member
- 3,657
- 1,328
- 113
- Location
- Schertz TX
I would wager the sand clogging the body rails is either Negev or Sinai. It sure is fine and soft.
- 5,637
- 382
- 83
- Location
- Spring Branch, TX
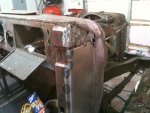
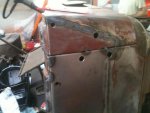
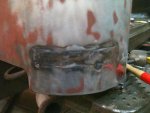
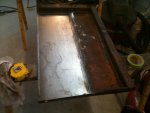
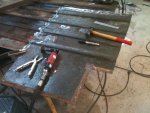
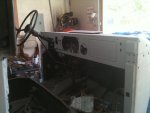
Keith_J was back out doing his welding thing today and finished getting the right cowl rust damage fixed. He basically had to cut the bottom part of the panel from the top seam down to the bottom and from the door edge to about 1/2 across, in other words most of the bottom. On the top he cut from the seam up to where it starts to roll over the top of the cowl. Both of these patch panels he made by hand using a simple metal brake and a lot of clamps. There's a little finesse work left but it's looking amazingly better.
Pics:
1) Panel before
2) 1st patch panel in
3) 2nd patch panel in
4) New Metal!
Pics:
1) Panel before
2) 1st patch panel in
3) 2nd patch panel in
4) New Metal!
Attachments
-
 67.5 KB Views: 100
 -
 64.8 KB Views: 99
 -
 51.3 KB Views: 104
 -
 57.1 KB Views: 103
Keith_J
Well-known member
- 3,657
- 1,328
- 113
- Location
- Schertz TX
Tomorrow will be the B-pillar bottom patches and cab back. I have the tiny tungstens sharpened and will pack my long file to get the fit perfect on the back quarter round section.
Fitting the bed front patch will be an all-day event, even with the long file.
Fitting the bed front patch will be an all-day event, even with the long file.
Keith_J
Well-known member
- 3,657
- 1,328
- 113
- Location
- Schertz TX
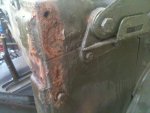
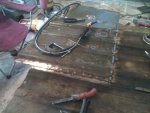
Patched two more areas of the cab, both rust-outs. Working slow as I prefer to have tiny gaps for fast welding. Mark with tape, excise with cut-off wheels, then use files to make the cuts straight. Test fit, mark and trim more. This is 2 hours of fitting and 10 minutes of welding.
Also, being blind, the back of some of the existing steel is bubble-rusted. When those are hit with the TIG, instant hole and sparks as the rust releases oxygen. The only way to quiet that bead is with E70 S6 filler. But when the fit-up is perfect, 10 inches per minute is the typical speed on 18 gauge at about 20 amperes running (set for 40 on the machine, throttled with remote control).
Two more patches, two inches square on the inside of door openings, bottom of the B-pillar.
With the tiny arc and rusty metal, having a full box of sharp 0.040" tungsten electrodes really helps with the speed.
mecharedneck
New member
- 11
- 0
- 1
- Location
- Owens Valley, CA
After finding 3 clues that our truck once belonged to the Israeli Defense Force (Hebrew on spare tire, correct color under the current OD green, Israeli phone token buried in grease on frame) the wife decided she wants it dressed back in IDF colors. In this case Sinai Grey (thanks to M813rc for pointing me in the right direction). At least the Grey was painted over the OD the original go around so I don't have to sand everything back down just paint over it.
I've been thinking along these lines myself, but I've had no luck finding any pics of IDF M37 markings. Do you have any reference photos you could share? For the record, mine's not Israeli, But I want to have a little fun before going full restoration, so I'm going to play dress-up a little.
- 5,637
- 382
- 83
- Location
- Spring Branch, TX
I haven't found specific photos of M37s but a TON of M38s and halftracks. Here's a link to some other IDF vehicles including 6 Day War Power Wagons (pic 2):I've been thinking along these lines myself, but I've had no luck finding any pics of IDF M37 markings. Do you have any reference photos you could share? For the record, mine's not Israeli, But I want to have a little fun before going full restoration, so I'm going to play dress-up a little.
IDF ARMOR ??? ??????-??"?: IDF -Tactical armor, Apc,Half tracks,tracks,light vehicles
Keith_J
Well-known member
- 3,657
- 1,328
- 113
- Location
- Schertz TX
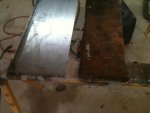
We got the rest of the cab rust holes excised, patches fitted and welded! We also got the bed back patch bent with 1" flanges. Abused the poor $30 Harbor Freight sheet metal brake on that, it seems to have weathered this fine, although we did reinforce it with 1-1/2" square tube after pulling off a 75mm angle.
The flange bends weren't tight enough, a bit of hammering on the vise with a 1/4" thick bar "pad" did the trick. Still need to weld the flange corner brace and the square nut for the side, these are far easier welds in the flat position.
The flange bends weren't tight enough, a bit of hammering on the vise with a 1/4" thick bar "pad" did the trick. Still need to weld the flange corner brace and the square nut for the side, these are far easier welds in the flat position.
- 5,637
- 382
- 83
- Location
- Spring Branch, TX
I've been falling down on the job getting photos posted. This morning my computer crashed (power supply died) and I wasn't sure I'd get it back up and running but 1 new power supply and here we are.
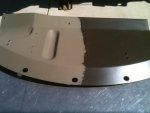
Keith got the bed front panel welded in today so the only thing really left, metal wise, is the bed floor. I haven't gotten a shot with the front patch welded in yet but I'll post it later this weekend. We're going to take a couple of days off and try it again next week but here's some shots first.
Pics:
1) Right cab corner patch
2) Bed Front Panel Old/New
3) Bed Front Panel patch
4) Front Panel rough fit
Attachments
-
 53.3 KB Views: 77
 -
 40.2 KB Views: 79
 -
 31.7 KB Views: 72
 -
 50.2 KB Views: 75
Last edited:
- 5,637
- 382
- 83
- Location
- Spring Branch, TX
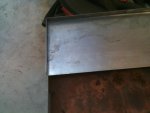
As promised here's the photo of the bed front panel welded together.
The next 2 pics are of the sample of Sinai Grey that I had mixed up at Home Depot. It's not dead on but pretty close to the original, actually about 1/2 way between the 6 Day War color and the Yom Kippur color but without an exact match next to it I don't think anyone could tell. It's on one of the inner fender wells. I left one side in OD for a comparison.
I brushed this on just to get a feel for the color so there are some brush stokes in the paint and I only did 1 coat so it needs to be a bit thicker. I'll be thinning it down enough to spray on and after a couple of coats I think it should come out fairly nice.
Attachments
-
 42.5 KB Views: 70
 -
 29.1 KB Views: 78
 -
 36.5 KB Views: 67
Keith_J
Well-known member
- 3,657
- 1,328
- 113
- Location
- Schertz TX
MK is probably beat after this week's work and getting needed rest.
Aside from grit blasting rust, we have finished all body filler, a few welds in the skin and moving metal after using guide coat and long sanding. Then went on the body filler. Not bad, less than 2 quarts including the loss from sanding and hasty work necessary due to high temperature kicking the magical chemical reaction in less than five minutes.
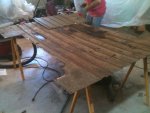
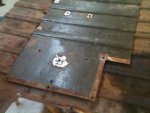
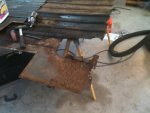
Today, we got the bed floor patched. Since both bed bottoms were rusted in the same area, we used the other side, flipped it over and turned it 180 degrees. Cut the mid line spot welds, making an easy double lap joint for welding. The long weld seam was a bit more complex, having the convolutions of the corrugations but I welded it from both sides. It will need some flap wheel work, both 80 and 40 grit ones we have are near death but I still use them.
We also did some POR work on the somewhat cleaner metal. The humidity here is LOW, making the urethane cure very slow. I did a TLAR calculations on the shop volume and dewpoint in the 30 F range to estimate it needed 2 pounds of water. Using a drinking straw and air hose blow gun, I sprayed the air, dust curtains and walls with the mist. Cured the POR in about an hour. All that course work in HVAC design has other uses
Aside from grit blasting rust, we have finished all body filler, a few welds in the skin and moving metal after using guide coat and long sanding. Then went on the body filler. Not bad, less than 2 quarts including the loss from sanding and hasty work necessary due to high temperature kicking the magical chemical reaction in less than five minutes.
Today, we got the bed floor patched. Since both bed bottoms were rusted in the same area, we used the other side, flipped it over and turned it 180 degrees. Cut the mid line spot welds, making an easy double lap joint for welding. The long weld seam was a bit more complex, having the convolutions of the corrugations but I welded it from both sides. It will need some flap wheel work, both 80 and 40 grit ones we have are near death
but I still use them.We also did some POR work on the somewhat cleaner metal. The humidity here is LOW, making the urethane cure very slow. I did a TLAR calculations on the shop volume and dewpoint in the 30 F range to estimate it needed 2 pounds of water. Using a drinking straw and air hose blow gun, I sprayed the air, dust curtains and walls with the mist. Cured the POR in about an hour. All that course work in HVAC design has other uses
- 5,637
- 382
- 83
- Location
- Spring Branch, TX
Dead tired was correct. I slept 11 hours last night and feel much better.
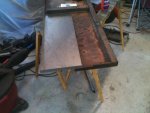
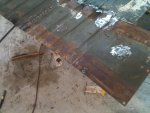
Keith was almost correct on the floor patch (no flipping). Since both parts of the M37 floor are almost mirror images (a slight difference at the rear where the fuel filler goes) we were able to take the unrusted left front of one floor, rotate it 180 degrees and match it up to the right floor. That way the ribbing in the floor lines up and what was the under side lip on the left side now becomes the upper side lip on the right and the flat section above the tool box door stays the same.
You can see in the pictures where the patch section extends past the front of the bed while Keith was welding it in. After that we flipped the bed over for the final clean up and then cut that section off.
You may notice our "patch" piece had 6 "patches" of it's own. Keith cut out a couple of extra holes, both drilled and rust, then made replacement sections. The fit was so close in a couple I thought we could just paint over them to hold them in.
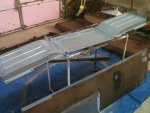
The last picture shows the tool box that goes under the bed with the POR drying.
Pics:
1) Bed floor before
2) Floor patch panel
3) Patch laying on full bed
4) Patch tacked in
5) Before the final cut
6) Patch completed
7) Tool box POR'd
Keith was almost correct on the floor patch (no flipping). Since both parts of the M37 floor are almost mirror images (a slight difference at the rear where the fuel filler goes) we were able to take the unrusted left front of one floor, rotate it 180 degrees and match it up to the right floor. That way the ribbing in the floor lines up and what was the under side lip on the left side now becomes the upper side lip on the right and the flat section above the tool box door stays the same.
You can see in the pictures where the patch section extends past the front of the bed while Keith was welding it in. After that we flipped the bed over for the final clean up and then cut that section off.
You may notice our "patch" piece had 6 "patches" of it's own. Keith cut out a couple of extra holes, both drilled and rust, then made replacement sections. The fit was so close in a couple I thought we could just paint over them to hold them in.
The last picture shows the tool box that goes under the bed with the POR drying.
Pics:
1) Bed floor before
2) Floor patch panel
3) Patch laying on full bed
4) Patch tacked in
5) Before the final cut
6) Patch completed
7) Tool box POR'd
Attachments
-
 50.7 KB Views: 74
 -
 53.8 KB Views: 77
 -
 62.5 KB Views: 74
 -
 69.7 KB Views: 75
 -
 62.3 KB Views: 73
 -
 49.8 KB Views: 75
 -
 48.1 KB Views: 77
- 7,744
- 155
- 63
- Location
- Columbus Georgia
Great pics of the progress - keep em coming as it is all looking good.
axlr8
Member
- 424
- 0
- 16
- Location
- Rushford MN
DITTO! ^ this is a great documentary! Keep the film rolling in!
Keith_J
Well-known member
- 3,657
- 1,328
- 113
- Location
- Schertz TX
Duh! The corrugations would never match if flipped  .
.
I still need to source the snorkel elbow, cut the hole in the flange and weld up. I don't remember the diameter..
. I still need to source the snorkel elbow, cut the hole in the flange and weld up. I don't remember the diameter..
- 5,637
- 382
- 83
- Location
- Spring Branch, TX
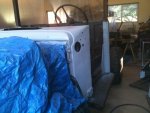
We're shutting the shop down for a week while the wife and I tour Ireland in a tuna can on wheels (sit on the right, stay on the left, shift with your left hand - say a prayer we make it back).
The body work is done for the most part although I think I need to work on the top of the cowl a little before putting the windshield frame back on. I shot a little primer this morning just to make sure there's no surface rust starting before I get back. It went on pretty dry so I'll need to do a quick dust job with some 220 grit before the next coat.
We're shooting for a debut on Veteran's Day and looks like we might just make it.
Attachments
-
 41.9 KB Views: 77
 -
 61.5 KB Views: 69
 -
 38.6 KB Views: 71
 -
 44.2 KB Views: 72
Keith_J
Well-known member
- 3,657
- 1,328
- 113
- Location
- Schertz TX
Just to illustrate how much work went into this restoration, I purchased two pounds of welding filler rod, 1/16" diameter (ER70S2) and two pounds of 0.023" wire (ER70S6). I have less than a dozen left out of the 64 filler rods. And used a good bit of the fine wire too. Ok, some of that went to building the frame for the air compressor retrofit (required for project, no air means no sanding, cutting) and reinforcing the sheet metal brake (also required). Less than one rod each.
The cost of the filler materials is less than $15, the welding also used about 150 cubic feet of argon.
November 11th, here we come! Actually, it should be done by the OHF Fill the Deuce.
Now I need to find that elbow bent tube for the snorkel (exhaust shop?) and do another hour of fitting with a minute of weld.
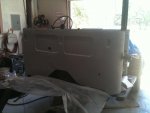
ETA: Just saw the primer job over the welding/filler/sanding rehab. WOW, what a difference! No more cottage cheese metal, no more sponge steel. It will be the queen of the motor pool. Yet still will have that "old look".
Just checked the welder for time and arc counts...it did about 9 hours and 30 minutes of weld time. Yes, I had one instance of a slight argon leak (averages to 20.5 cubic feet per hour, I had it set between 15 and 12 cubic feet per hour, tacking also consumes more due to pre and post flow. Arc count is about 2000.
The cost of the filler materials is less than $15, the welding also used about 150 cubic feet of argon.
November 11th, here we come! Actually, it should be done by the OHF Fill the Deuce.
Now I need to find that elbow bent tube for the snorkel (exhaust shop?) and do another hour of fitting with a minute of weld.
ETA: Just saw the primer job over the welding/filler/sanding rehab. WOW, what a difference! No more cottage cheese metal, no more sponge steel. It will be the queen of the motor pool. Yet still will have that "old look".
Just checked the welder for time and arc counts...it did about 9 hours and 30 minutes of weld time. Yes, I had one instance of a slight argon leak (averages to 20.5 cubic feet per hour, I had it set between 15 and 12 cubic feet per hour, tacking also consumes more due to pre and post flow. Arc count is about 2000.
Last edited:
- 5,637
- 382
- 83
- Location
- Spring Branch, TX
Things have been going pretty slow since the run up to our vacation and the wind down after getting back.
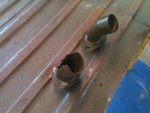
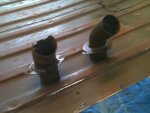
Keith_J did come out and fab a new elbow for the fording kit. The old one was rusted out on both sides of the pass through of the engine cover. Luckily I had an additional hole blank from the parts truck. We cut the hole on the drill press then Keith welded in a new elbow he had bent at a muffler shop. He also took care of the rust holes on top of the cowl.
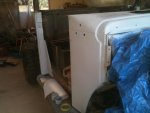
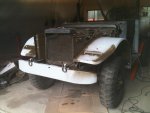
Afterwards I cut in the fenders with paint so I could reinstall them and clear a little room in the shop. The final paint will go on once everything is together. It's going to be OD to begin with then once the whole thing is green we'll paint it again in Sinai Grey just like the IDF would have painted it. The reason for this is two-fold. First is because that will be historically correct, i.e. the way the military would have done it. Second, in the unlikely event we decide to sell it the new owner can return it to US dressings very easily.
Pics:
1) Fording Tube I
2) Fording Tube II
3) Lt Fender Installed
4) Rt Fender Installed
5) Rt Fender
Keith_J did come out and fab a new elbow for the fording kit. The old one was rusted out on both sides of the pass through of the engine cover. Luckily I had an additional hole blank from the parts truck. We cut the hole on the drill press then Keith welded in a new elbow he had bent at a muffler shop. He also took care of the rust holes on top of the cowl.
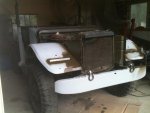
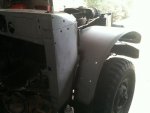
Afterwards I cut in the fenders with paint so I could reinstall them and clear a little room in the shop. The final paint will go on once everything is together. It's going to be OD to begin with then once the whole thing is green we'll paint it again in Sinai Grey just like the IDF would have painted it. The reason for this is two-fold. First is because that will be historically correct, i.e. the way the military would have done it. Second, in the unlikely event we decide to sell it the new owner can return it to US dressings very easily.
Pics:
1) Fording Tube I
2) Fording Tube II
3) Lt Fender Installed
4) Rt Fender Installed
5) Rt Fender
Attachments
-
 46.5 KB Views: 61
 -
 46.9 KB Views: 60
 -
 43.5 KB Views: 68
 -
 41.3 KB Views: 63
 -
 35.3 KB Views: 63
Boss Doug
New member
- 266
- 1
- 0
- Location
- St. Petersburg Fl
You do good work! Keep it up. ![[thumbzup]](https://www.steelsoldiers.com/images/smilies/icon_smile_thumzup.gif "Thumbs Up [thumbzup]")
Keith_J
Well-known member
- 3,657
- 1,328
- 113
- Location
- Schertz TX
I see color being shot! Give you a buzz in the AM.
- 114,254members
- 167,165threads
- 2,353,497posts
- 4,952online users