• Steel Soldiers now has a few new forums, read more about it at: New Munitions Forums!

  • Microsoft MSN, Live, Hotmail, Outlook email users may not be receiving emails. We are working to resolve this issue. Please add support@steelsoldiers.com to your trusted contacts.

Just won an auction - M1088A1

dwlindsey

Active member
Steel Soldiers Supporter
193
156
43
Location
California
I just **FINALLY** got the passenger side front cab mount bushings replaced. My 3/4 inch Dewalt impact was not loosening the nut on the bolt. So I bought and applied an Induction Heater. No luck. Propane torch . . . no luck. Then I tried chilling the bolt, no luck. Then a 3 foot cheater on a breaker bar, no luck.

Today I bought 6 feet of black iron pipe and applied it to a 3/4 breaker bar. With my son pulling on the end of the cheater and a significant bend in the pipe, we had a small movement and a loud crack like something broke. Turns out it was the rust or locktite on the bolt . . . the Dewalt took the bolt right off.

From there the only issue was getting the right amount of cab tilt so that the thread on the bolt was exposed enough to thread the nut on.

5 sessions with this and FINALLY today we got the nut off the bolt. The top bushing was gone. The lower bushing was compressed about 50%. When driving I'd get, not surprisingly, a clank and cluck from that location. I'll drive it again tomorrow and see how it sounds and feels.

Sometimes the simple things, like getting a nut on a bolt loose, are the hardest
 

GeneralDisorder

Well-known member
Steel Soldiers Supporter
2,560
6,194
113
Location
Portland, OR
I broke a 1/2" breaker bar anvil on the cab bushing nut. Bent the HECK out of C-clamp doing the rear sway bar bushings. The ones that go around the bar itself. That's an ugly job. I think the worst jobs I've done though were the engine mounts, and the sum total of the AC install is pretty tiring. I mean I did it over like a year - finding the parts and sorting it all out perfectly was tiring. And fitment of "reproduction" parts like the compressor brackets....

And of course tire mounting. That's just a good time and best with friends if you can bribe them to participate.
 

dwlindsey

Active member
Steel Soldiers Supporter
193
156
43
Location
California
I broke a 1/2" breaker bar anvil on the cab bushing nut. Bent the HECK out of C-clamp doing the rear sway bar bushings. The ones that go around the bar itself. That's an ugly job. I think the worst jobs I've done though were the engine mounts, and the sum total of the AC install is pretty tiring. I mean I did it over like a year - finding the parts and sorting it all out perfectly was tiring. And fitment of "reproduction" parts like the compressor brackets....

And of course tire mounting. That's just a good time and best with friends if you can bribe them to participate.
I've got most of the stuff for the AC install. I'm still missing the original OEM condenser, but I've got one that will probably work. I'm not looking forward to it, but my "plan", such as it is, is to tackle it one bit at a time. Compressor on one weekend, heater box removal on another weekend, installing the evaporator another, making the brackets for a condenser . . . It's getting cooler now so I don't really need to finish it before next summer . . .

Oh . . . I also don't have a wiring harness, so sorting out the wiring is going to be an interesting puzzle
 

AKPacker

Active member
Steel Soldiers Supporter
108
233
43
Location
Anchorage, AK
Yeah those cab bushing bolts can be a bear, I still need to tackle the driver's side on mine. I replaced the lower passenger side one with a MME repro earlier this year and it is already cracking...

I'm jealous of you guys with your A/C units, at this point I think I'm going to have to wait it out until some of the A1P2 units/parts start to show up at auction.
 

dwlindsey

Active member
Steel Soldiers Supporter
193
156
43
Location
California
Yeah those cab bushing bolts can be a bear, I still need to tackle the driver's side on mine. I replaced the lower passenger side one with a MME repro earlier this year and it is already cracking...

I'm jealous of you guys with your A/C units, at this point I think I'm going to have to wait it out until some of the A1P2 units/parts start to show up at auction.
I installed the MME bushings . . . we will see. Now that there's some anit-seize on the bolt, replacing it should be simple when it happens.

MME is offering an air conditioner that will be easier to install than the original OEM, because they have the full kit. As I recall the evaporator sits behind the heater box in the lower part of the engine hump.

I was able to find an original evaporator to replace the heater box, I believe it's Gen2, but I haven't verified that yet. It was stupidly expensive and in total I already have parts on hand that cost about what the MME unit is selling for. Apparently a while ago the evaporators were pretty cheap, but now it's a sellers market, if you can find one at all.

I'll need to kludge up a condenser and the wiring . . . so the MME might have turned out to be easier . . .
 

dwlindsey

Active member
Steel Soldiers Supporter
193
156
43
Location
California
I took her for a drive today.

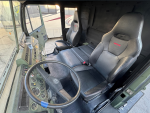
Passenger side cab bushings replaced, Subaru WRX seats installed, Eco Hubs installed. Air leaks mostly fixed, it holds 110 PSI or so overnight. I did the power cycle 6 times and press the accellerator to the floor on the 6th, to ask Allison to re-learn the shifts.

She's starting to look pretty good and feel pretty good at low speeds. Today I got on a large road with, at that moment, no traffic and nailed the accelerator to the floor. At 60 MPH it was a pretty wild ride. at 40 MPH she's acceptable, but 60 feels pretty bad.

I've removed about 1300 pounds from the rear. So she's very light at the back. I have not yet had the drive shafts balanced and the tires may well be unbalanced.

I'm hoping that the biggest single item is the lack of weight on the back, which will be solved when I put the habitat box on.
 

dwlindsey

Active member
Steel Soldiers Supporter
193
156
43
Location
California
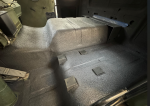
Raptor bed liner on the floor of the cab.

3 coats of Lizard Skin sound control, 3 coats of Lizard Skin ceramic insulation and today I did one coat of grey Raptor bed liner on the floor.

The Subaru WRX Seats go back in tomorrow.

1758838962151.png
 

ckouba

Well-known member
Steel Soldiers Supporter
696
2,014
93
Location
Oregon
I have not yet had the drive shafts balanced and the tires may well be unbalanced.
With Eco Hubs, this is less critical, but still a very important thing to do. As exciting of a thing it is to have a driving truck, it should probably be the next thing you do. The consequence of failure is expen$ive.
 

GeneralDisorder

Well-known member
Steel Soldiers Supporter
2,560
6,194
113
Location
Portland, OR
With Eco Hubs, this is less critical, but still a very important thing to do. As exciting of a thing it is to have a driving truck, it should probably be the next thing you do. The consequence of failure is expen$ive.
Absolutely. And I've seen what some people think is acceptable for u-joint installation. Just did some on a surplus truck with 6k miles. You'll want the u-joint removal tool. Joe's be pounding them in with a sledgehammer. The cups should slip into the yokes by hand. If they don't investigate why and check the yokes carefully. In fact just have the driveshafts rebuilt. I've brought several sets to my local shop and about half of them they just throw in the recycle. Even with almost no miles on them - the splines often have too much hinging, and the dampers inside the tubes are often loose inside which will unbalance them. The driveshaft shop I use replaces the dampers with synthetic foam that should last much longer.
 

dwlindsey

Active member
Steel Soldiers Supporter
193
156
43
Location
California
I'll get the driveshafts done in late October, I'm headed to Asia for two weeks starting Friday.

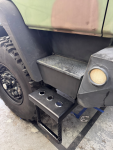
Meanwhile I've just added an MME cab entry step upgrade. My wife wasn't able to get into the cab with the existing entry cable step. We'll see if she can manage this one, but it's certainly an improvement for me.

1759180839562.png
 

dwlindsey

Active member
Steel Soldiers Supporter
193
156
43
Location
California
I replaced the original air dryer today with a Haldex. I also checked the pressure switch on the wet tank for the CTIS and it's not closing, so thanks to posts by Ronmar that I read last night, I put a jumper wire into the pressure switch connector and now my CTIS (Christian Platzer Arduino) controller is working properly on inflation.

Progress!
 

Ronmar

Well-known member
4,457
8,369
113
Location
Port angeles wa
I replaced the original air dryer today with a Haldex. I also checked the pressure switch on the wet tank for the CTIS and it's not closing, so thanks to posts by Ronmar that I read last night, I put a jumper wire into the pressure switch connector and now my CTIS (Christian Platzer Arduino) controller is working properly on inflation.

Progress!
Is your governor pumping the tanks up to 125PSI? That switch needs something over 117 PSI to close…
 

dwlindsey

Active member
Steel Soldiers Supporter
193
156
43
Location
California
I'm pretty sure it is.

My dash gauges read 120 and the old air dryer and blew off after the 120 on the dash. The new air dryer does as well. I ordered the $14 pressure switch you located in 2023. I'm heading to Asia on Saturday but when I get back I'll take the get a pressure gauge on the wet tank and/or take the switch out and give it shop air. I'm pretty sure the switch is dead, but meanwhile the CTIS is working and the dash gauges stay at 120 during the fill. I think it's working well enough for now, but I'll follow up when I get back from Asia
 

dwlindsey

Active member
Steel Soldiers Supporter
193
156
43
Location
California
As I mentioned, I'll get a pressure gauge on the wet tank later in October when I get back from Asia, then I'll know. I wonder what pressure the Haldex is set to blow off at?
 
Top