• Steel Soldiers now has a few new forums, read more about it at: New Munitions Forums!

  • Microsoft MSN, Live, Hotmail, Outlook email users may not be receiving emails. We are working to resolve this issue. Please add support@steelsoldiers.com to your trusted contacts.


goldneagle's M923 recovery and modification thread

goldneagle

Well-known member
4,428
858
113
Location
Slidell, LA
I installed the 2 Red LED marker lights today. That finishes the marker light installation. Will paint the housings when the weather is warmer.

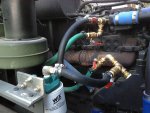
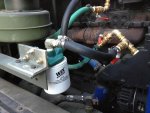
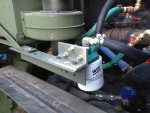
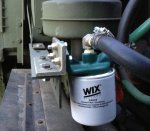
Second item on my list today was the coolant filter installation. I cut a 14" long piece of 2 by 2 angle. (leftover from the shelving inside the M109 box.) Drilled 2 holes that will be used to attach it to the personal heater support. I sanded, primed and painted the angle. I cut a 3" long piece of scrap aluminum angle and drilled 5 holes in it. (3 for the filter mount and 2 for attaching to the other angle. I attached the 14" long angle to the heater support using 1 existing bolt and 1 new one. I then attached the 3" long angle to the long angle. Then I attached the filter mount and filter. I installed two 5/8" 90 degree barbed fittings to the filter housing. I cut and installed both heater hoses to the barbed fitting and clamped them in place. I took pictures of the finished project.
 

Attachments

juanprado

Well-known member
Steel Soldiers Supporter
5,507
2,707
113
Location
Metairie/La (N'awlins)
Nice work.

I think I am going to use some of your ideas for R&D (highly scientific name for rip off and duplicate). No need to reinvent the wheel as you have it going right. :)
 

goldneagle

Well-known member
4,428
858
113
Location
Slidell, LA
Nice work.

I think I am going to use some of your ideas for R&D (highly scientific name for rip off and duplicate). No need to reinvent the wheel as you have it going right. :)
That is exactly what I always say "no need to reinvent the wheel" I post here with the intent that other can benefit from my ideas. Glad you like my work. Wait until you see the seat setup I have planned for the cab!
 

goldneagle

Well-known member
4,428
858
113
Location
Slidell, LA
You sure the ball valve handle is far enough from the exhaust manifold? Heat may melt the red plastic right off.
If it melts I will not loose any sleep over it. It will not effect the functionality of the valve. I will keep an eye on it anyway. If it melts I will just paint the handle with some good paint.
 

o1951

Active member
899
155
43
Location
Bergen County, NJ
If you can turn it 90 deg, like the one above, will get less heat.
If the plastic melts off, be carefull, edges of metal handle can be sharp.
 

goldneagle

Well-known member
4,428
858
113
Location
Slidell, LA
If you can turn it 90 deg, like the one above, will get less heat.
If the plastic melts off, be carefull, edges of metal handle can be sharp.
I have already driven the truck with the new valves installed. Almost 1-1/2 hours each way and the handle survived. In the ON position the handle will be further from the exhaust. I do appreciate your concern. I will keep an eye on it (especially during summer time)
 

goldneagle

Well-known member
4,428
858
113
Location
Slidell, LA
Today was a busy day. I started by removing the driver's seat. Glad to see that torture device go! Next i cleaned and vacuumed the the cab floor thoroughly. I used some Acetone to clean the floor area in front of the driver seat location. Looked oily! Using a 2" brush i primed the entire floor with Glidden Primer. This primer is good on wood, glass, plastic, and painted metal.

Since the primer was taking its time drying I decided to take care of some other projects. Here are some pictures of the primed floor:

Primed_floor_1.jpgPrimed_floor_1a.jpgPrimed_floor_1b.jpgPrimed_floor_1c.jpgPrimed_floor_1d.jpg

I removed the marker light covers and spray painted them to match the color of the mounted area. I used the Gillespie spray paint I just purchased. (I think they sent me the wrong brown. It was not reddish like the brown on the truck.

Next I decided to work on the tool boxes on the passenger side. I had some new in the box cargo organizers that fit nicely into the large tool box. After assembling the organizers I decided to load them up with tools and supplies. Here are pictures of the tool boxes in use.

Tool_box_1c.jpgTool_box_1b.jpgTool_box_1a.jpgTool_box_1.jpgTool_box_1d.jpg
 
Last edited:

goldneagle

Well-known member
4,428
858
113
Location
Slidell, LA
That primer looks ​thick.
It's a real good primer. It was thick from the time I got it. Really good coverage. Stain blocker too... I know that the floor will be well protected under the floor mat once I get the Polyurethane top coats done! I used the same primer and paint on the M109A2 cab floor.
 

o1951

Active member
899
155
43
Location
Bergen County, NJ
I like your work.
Others may like it a bit too much!
Now - put something in there that you don't tell anyone about to make your truck hard to steal. Possibly a hidden fuel valve or electrical cuttoff for fuel pump. Just sayin.
 

Scarecrow1

New member
1,355
1
0
Location
Florence , S.C.
The primer went on smooth I just worry about Glidden products I used them many years ago and didn't like their results. Of course I did say MANY years ago. Good progress thanks for the pics
 

goldneagle

Well-known member
4,428
858
113
Location
Slidell, LA
I like your work.
Others may like it a bit too much!
Now - put something in there that you don't tell anyone about to make your truck hard to steal. Possibly a hidden fuel valve or electrical cuttoff for fuel pump. Just sayin.
I already came up with 3 more really good ideas for the truck security. I also have a security that cannot be defeated- it's called insurance.
 

doolest

New member
86
1
0
Location
Fort Worth, Texas
goldneagle - great progress, looking good, when you get yours finished you will have to come over to Texas and work on ours...keep the thread and pics coming so I can use this for examples if we have to work on ours!!!!!
 

goldneagle

Well-known member
4,428
858
113
Location
Slidell, LA
Yesterday I put down the first coat of Polyurethane Paint on the cab floor. Since it was a bit cool out I followed Jeff Davis's advice and put a ceramic heater in the cab to warm it up before the paint application.

While i was waiting for the cab to warm up I mixed the paint and got things ready to apply the paint. I also took time to repair the bottom of the map box i had removed from the truck. The vibrations from the driving cracked the bottom sheet-metal. I also broke off the plate that was attached to the bottom welds when I removed it from the truck. I want to reuse it somewhere in the cab so i decided to patch up the bottom. I fund a sheet-metal door that belonged to an old alarm panel. Traced the shape of the bottom of the map box and cut it to fit. i riveted the new bottom piece to the map box. I painted the whole box and let it dry.

Once I applied the paint the the cab floor I left the heater run all day and night to keep the cab warm and let the paint dry. Can directions said 24 hours drying before recoat. I did not bother with any pictures of the first coat.

After completing the painting of the floor I went back to finishing the Map Box. I cut a piece of green foam (used under a sleeping bag) in the shape of the Map Box bottom. I inserted the foam on the bottom of the Map Box to cover any rivet protruding from the bottom. When i have time i will find a place to install it.

I also cleaned the bottom of the floor mats ready to reinstall once the floor paint dries.

Today I painted the 2nd coat on the cab floor. I took some pictures of the work. I left the heater on again to help dry it up. I need to install the air-ride seat early tomorrow so I can use the truck to go visit Jeff Davis and pick up some more parts for my trucks. Before anyone makes comments about the color of the floor I want to explain that i already had the paint from the Deuce project and wanted to use it. It is there to protect the metal floor. It will be covered with the floor mat once it is dry enough. Any paint that is still visible will be covered over with the Gillespie spray paint i ordered. I will touch up any visible surface that I accidentally go with the OD floor paint.
 

Attachments

Top
AdBlock Detected

We get it, advertisements are annoying!

Sure, ad-blocking software does a great job at blocking ads, but it also blocks useful features of our website like our supporting vendors. Their ads help keep Steel Soldiers going. Please consider disabling your ad blockers for the site. Thanks!

I've Disabled AdBlock
No Thanks