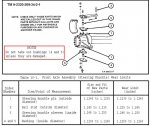
• Steel Soldiers now has a few new forums, read more about it at: New Munitions Forums!

  • Microsoft MSN, Live, Hotmail, Outlook email users may not be receiving emails. We are working to resolve this issue. Please add support@steelsoldiers.com to your trusted contacts.

NDT Tire Wear, alignment good, next step suggestions?

Valence

Well-known member
Steel Soldiers Supporter
2,135
613
113
Location
Davis County, UT
Note: the new bushings that come with the Monroe shocks will not fit unless you grind them down some. They are too thick.
What Monroe shock number did you order/use Jeepsinker? I used the 66605, and I had zero problems with the bushings. The shocks fit perfectly in every way.

Each shock came with 2 baggies of the following:
Note 1: I did not need the metal shaft spacer, as the shock mounts on the deuce were already appropriately narrow
Note 2: The rubber bushings are identical, I'm just illustrating what both sides look like
2015-02-14 17.43.29.jpg

On either side of the deuce shock mounts, there is a raised lip, the bushing's nipple fit great inside this raised lip.
2015-02-14 17.34.06.jpg2015-02-14 17.35.10.jpg2015-02-14 17.35.43.jpg

The only real item of note was the bottom shock mount, as the mount support is a tad close (the bushing is pressed right against it), but in my opinion, it's fine.
2015-02-15 17.28.42 HDR.jpg

Top mount also was fine:
2015-02-15 17.29.54.jpg

And I changed my other mind and painted shocks black:
2015-02-15 18.01.08.jpg


WORD OF NOTE:
I found it beneficial that I had NOT cut these shock straps when I first pulled the Monroe's from their packaging (they're just to keep the shocks compressed for more efficient shipping). Again, because I'm not Superman I found it much more difficult to attempt to compress the shocks on the truck, and much easier just putting one end on the cement in front of me.

What I did was loop one end of the plastic retainers on the bottom of the shock like normal (like how they came shipped), and then placed the other end at the TOP of the bolt. It was a bit difficult to hold the plastic strap there (it wanted to slip off), but it kept the shock compressed enough I could get it into place. Then I just cut the bottom end free.
2015-02-15 17.11.49.jpg
 

Jeepsinker

Well-known member
5,341
329
83
Location
Dry Creek, Louisiana
I just had the guys at Advance cross reference the napa shock number in the parts reference guide sticky. I don't remember the number, but it was a pair of yellow Monroe brand 1/2" rod shocks, but my bushings were different.
 

rosco

Active member
Steel Soldiers Supporter
2,102
28
38
Location
Delta Junction, Alaska
Maybe with weight on the front tires you have a toe in issue. Jacking it up made it go away. Try checking toe in on the ground. I had cupping issues and found excessive toe in. I set my to 0 toe in. Cupping ceased.
You can't check "toe in", without vehicle weight on the tires. The front end shops have a bearing plate under the tire, so that it can rotate tires, left or right/ in or out, when setting toe. Only with weight do you get an accurate reading, including wear. I made up two plates with a large used wheel bearing tacked to the plates, so that it (bearing), is sandwiched between the two plates. To check toe, I jack it up, scribe the center line on the tire, let it down on the bearing plate, then one can adjust toe with little or no resistance, in or out. Tomorrow I will try to get pictures of the bearing plates, and my scribe, etc.

With winch & other junk (Jewelry/tire chains), on front end,, I run 60 PSI. NDT's (or any tire with cross lugs), will cup some just from braking alone, all else being good. Rotating the fronts, will even some of that out, if done before they get too bad.
 

Valence

Well-known member
Steel Soldiers Supporter
2,135
613
113
Location
Davis County, UT
You can't check "toe in", without vehicle weight on the tires. The front end shops have a bearing plate under the tire, so that it can rotate tires, left or right/ in or out, when setting toe. Only with weight do you get an accurate reading, including wear. I made up two plates with a large used wheel bearing tacked to the plates, so that it (bearing), is sandwiched between the two plates. To check toe, I jack it up, scribe the center line on the tire, let it down on the bearing plate, then one can adjust toe with little or no resistance, in or out. Tomorrow I will try to get pictures of the bearing plates, and my scribe, etc.

With winch & other junk (Jewelry/tire chains), on front end,, I run 60 PSI. NDT's (or any tire with cross lugs), will cup some just from braking alone, all else being good. Rotating the fronts, will even some of that out, if done before they get too bad.
That's a mighty cool idea, the wheel bearing between the two plates. But yes, I have amended my errored ways and did my measurements properly this time, full weight on fronts. Thanks for the additional Tire Pressure tip too - I do have a front winch.
 

rosco

Active member
Steel Soldiers Supporter
2,102
28
38
Location
Delta Junction, Alaska
Toe in measurement

DSCN0006.jpgI couldn't find my bearing plates, but they are described as above - I moved to a new shop, and some of the hardware has yet to present itself in a logical manner . I did find the measuring device, that I made up to measure the toe with, and its set up enables one to check the measure without Soldier 2. The scribe is also shop made.
 
Last edited:

Valence

Well-known member
Steel Soldiers Supporter
2,135
613
113
Location
Davis County, UT
How's your kingpin bushings?
Honestly, I can't quite tell. I've only done the passenger side so far and the upper and lower plates seemed very tight and it took quite a number of minutes to slowly work them off. I would believe the bushings were fine?

(the following pictures are of the passenger side, upper kingpin bushing+plate)
2015-02-28 19.18.44.jpg2015-02-28 19.21.32.jpg

I don't see any wear that would grab my attention with a visual inspection. But I'm going to replace them anyway since I'm servicing the front axle.

I assume I just tap the old bushings out of the plate and tap in the new ones?
 
Last edited:

Bill W

Well-known member
1,985
42
48
Location
Brooks,Ga
Also keep in mind the pitch of the roads puts extra weight & wear on the passenger side tires of all vehicles.
 

peashooter

Well-known member
1,039
205
63
Location
Hanover, minnesota
I don't see any wear that would grab my attention with a visual inspection. But I'm going to replace them anyway since I'm servicing the front axle.

I assume I just tap the old bushings out of the plate and tap in the new ones?
I replaced my bushings, I never could find the documented way to get them out so I did it in the only fashion I could think of. Those older style bushings were a work of art! They had grease paths machined into them and were just beautiful, I replaced them (nos sure if I needed to or not) but the "new" style ones were just plain bushings with no grooves machined in them so lubricating the grease zerks on the king pins is about pointless since grease has no place to go now...... point being, I should have measured them to see if they needed replacing because I now have inferior bushings in there.
 

Valence

Well-known member
Steel Soldiers Supporter
2,135
613
113
Location
Davis County, UT
Those older style bushings were a work of art! They had grease paths machined into them and were just beautiful, I replaced them (nos sure if I needed to or not) but the "new" style ones were just plain bushings with no grooves machined in them so lubricating the grease zerks on the king pins is about pointless since grease has no place to go now......
I noticed that too! But thanks for confirming my hunch.

point being, I should have measured them to see if they needed replacing because I now have inferior bushings in there.
I'll measure mine and report back!
 

gringeltaube

Staff Member
Super Moderator
Moderator
Steel Soldiers Supporter
6,891
2,282
113
Location
Montevideo/Uruguay
Somewhere I think I have posted about a "trick", to be able to save/re-use these very nicely made old bushings...

All you need is a beer can (yes, save the empty can, as material...) and a reamer, made to match the existing (measured!) kingpin diameter- and then some patience, of course.
Excellent results and works like new, I guarantee. And you'll still have plenty of groove depth left..., for the next 50 years or so...:)


G.
 

Valence

Well-known member
Steel Soldiers Supporter
2,135
613
113
Location
Davis County, UT
I measured, and remeasured, and remeasured again (in as many different spots possible) the bushings, steering knuckle pin (kingpin), and the steering knuckle pin sleeves. Everyone of them were in the "Size and Fit of New Parts". In fact, the king pin was just slightly larger than that new spec:

1: Steering knuckle pin: 1.125"
2: Ball stud: Not measured (not on driver's side yet)
3: Steering knuckle sleeves (inside diameter): 1.247"-1.248"
4: Bushings (inside diameter): 1.126"

I reinstalled the passenger side bushings as is, unmodified. It'll be interesting to see how closely the driver's side follows.
 
Last edited:
Top