• Steel Soldiers now has a few new forums, read more about it at: New Munitions Forums!

  • Microsoft MSN, Live, Hotmail, Outlook email users may not be receiving emails. We are working to resolve this issue. Please add support@steelsoldiers.com to your trusted contacts.


101A2 Adventure Trailer

Storm 51

Just a Grunt
Steel Soldiers Supporter
888
9
0
Location
Seattle, WA
Too much weight on top would have made the trailer a lot more prone to tip over (roll) which is not fun and doesn't expedite the task you are trying to accomplish.

As for reconsideration of your design after fabrication, just remember that "experience" is what you get, when you didn't get what you want.

....and as a bonus you got to bust up your body again and have a friendly visit with your doctor (yeah, I'm pretty sure that "again" is appropriate, because I'm pretty confident you've done this kind of thing before...)

You are an excellent story teller (writer), in addition to being an accomplished welder. Please keep posting tales of your adventures in the world of MV modification and improvement. This one has been quite entertaining, and I've thoroughly enjoyed it! I'm eagerly looking forward to your next adventure!
 

Buffalobwana

Well-known member
Steel Soldiers Supporter
1,392
170
63
Location
Frisco Texas
Too much weight on top would have made the trailer a lot more prone to tip over (roll) which is not fun and doesn't expedite the task you are trying to accomplish.

As for reconsideration of your design after fabrication, just remember that "experience" is what you get, when you didn't get what you want.

....and as a bonus you got to bust up your body again and have a friendly visit with your doctor (yeah, I'm pretty sure that "again" is appropriate, because I'm pretty confident you've done this kind of thing before...)

You are an excellent story teller (writer), in addition to being an accomplished welder. Please keep posting tales of your adventures in the world of MV modification and improvement. This one has been quite entertaining, and I've thoroughly enjoyed it! I'm eagerly looking forward to your next adventure!
Thanks Storm 51, nice to know someone is listening. Tinstar has been following along, he loves the 101A2, Scrapdaddy has a good writeup over on ExPo. I used some of his info. Harleyhouse has a nice write up on his build too.

Mine is a collection of pipes so far, but it’s taking form. The form I had in my head. There is a pile of goodies in the garage for it, but I’d rather “Do it and then talk about it” instead of “talk about what I am going to do” if that makes sense.

In other words, Lots of people talk about what they are going to do. Great. Go do it and then come tell me about it. Anyone can buy parts. Me too. Put them together and impress me.

Lets see see if I can put them together.

Thanks for watching.
 

tobyS

Well-known member
4,820
815
113
Location
IN
Is your design staying the same as post 39? It looks good. Will you have a custom canvas made (or maybe do the fit yourself)?

From the sound of it, you are giving up on the top rack, having wrestled with it and lost. You might consider expanded metal for support under the canvas and a few tie downs....just in case.
 

Storm 51

Just a Grunt
Steel Soldiers Supporter
888
9
0
Location
Seattle, WA
snip...Mine is a collection of pipes so far, but it’s taking form. The form I had in my head. There is a pile of goodies in the garage for it, but I’d rather “Do it and then talk about it” instead of “talk about what I am going to do” if that makes sense.

In other words, Lots of people talk about what they are going to do. Great. Go do it and then come tell me about it. Anyone can buy parts. Me too. Put them together and impress me. snip...
I know exactly what you mean. Talk is cheap, walk the talk, show me, don't tell me.

My posts are always AFTER my "kits" are complete and installed (they are all removable; just unbolt them). It's easier to show than to explain, and I'm lazy.

All my M101A1 trailer mods are much simpler, and really don't change the trailer much. I'm thinking of adding the 24 gallon fuel tank underneath the bed this winter. I've got all the pieces to do the install, but the design is still in my head and there are pieces of that design that are still vague and foggy. I've got to give it some more thought.

I'll be interested to see your final product and please let us know how it works when you start using it on your ranch.

Storm
 

Tinstar

Super Moderator
Super Moderator
Steel Soldiers Supporter
4,256
1,708
113
Location
Edmond, Oklahoma
That’s the beauty of having the tools and supplies for a project.
If it doesn’t turn out like you want ......start over.
That usually results in some great work.
Learn from mistakes or see how a different idea will work.

That’s the wonderful thing about the M101A2, it can handle almost anything.
 

Buffalobwana

Well-known member
Steel Soldiers Supporter
1,392
170
63
Location
Frisco Texas
Toby, you are correct. I am giving up on the rack. I spent more time and energy getting that rack built than anything, and it wasn’t an easy decision.

Actually, it was. When I saw it sitting up there (it did stay up there for a good 90 seconds) I was disappointed. I didn’t take a picture because I didn’t like it. No angle looked good. It looked all wrong.

I might be able to salvage it by cutting it down and making it smaller, but I really like the design in post 39. Lighter, sleek, I have some other ideas that incorporate well into this design. So this is the new path!

Like Storm 51 said “experience is what you get, when you didn’t get what you want”. I just got some experience. And a big 8’ roof rack in an already crowded garage :/

I could have a tarp made for it in this configuration, but there will be too many accessories (to be) mounted on top and sides that would make it difficult to tarp. I have an idea on a way around this that would make it easy to tarp ... but let’s see how it progresses. I have already scrapped the original plan once. Tarp would be the last item on the list once everything else is done.
 

tobyS

Well-known member
4,820
815
113
Location
IN
Hope it doesn't bother you guys, I like to talk it out before I do the work. I'm too old to waste physical effort.

The rack on the top is cool, it's just a bit heavy, maybe better suited to a M105 with a built in ladder. The rest of the frame on the 101 looks very nice, are you thinking about using sheet metal for the top and/or sides?

I'd probably consider buying the top rack if we were closer. It could be a nice deck over the deuce cab with some diamond plate.
 

Buffalobwana

Well-known member
Steel Soldiers Supporter
1,392
170
63
Location
Frisco Texas
The rack on the top is cool, it's just a bit heavy, maybe better suited to a M105 with a built in ladder. ... I'd probably consider buying the top rack if we were closer. It could be a nice deck over the deuce cab with some diamond plate.
You have two good ideas. That would suit a 105 really well.

The problem is the rack is 8’ long. The legs are spaced at about 6’ from the front one to the back one. When you put that rack up there, it looks out of place.

I could easily make 4 legs for that rack that came down out of each corner and attached to each corner of a 101 or 105 and it would probably look fine.
 

Buffalobwana

Well-known member
Steel Soldiers Supporter
1,392
170
63
Location
Frisco Texas
I’m going to break my rule for a moment. The “Do it and then talk about it” because I’m not sure where to turn here and this requires investment in time and steel (that I need anyway).

For the top: (there will be a winch still, to help with spare tires and generators and avoiding another back surgery.)
As far as finishing the top out:
A.) I can just leave it open, no real storage except for lumber, plywood ladders Afghanistan ramps etc. and just attach things to the side. H-lift jack, shovel, fire extinguisher, Max-track etc.

B.) Light expanded metal. This will require more support, as the metal will sag in areas not supported well. Not as issue. 1” sq tube will work fine.

C.) This material looks like horse panel to me. It’s a 1x2 panel. Very strong and a good choice. About the same cost for a 16’ piece as a sheet of expanded metal (+/-)

BF766660-C479-40C4-9A04-580B2A05AF51.jpg

D.) I was thinking of running a few 2x4 “purlin like”material with dimples punched in them. Similar to below. The look is really sharp! It’s stronger than the actual gauge because of the dimples. Problem is I don’t have a press ... yet. The dies are cheap. $25-$35 depending on size (in this 1.5” range) that will dimple 1/8-3/16 steel.

AC6F156A-406D-46F2-89BB-74BE6F113AE8.jpeg

Everyone needs a press. The problem is I will probably go overboard and build a big one thinking long term (like I should).

If I can dig around and find the steel to build a press, I may go this route. I have wanted to mess with these dies for a while in other applications.

What say you?
 

tobyS

Well-known member
4,820
815
113
Location
IN
I kinda like the plan A....it looks good as-is in post 39. But if you need the carry capacity, that changes things. What would you use for the cover, sides and top?

I could help a lot (with the steel for your press) if we were closer and you have the bed(s) I want...so Murphy's law strikes again.

The metal thickness in the channel picture seems rather thick. Wouldn't that piece be strong enough with 16 or 18 gauge? Maybe I'm not clear on how you will use the component.

My projects weight is beginning to add up too.

I bet you could sell your rack that you made. It would go nicely over the top of a bobbed deuce or 5 ton.
 
Last edited:

Buffalobwana

Well-known member
Steel Soldiers Supporter
1,392
170
63
Location
Frisco Texas
Toby, the good thing about plan A is that ... it’s the base for all the other plans, so it’s always a good choice. You can wire a piece of expanded metal, hog panel, horse panel or whatever up there if you wanted to use it as a roof rack and boom. You have support for duffle bags or small items.

The dimpled channel can be 16 or 18 gauge and be fine. That’s the beauty of the dimples they take a 16 ga and give it the strength of a piece of 1/8 if done properly (just a a swag). My idea was to throw a couple of those up there on either side of the center tube. It would add plenty of real estate to keep anything from falling through, and add strength without too much weight.

Plus I need some motivation to build a press.
 

Buffalobwana

Well-known member
Steel Soldiers Supporter
1,392
170
63
Location
Frisco Texas
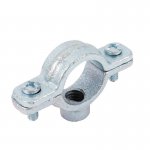
I bought all this pipe at gov auction in OKC. I believe they were meant to be used as a structural component in something. They are all 6’4” long and all of them are powder coated. It takes quite a bit of work with a flap disk to get through to steel before I can weld it. 2B5AE959-4527-43E3-BC0F-BC8DADEC295F.jpgI bought a few of these and they could be very useful. They are supposed to be EMT conduit hangers. They have a threaded 3/8 (I believe) hole. You could possibly add stuff to the top and sides with these by bolting them on wherever you want, then bolting items to it with a 3/8” bolt and some creativity. They fit very snug to this pipe. Since all of it is already powder coated it is a little thicker in diameter than normal schedule 40, so these fit tight and don’t move.

The screws that hold them together are a little small, but still seem to work well. As long as you used them wisely, I think they could be used effectively for various items. (RTT, some kind of platform or separate aluminum roof rack).

I think i would drill out the small screw and use larger screws to secure it though.
 

Buffalobwana

Well-known member
Steel Soldiers Supporter
1,392
170
63
Location
Frisco Texas
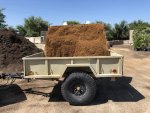
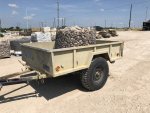
The trailer got requisitioned by my wife to help re do our landscaping. While it was hauling decomposed granite, the rack had to be removed.

B57685C7-1CBD-4E6F-8F71-58A9CF3057CF.jpg
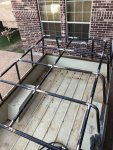
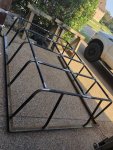
Before I removed the rack, I cut and notched all the pieces. Tacked each one in place after tying a string around the uprights, aligned with marks at the front and back to get them straight. I wanted to tack them in while still bolted to the trailer so there wasn’t any issue with flexing the base.
9FD39055-2B85-46FF-B0C6-DF87119ABEB8.jpg
I fully welded all pieces on after the top was off. I forget how difficult it is to weld a perfect bead around 180 degrees of small diameter pipe. I got better as I went along, but it’s a perishable skill. Having the top off allowed me to flip it and make the bottom welds a little easier to manage.
6A57DCC5-E634-4277-A605-2E61F44F5818.jpg
 

tobyS

Well-known member
4,820
815
113
Location
IN
I built the cover for my 929 and have yet to put it on. Just having an open trailer (or truck) is handy. I see you have a few 101's, why take the top off?

Composted granite....that must take some time? A local quarry used to crush it. I love it for my driveway.
 

Buffalobwana

Well-known member
Steel Soldiers Supporter
1,392
170
63
Location
Frisco Texas
Short answer is that it’s the easiest one to use. I know the bearings are new and it’s here, while two others aren’t. This rack slides off easily anyway. I made the base with 1/4” gap between the angle and side so it won’t bind.

I have a couple guys shoveling granite. Not me. I just went and got another load. This time he put about 1.5 yards in. That’s about 4,000 lbs of granite. Not by request, he was just feeling generous I guess.

Springs about 1” from bumpers. May be too much for this trailer ... technically. But, we know it can handle it.

The guy in front of me got about 1.5 yards of topsoil in the back of his F150.
 

Buffalobwana

Well-known member
Steel Soldiers Supporter
1,392
170
63
Location
Frisco Texas
Made 4 runs with stones for the garden beds before any more work can commence on the rack. Priorities.
93ECE6CC-7D25-4CDE-866A-BD3E49F776F4.jpg
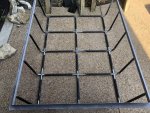
Removed any rust that has accumulated since the project started in May. Polished the welds, removes any slag, prepped for paint. Started priming all the bare metal since the rack itself is basically done. From here, I’m adding accessories, so, I’ll just strip where I need to weld from here on out.
429DE55E-973F-48AE-88D6-115BACB79E75.jpg
It took a while to get the hang of welding around 180 degrees of tubing, forget attempting a 360 degree weld. About the time I was nearing completion the welds started looking much better and my technique improved. I only had to go back and grind one down it was so bad. I turned the gas off and realized it about two seconds in to the weld. This kind of welding is a perishable skill. Takes a lot of practice. Not all of them look this nice. But some do!
E53D626C-4C45-4BE3-8382-59E30C942ACF.jpg
 
Last edited:

Buffalobwana

Well-known member
Steel Soldiers Supporter
1,392
170
63
Location
Frisco Texas
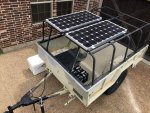
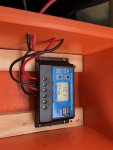
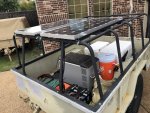
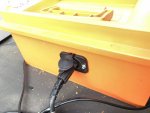
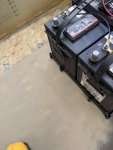
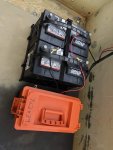
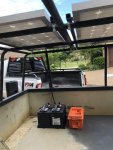
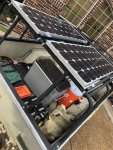
I bolted some 1” square tubing to the conduit hangers “, which were mounted to the top bars, to give me a flat bar to mount the solar panels to. These panels put out 100 watts each at 19 volts (they are 12v panels, but the panels do say output is in the 19v range) I tested them, and they were true to their specs.

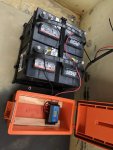
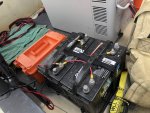
I installed two, in line, to two batteries, in line, with a charging regulator between the panels and the battery.

This was a rush job job since I was pressed for time. I was leaving for an Antelope Hunt in a couple days. Needed a way to mount all this to the trailer. I remembered that a piece of plywood fit snug with the tailgate closed, so I took a few cans of spray paint after notching out for the wheel wells, I painted the plywood and screwed everything to the plywood.

I used an Engel MT-45 fridge/freezer. It froze all the meat by the time I got home, which wasn’t exactly my plan, but it worked. It ran 24/7. I would throw a case of water in it to freeze and use the frozen bottles of water to keep food in the cooler cold. It was the perfect setup.

I dont know if i could have gotten by with one battery. Maybe, but I had two, so I took two.
5926D288-7581-4513-BC20-7448FB6F07C0.jpg810EC24B-D385-45BF-9DAB-6E4463542642.jpg7A1552A3-A554-4321-98B5-BA878FB4B4D7.jpg
 

Buffalobwana

Well-known member
Steel Soldiers Supporter
1,392
170
63
Location
Frisco Texas
Everything was screwed down to the plywood and it worked great. Since there are ridges in the floor of the 101, the plywood stands up about 1/2” off the floor. That gave me enough room to ratchet strap the fridge down to the edge of the plywood lightly so it wouldn’t walk around.

This method of a temporary floor is ideal. You can fasten anything to it. The tailgate holds it perfectly in place, if not, you could shim it with a couple pieces of small diameter bungee or rope.
A12D08ED-79B6-4CB0-8571-E7754FFC961B.jpgF6FCF1B2-7A20-49D3-9167-8C4262D5CC13.jpgA22FE846-B0FB-4D4D-A51C-2799601FD6B1.jpgF56BECE1-26A9-4FD4-9084-53EDF5A93C4F.jpg
 
Top
AdBlock Detected

We get it, advertisements are annoying!

Sure, ad-blocking software does a great job at blocking ads, but it also blocks useful features of our website like our supporting vendors. Their ads help keep Steel Soldiers going. Please consider disabling your ad blockers for the site. Thanks!

I've Disabled AdBlock
No Thanks