• Steel Soldiers now has a few new forums, read more about it at: New Munitions Forums!

  • Microsoft MSN, Live, Hotmail, Outlook email users may not be receiving emails. We are working to resolve this issue. Please add support@steelsoldiers.com to your trusted contacts.


1985 M1009 still rolling

scooter421

Active member
71
108
33
Location
Queen Creek, Arizona
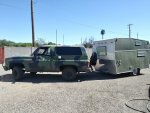
Hi all, I purchased my M1009 around June 2019 as a back up vehicle after a bad car accident. I'm getting healed up and I'm just getting started. So far, I've replaced the front end bushings, wheel bearings, brakes, seals, new tires and additional standard items (fluids, belts) from an old vehicle not driven much. From what I understand the previous owner had it several years and put a few thousand miles on it. I don't know where I'm going to go with it but I plan to stay as close to stock as possible....I think. It's hard to resist adding modern conveniences! Either way I'll have fun tinkering. I love driving it, I get a lot of looks and many thumbs up going down the road. I think I read somewhere on here someone had put a C-series air intake on the M1009 to help with the noise. Thank you, it does help! Also, someone posted the belt numbers from an M1009 out of Fort Bragg, thank you. The belts offered by computer selection at your auto parts store (Autozone, O'reilly's and Napa) are slightly off for whatever reason. I completed the relay swap and I've had no issues. I replaced the vacuum pump with Cardone select 90-1008 from Amazon and once the vacuum pod was removed ended up being a perfect match. The new pod works great, my transmission and my sanity greatly appreciate it!

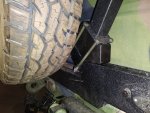
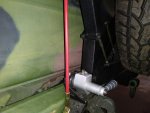
Pictures of how I did the air intake are below. The tube is an irrigation drain line and irrigation offset adapter. I used a heat gun to shape the adapter to the "squarevol" air cleaner connection. I kept the heat on until the hose clamp was snug. The galvanized and aluminum bar stock I had laying around. The air intake is off an old Suburban I found at the junk yard. The drainage parts came from Home Depot. The key to making it work is the lip inside the air intake from the Suburban which matched the smaller inner diameter of the corrugated tube. I was able to trim down the corrugated tube edge to tuck inside the intake for a tight fit on the inner diameter of the tubing. I did this on my daughters C20 already, so I had scrap for a test fit. The test fit worked perfect, then I bought a new section of irrigation tubing and trimmed to fit. The tube came out of the intake too easily but the third time I got it right. If the corrugated tube edge is crinkling up too much when tucking it into the intake it will not stay and you've not trimmed enough. If you trim off too much it will tuck in easy but pull out too easy, it has to be just right. If you go this route, don't cut the corrugated tube for a perfect fit length wise, give yourself a several extra corrugations in case you have to trim to fit more than once! Hopefully, that makes sense. Whatever I do with my M1009 will be slow going but I'll try to post worthwhile tidbits when I can.
20191201_191647_resized.jpg20191201_191709_resized.jpg20191201_194502_resized.jpg20191201_194358_resized.jpg20191201_191736_resized.jpg20191201_193015_resized.jpg20191201_194351_resized.jpg20191207_130708_resized.jpg20191207_130718_resized.jpg1559015450918.jpg
Cheers....Scooter
 
Last edited:

scooter421

Active member
71
108
33
Location
Queen Creek, Arizona
I spent an insane amount of time running a wire for a dome light. That was far more of a challenge than expected! I managed to get it mounted but I still need to run power from the buss bar on the passenger side to the center console and distribute through a 6 switch panel I've yet to install. A topic for another post I'll have the 24v and 12v coming into the same buss bar, separated of course. 12v distribution for everything other than the RAK15 MRE heater. That part of the project should be way easier.

Anyway, I used two fish tapes, a bore scope and pulled several strings through once I actually got it. This took a lot of patience trial and error. I taped a bore scope to the end of one fish tape and ran it up the hole near the seat belt. I used the other fish tape to go through the civi dome light hole left covered from the factory. The cover plate is spot welded in place, once removed you have access through the existing civi model dome light mounting hole for the other fish tape. Long story short, I finally managed to get the fish tape down to the seat belt, connect some pull strings, leaving 2 for later just in case. I used a step drill to increase the hole size in the vertical pillar to 1/2 inch and installed a wire guide/protector. I then pull the wire back up through to the center light. The light started off white but that was not going to cut it. I found some camo paint which is not perfect (looks better in person) and way better than white. I got it screwed down and now I need to get the power distribution part ran another day. This particular item is at least out of the way.
20191215_110044_resized.jpg20191215_105921_resized.jpg20191215_105933_resized.jpg
 
Last edited:

scooter421

Active member
71
108
33
Location
Queen Creek, Arizona
I managed to get the 12V power ran from the front to the back buss bar. 24v on the left and 12v on the right. Although I've only gotten the dome light working at this point, the hard part is now over. I can move on to accessories! I'm debating on what to add; so far, inverter of course, air compressor, light bar, more interior lights, 12v power points, 110v outlet, a 3rd battery etc. Who knows, a disco ball and part lights, Keurig? Anyway, I'm stoked and darn happy I have a dome light.....it's the little things in life. I'm still waiting for the fuse block to connect all my wires neatly inside the "Tuffy" box. It will work until Monday.
20191221_111614_resized.jpg20191221_141122_resized.jpg20191221_111640_resized.jpg20191221_111656_resized.jpg20191222_093520_resized.jpg20191222_094529_resized.jpg20191222_094533_resized.jpg

Cheers...
 
Last edited:

scooter421

Active member
71
108
33
Location
Queen Creek, Arizona
Hi all, Happy New year!

I made a little progress since the last update but the Holidays are family time. I'll take that when I can get it too! I was lucky enough to grab the Flu while off also. That slowed me down a bit.

I managed to get my Blue Seas 6 independent circuit fuse block installed for my USB/Power Points mounted into the Tuffy Box. I've got USB in the front and both sides of the cup holders in the back. To finish out the switch box, I need to find which LED light bars I want. I have 2 switches remaining in the current configuration. I imagine I'll have a front and rear LED light set of some combination. I have more power in the back with the inverter, I'll upholster or paint the wood once I'm done running wires. I need to make a support leg for the board which will mount to the tire holder bracket. The perforated angle is a piece of 3' angle at Home Depot and it lined up with the topper bolts perfectly! I used longer 5/16 bolts in order to put a nut/washer underneath to hold the angle in place with no drilling required. I used Carpentry Tee nuts to mount the board to the angle. With the power in the back I'll now be taking a serious look at space for cooking, food, coolers etc. The RAK15 is a must use item but I have to decide where I want to put it. I'm trying to decide between being portable or a fixed mount. I'll get there! As a joke, my wife did buy me a small disco ball. She thinks I'm kidding......
20200106_182600_resized.jpgInverter.jpg20200106_182728_resized.jpg20200106_182736_resized.jpg
 
Last edited:

scooter421

Active member
71
108
33
Location
Queen Creek, Arizona
I finally got the 24v ran for the RAK15 heater and my Gosun fridge/cooler. I had to get the plug for the RAK15. I selected the odd plug style to ensure no 110v items are plugged in to the 24v outlet by mistake. I added a 20 amp 12v power point for any potentially high power drawing 12v items I just can't live without. The supply wires are fused and sized accordingly. I may add another fuse block and get away from using the bus bar a little and remove some inline fuses to clean it up but it's fine for the moment. A dual voltage meter and a tiny button to turn it on/off. My intent is to have nothing on unless turned on. Next on the list, I've found some strip lights that have their own on off button built in which I need to get for under the side rails. I'm still working on the disco ball!

I've been eyeballing the Banks turbo kit also. Unfortunately; after speaking with Banks, they don't offer the kit as the turbo used is no longer available. The turbo itself is not being made anymore. The jury is still out as to whether they'll source another turbo for the existing kit or change the kit.

That's it for now, keep rolling!


Sent from my LGMP260 using Tapatalk
 
Last edited:

scooter421

Active member
71
108
33
Location
Queen Creek, Arizona
So, I could not stand the inline fuses and had to install fuse blocks to eliminate some ugly. Labels are going on while waiting for the Amazon delivery.
The 2 LED lights bars are coming in today. One is going in the back and the other I may attach leads and magnets for portable use under the hood or wherever as needed. Not sure yet. I better insulate that positive wire on 12v to console fuse while I'm at it!12-24 fuse_block_resized.jpg
 
Last edited:

richingalveston

Well-known member
1,715
120
63
Location
galveston/Texas
what amperage do you plan on pulling through the 24V plug. your work looks really good but I would caution you on that plug. it is for AC power and from the style should allow for 20 amps at 120. DC power takes a lot more copper than AC to pass the same watts. Once you get things plugged in and running, use an IR temp gun on the plug to see if it is getting hot. It may overheat if pulling to much DC current through it.

Otherwise, everything looks great.
 

Lostforwords

Member
48
45
18
Location
Ventura, CA
15 amps max at 24v with 12 gauge wire and a 15 amp fuse.

The outlet sir? I picked up at Home Depot.

Scooter...

Sent from my LGMP260 using Tapatalk
Thanks for the fast reply! Hope your recovery is fast and your stronger than before!
Sorry dumb me, I mean the m1009. I almost had one but got out bidded =[. eneded up being sold for $9,298.75654654.jpgawdawda.jpgdasdasdas.jpgdqwdqwdq.jpgfgdfgdfgd.jpgwdawdawda.jpg
 

scooter421

Active member
71
108
33
Location
Queen Creek, Arizona
Oh! I picked mine up in AZ for $5500 from a gentlemen who's health was getting the better of him. Keep looking, you'll find one! I'd been wanting one for years but my wife never understood. After the accident, I needed a vehicle to get back to work until the insurance mess was sorted out. I found this one and now my wife gets it and loves it....go figure!

Scooter...

Sent from my LGMP260 using Tapatalk
 

Lostforwords

Member
48
45
18
Location
Ventura, CA
Oh! I picked mine up in AZ for $5500 from a gentlemen who's health was getting the better of him. Keep looking, you'll find one! I'd been wanting one for years but my wife never understood. After the accident, I needed a vehicle to get back to work until the insurance mess was sorted out. I found this one and now my wife gets it and loves it....go figure!

Scooter...

Sent from my LGMP260 using Tapatalk

Nice! I can't wait to finnaly have one! Going to kick ass! Your wife is awesome!
 

scooter421

Active member
71
108
33
Location
Queen Creek, Arizona
After what seems like forever, I managed to get a little done. I hope you are all doing well!

I ran a strip light in the back, found a new storage box that fits great, and the lid opens up inside. Put in a "Jerry Can" tool box from Rampage, if you've not seen them, the Jerry Can is actually a tool box. Bought and modified a stock Pintle hitch mount to accept a Civi 7 pin and wired that up. Replaced the IR lights in the bumpers with Rock lights but retained the wiring in case someone wanted to return it to stock. And finally, added the 10k lb tow/step to access the roof and interior without opening the tailgate. I replaced the shocks too. Currently working on new seat brackets/seat install. I sure hope it does not take this long again to make some progress! Looking at a Sidewinder turbo set up soon, if I can locate one...anywhere.
20200209_182921_resized.jpg20200209_182947_resized.jpg20200912_080922_resized.jpg20200912_080945_resized.jpg20200912_081009_resized.jpg20200913_165708_resized.jpg20200915_192515_resized.jpg20200921_185711_resized.jpg
Scooter...
 
Last edited:

scooter421

Active member
71
108
33
Location
Queen Creek, Arizona
Slowly inching forward...finally!
The tire carrier is a Smittybilt XRC 2 and I'm making the mounting bracket/adapter to utilize the original M1009 tow points. This way, I can leave everything as stock as possible. I ordered the steel for the tow point online which was a match for the original steel but not cheap, shipping in particular. The steel delivered to my door was $153 for a 6 foot stick. I was unable to locate the 1-1/2' x 2" x 3/16" wall tubing locally. There was a minimum order/special order/extra high price....locally for far more steel than I needed anyway.


The seats are from a Chevy Uplander.. The mount comprises of 1/8" steel plate and uni-strut all bolted/welded together.
More to come on the carrier as I finish up. I know others may be interested considering the limited availability of tire carrier options for the M1009.

As a side note, I mentioned the Sidewinder turbo in an earlier post. I was hoping I could find one sitting in a warehouse somewhere but I've had no luck. The Sidewinder kit for the 6.2 is no longer in production. Banks, says the turbo manufacturer stopped making the turbo and they've been unable to find a suitable replacement. I would imagine it's a financial decision NOT to chase a limited requested item as well. So, it's either find a used one or customizing a 6.5 turbo set up I guess. I saw another company advertising a kit for the Humvee's with the 6.2 here on the forum. It's obviously not going to be the same layout under the hood as the M1009. They want a fair bit of coin for the kit at around $4500.00.

Scooter...

Sent from my LGMP260 using Tapatalk
 
Last edited:

scooter421

Active member
71
108
33
Location
Queen Creek, Arizona
Nice work.
Thanks, I completed the tire carrier and it's one of those rare items that actually turned out the way I had it in my head on the first attempt!

I managed to retain access to all tow related items without needing to swing the carrier out of the way. I still have easy use of the Pintle, window crank and the pivot point barely impedes the passenger side tail light at the very bottom left corner. The reverse light is still completely visible from behind.

One issue with this design, the latch on the drivers side (pic's 6, 7 and eight) has to be rotated 90 deg before dropping the tailgate. I figured this was going to be an issue from the start. I could have removed the Pintle to fix this problem but what's an M1009 without a Pintle? It just seemed wrong...so I went this route. I'd like to get the matching trailer at some point. So, the Pintle had to stay. The carrier is designed for a Jeep tire; so, I had to fab a tire mount to match the 6 x 5.5 spacing (pic 4).

I may mount a small flag/rod or something on the latch that sticks up as a reminder. A little fiberglass pole that sticks up and would rub the tailgate before the damage is done would save some heartache. It will be too easy to forget about the latch or for someone unfamiliar with the set up to damage the tailgate. I'm picturing a 4am fishing trip and my self or someone else has to grab one more thing out of the back....OOPS! Now, I'm looking for a tailgate.

All in all I'm happy with the way it turned out and it should serve its purpose well. With the carrier locked in place; if for some reason, the red pin was to come out, the carrier really can't swing out anyway. I highly doubt the pin would ever come out but I used a pin which accepted an additional retainer just in case (pic 9)

I can provide a cut list of what I used if anyone wants to build one themselves.
20210223_212359_resized.jpg20210223_212700_resized.jpg20210223_212709_resized.jpg20210223_212732_resized.jpg20210223_213234_resized.jpg20210223_212813_resized.jpg
20210223_213149_resized.jpg
20210223_213303_resized.jpg20210223_213719_resized.jpg

I used a 6" x 1/4 round plate for the antenna mounts also. I'm changing the bolts after a trip to the hardware store at some point. Grade 8 was all I had laying around. I bought an SWR meter and tuned the antenna's after the install and low and behold there were people talking. They must have been off in the distance as it was not very clear but it works!
 
Last edited:

scooter421

Active member
71
108
33
Location
Queen Creek, Arizona
I boxed in the risers and got them painted. I also installed the anti-destruct mechanism for the tailgate. I'm not in love with the look or the location but I had to attach it to the part that needs to move out of the way in order to prevent the inevitable tailgate destruction. So, this project is completed! On to the next one...a turbo.

Scooter...
 

Attachments

Last edited:

scooter421

Active member
71
108
33
Location
Queen Creek, Arizona
I rebuilt this 71 Shasta trailer many years ago. I had some spare time today and figured I'd make sure my civi trailer connections work and give it a spin around the block. The wiring worked and to my surprise it towed effortlessly with the M1009. I was a bit worried it would be horribly slow but it seemed to do just fine. I have an extended length hitch already on order because there is not enough room between the tire carrier and the trailer. Once the hitch arrives, I need to try it again but up a serious hill and see how it does.

Funny, when I built the trailer I joked about giving it a camo paint job and picking up an M1009 to pull it with. I'm getting there!

Scooter...
 

Attachments

Last edited:
Top
AdBlock Detected

We get it, advertisements are annoying!

Sure, ad-blocking software does a great job at blocking ads, but it also blocks useful features of our website like our supporting vendors. Their ads help keep Steel Soldiers going. Please consider disabling your ad blockers for the site. Thanks!

I've Disabled AdBlock
No Thanks