Firstinline
New member
- 7
- 10
- 3
- Location
- Pittsburgh, Pennsylvania
The finish line is near. You will have that M done before June!
Steel Soldiers now has a few new forums, read more about it at: New Munitions Forums!


 In my opinion the seals fit perfect. I will discuss the handles on my next pot. That was not the best replacement parts but I did manage to complete my repairs and that was my goal from the get go. Be Safe. I am NOT going to install these wing vents today. It is too cold and damp out in the barn. There will be better days coming. Thank you for looking and the positive support. I hope this helps persuade you to change your seals. I thought about offering a rebuild service. You can buy entire wing vents for $199.
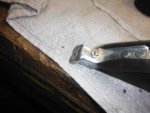
 Left side complete.
  You can trash or save the hardware from the new handles.
  The proper fit in the bottom corner.
  Right side complete.
 The lower screws are double nutted and stripped.
  The pivot rivet tool.


 windows, regulators and window rubbers in place. Before you begin make sure the J nut is in place below the wing vent.

 If you don't have it in place when you start you will be attempting for a long time to get one in place. Secure that J nut with an alignment tool and then get the lag screw in place. Not tight but in place and securing the J nut. Next get the 3 screw and 2 funnel washers in place and tight. Put the upper screw in last with the flat washer. Next load the regulator into the door and put the crank stem thru the hole. With a helper holding the glass almost all the way up put the guide wheels into the sash and door side channels. Get the window regulator lined up with the 4 holes centering the drive stem in the middle of the hole. Tighten the regulator. Install the rear window guide into the door with the glass cranked up tight. Adjust the bracket loosely. Now you can install the new felt runs and use a silicone based spray and slide the rubber in place. Crank the window up and down and adjust and tighten the rear guide track as needed. Also you can tweak and adjust the wing vent side lower window track slightly if


 needed. Install the outer belt rubber moldings/ wipes. Thoroughly clean the windows and call it a day. I still failed to paint the mirrors. Now that the truck has all the glass it could sit outside over night if the need arises. Next I will grease the roller guide sash tracks and the regulator gears and pivot points. That will be another day. I am Happy with the weekend progress and exceeded my goal for today. The Kubota hydraulic hose was also easy. I must wait for a replacement from the hydraulic shop. Thank you for looking. I hope it helps out someone attempting the same task. it is always fun to work on my projects. I learn something everyday. The Brothers door seal set gets my seal of approval. I have 1 original GM door glass run left and one slightly used GM door seal run. My luck is they are both the same side. I haven't looked. I will used them on Little Red M1009. I did go look at the door seals on Little Red and they were like fresh potato chips. Crispy to the touch. But I learned about the metal clip on the corner of the new rubbers. it hooks on the door sheet metal. Be Safe.
")
I got called back to my regular job today at 0545. Told to be there at 0600. Short notice. Arrived at 0630 and was informed to maintain social distance. Also no 2 people in same vehicle. They are suggesting a divider tent/barrier in the vehicle. Reminded me of the Nova in Deathproof. More later. I hope to get back to my irregular work real soon. And maybe get this M1009 project under wraps. Weather related delays along with COVID19. Be Safe Take Care.
 have used them on several CUCV's and they are great tires.
  They give the M1009 the look I want.
 These are pictures on my 2015 build. The Mule M1009. Take Care and Be Safe. Several shops were closed and a few said they will have to get back to me on availability right now. All is well. No rush job here.
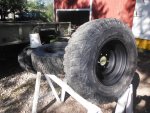
They do LOOK nice.....................I was calling around for 5 new tires for my M1009 project. I have decided that these are the tires I want. I View attachment 794365have used them on several CUCV's and they are great tires. View attachment 794366View attachment 794366They give the M1009 the look I want. View attachment 794368View attachment 794369These are pictures on my 2015 build. The Mule M1009. Take Care and Be Safe. Several shops were closed and a few said they will have to get back to me on availability right now. All is well. No rush job here.


 I went and picked up my new tires and installed them on my M1009.
  Huge improvement in appearance.


 The mirrors have been painted at a remote location in a heated garage. I was able to back the M1009 out in the driveway and I washed it. Next I want to get scrubbing the Line X floor and continue getting ahead on other parts to install. I overlooked the seatbelts I will get on them and clean and oil them before I install them. then it will be time to scrub the seats. Thank you for looking. The virus is effecting my working hours. I smashed a few cars today at the crusher and started home at 230 to work in my shop. I am happy with the progress. Be Safe and Stay Safe.
 . The 4 leaf plow type for front and new stock rear springs used 1 season.
 I noticed that the rear axle vent was not on the truck. The axle was capped. I measure a new piece of 5/16" hose and installed a new line with a clean vent. That was easy. After that I rolled around on the creeper double and triple checking every bolt I could touch. I checked the fluids in the differentials and the transfer case. All is dry under there at this time no leaks. which is good. I pulled a seat out and scrubbed it I think it came out really nice. I had the bottoms reupholstered back 12 years ago. I could have just put some Avalanche or Escalade seats in it. NOT.
 Also the seats have the recliner hardware and I left the gray mechanism covers on the seats. They match the stock gray seat pedestals. I used the Simple Green and a stiff scrub brush. I also used a white 3M scratch pad. I think they could get a bit cleaner but feel I will be getting it out to the alignment shop and driving it around to work out any bugs that may arise. I don't think so but it is possible.
 I am in for supper and am going out to scrub the passengers seat and the rear seat. More later. Be Safe and Take Care.
 I was fortunate to have an original replacement.
  The passengers seat is all original and is a bit thin at the stitching in the seat cushion. It cleaned up well.
  I also located a decent set of seatbelts. About as decent as you can get on 35 year old vehicle interior parts.
  Also have the original dash pad.
  It is a bit dirty and has a small damaged area on the left corner radius from someone prying their way thru the left wing vent window back 20 years ago. Never saw someone so dumb that they went thru the vent window and still never opened the door. The culprit was never caught. I have a plan to make a cover for the damaged area. Sort of a waste to scrap the dash pad because of the slight cuts. When the door is closed you don't even see it. Out of sight out of mind. Take Care and Be Safe. This is like a bad dream here where I live. I have a plexi-glass divider in my work truck. It was installed by the safety department. Crazy stuff going on here. Thank you for looking. Rain tomorrow.