• Steel Soldiers now has a few new forums, read more about it at: New Munitions Forums!

  • Microsoft MSN, Live, Hotmail, Outlook email users may not be receiving emails. We are working to resolve this issue. Please add support@steelsoldiers.com to your trusted contacts.


3 color NATO woodland question

04mustang

Member
349
8
18
Location
Lumberton/NC
I finished the green last night. And just for anyone's reference, 1 gallon will not cover a hmmwv completely, inside and out.
For some crazy reason I was thinking it would. I must have been thinking back to my m151a2 that I did a repaint on and it used less than 1 gallon....a jeep has less surface area than hmmwv, who knew? :eek:
If it looks like it still shinny and wet in the photos, that's because it is, I had literally just cleaned the paint gun and snapped these photos.
 

Attachments

04mustang

Member
349
8
18
Location
Lumberton/NC
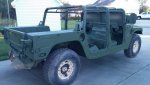
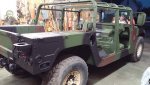
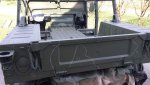
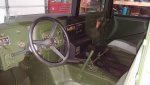
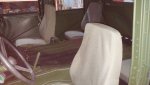
I started at the back of the truck in the tailgate area where you wouldn't be able to paint once the gate was closed. I then moved the other inside of the bed and got as much of the interior as I could reach, then the rear wheel wells. I then painted the passenger side up to the windshield and moved to the drivers side to do the same.
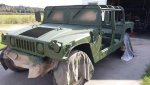
That's when I made very important discovery.....1 gallon of behr wont paint a hmmwv. I ran out at the B pillar and had to stop for the day.
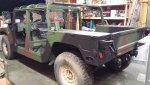
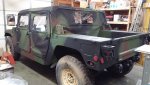
The next day after getting more paint I got inside the truck on the center tunnel and repainted all of the areas that I wasn't happy with from the day before, I also painted the overhead ribs (this was really not necessary but it was bothering me having them black and the truck green).
I then closed the tailgate and painted the rest of it that I did not get the previous day. From there I picked up from the previous day and painted the drivers side to the windshield and the front of the windshield with the hood raised. I painted the front wheel wells and the top of the hood while it was raised. The I lowered the hood and painted the front of it.
After that I just went around the truck touching up anything I didn't particularly like.
This paint is very forgiving and covers excellent, and the paint gun is awesome!
I have the bulkhead that I removed from the 2 man setup to practice the patterns with and that really helped.
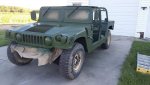
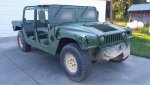
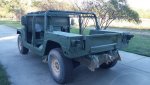
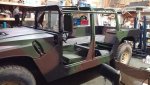
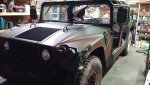
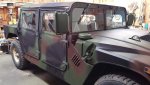
Once everything was dry I the got the patterns out of the TB 43-0209 color markings. I lined everything out in chalk and made sure what color went where.
Yesterday I painted the brown the first, again starting at the inside and moving out and did all of the brown. this took less than 1 qt of paint.
Once that had a little time to dry I cleaned the gun and swapped over to black. and again got inside the truck and painted the outside last.
This took 1.5 qts. I did these colors with the hood down so the lines matched better. One thing to watch is covering the chalk. If you don't get a heavy enough coating at the edges then the chalk will show through once its dry.
I hope this helps anyone wanting to try this pattern. This was a first for me and it wasn't bad at all. I was a little scared of messing it up but its a very forgiving pattern.
 

Attachments

m16ty

Moderator
Moderator
Steel Soldiers Supporter
9,576
210
63
Location
Dickson,TN
One thing to watch is covering the chalk. If you don't get a heavy enough coating at the edges then the chalk will show through once its dry.
Do you have to worry about the paint not sticking good where the chalk is? I always just freehand mine, mainly for that reason.
 

04mustang

Member
349
8
18
Location
Lumberton/NC
Thank you all for the responses. I really wanted to document this for anyone that has or will be getting a hmmwv in the future and wants to go back with this pattern.
My truck was a 2 man setup that was originally 3 color NATO and then painted tan in 2006.


Do you have to worry about the paint not sticking good where the chalk is? I always just freehand mine, mainly for that reason.
I havnt seen any issues with the paint not sticking to the chalk. And that is how the military does them. but time will be the judge.
 

04mustang

Member
349
8
18
Location
Lumberton/NC
I've got the seats installed and have a seat belt kit for the front seats on the way. I still need to touch up a few places here and there and I plan to take on the wheels today and tomorrow.


If anyone is interested I would be open to the idea of repainting trucks for other people for a fee. dependent on the size of the truck. i.e. a hmmwv would be less than a 5 ton. I am in Lumberton NC close to the NC/SC state line on I-95. If this interests anyone then let me know through PM and we can work something out.
 

Attachments

04mustang

Member
349
8
18
Location
Lumberton/NC
I liked it a lot. Like most systems its not perfect, but it did the job and I'm satisfied with it. And personally I am a very picky person when it comes to things not looking correct.
For the base coat of green the air was a little over half way open and the volume control for paint was just a play around with it and see factor.
I began all three colors by first practicing on the 2 man cargo divider bulkhead that came out of the truck.
For the brown and black settings the air was turned down pretty far and the flow control was turned down as well. This still had a fairly decent amount of over spray beyond where my chalk line was at, but again it is pretty darn good.
 

04mustang

Member
349
8
18
Location
Lumberton/NC
I didn't thin my paint. It can be done with no issue. But most people feel that the unthinned paint is more CARC like in the way it looks and feels, and I would agree with that based on my trucks in the guard
 

infidel got me

Well-known member
1,685
32
48
Location
Newberry, Florida
3 color paint

Nice job-- and the paint gun worked out ok.
I started to paint mine last year with a wagner electric sprayer, but it shot out the paint like a stucco gun [borrowed it from my neighbor] So I used my air powered paint gun. Your job came out perfect, maybe the electric gun needs another look at. I've noticed a lot of members are using the electric setup and getting a good job. [thumbzup]
 
Last edited:

04mustang

Member
349
8
18
Location
Lumberton/NC
Thank you!
And I know what you mean about the stucco look. Initally until I learned how to make it work right it that's how it sprayed. But in drying it levels out. That's a plus of Behr paint.
My only complaint is about how easy the paint will scuff and scratch. But I've been told it can take a month or so to completely harden and cure.
 

infidel got me

Well-known member
1,685
32
48
Location
Newberry, Florida
Yes it does take a few weeks to fully cure. My only gripe on the behr paint is that it wont wash clean. What I mean by this is -- here in Florida we have black inky mud. Not that I'm mudding my truck, but if you ride in the woods the tires will through mud up on truck and stain it, and the only way to cure this is a repaint.
 

infidel got me

Well-known member
1,685
32
48
Location
Newberry, Florida
Actually painting the suspension and undercarriage is as easy as painting the truck-- if not easier. You don't have to worry about runs. Just make sure that everything you want paint to stick to is CLEAN. Purple power everything, then power wash. REPEAT-- and all should be good Happy painting!
 
Top
AdBlock Detected

We get it, advertisements are annoying!

Sure, ad-blocking software does a great job at blocking ads, but it also blocks useful features of our website like our supporting vendors. Their ads help keep Steel Soldiers going. Please consider disabling your ad blockers for the site. Thanks!

I've Disabled AdBlock
No Thanks