• Steel Soldiers now has a few new forums, read more about it at: New Munitions Forums!

  • Microsoft MSN, Live, Hotmail, Outlook email users may not be receiving emails. We are working to resolve this issue. Please add support@steelsoldiers.com to your trusted contacts.


5Ton Rear Axle Hop

vvwilkins

Active member
106
116
43
Location
Riverside CA
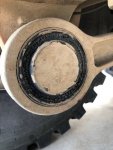
Crew, while taking my 5ton out on trails and hill climbs in particular, the rear axles will exhibit extreme hop under load and dig its own hole. I've also noticed that while cruising down the road at +55mph the rear wheels are constantly bouncing - even with fresh tires. Took a look at the torque rods and the bushing look really rough. I'm guessing the bushings are the key damping system as there are no shocks on the rear assembly. Looking for others thoughts. I tried to climb Oldsmobile Hill (Glamis) but the axle hop just killed progress. Picture of my torque arm axle bushings attached.
 

Attachments

Elijah95

Certified Rookie
1,239
1,183
113
Location
Georgia
That thing is simply rotten, I’d venture to say put 5 ton in the bed and after a single tight turn on a paved surface she’d pop right off.


I’d replace all the dog bone bushings ASAP and your problem should be gone. I’d also check true roundness on the tires


Sent from my iPhone using Tapatalk
 

vvwilkins

Active member
106
116
43
Location
Riverside CA
That thing is simply rotten, I’d venture to say put 5 ton in the bed and after a single tight turn on a paved surface she’d pop right off.


I’d replace all the dog bone bushings ASAP and your problem should be gone. I’d also check true roundness on the tires


Sent from my iPhone using Tapatalk
Thank You for the quick feedback. Replacing the all the dog bone bushings is now the top priority.
 

MAdams

Active member
373
123
43
Location
San Dimas, CA
The best advice I have it to air down in the sand. The suspension design in the 5 ton will always bounce. Replacing the worn dog bones may help but it wont eliminate it. At Pismo beach I took the valve core out of the rear tires on my old 931a2 with 16.00's. Driving around in the sand with zero air pressure really helped but it would still bounce when climbing a sand hill.
 

Jbulach

Well-known member
Steel Soldiers Supporter
2,587
2,041
113
Location
Sunman Indiana
All good advice. Replacing the bushing in the picture is a must! Tires bouncing while going down the (smooth) road is not normal, and I’m not sure if replacing the bushings will fix that.
 

Ajax MD

Well-known member
1,571
1,420
113
Location
Mayo, MD
@vvwilkins This might sound dumb but have you checked ALL of your torque rods? You know that there's six of them, not four, right?

There are 2 extra on the passenger side.
 

vvwilkins

Active member
106
116
43
Location
Riverside CA
The best advice I have it to air down in the sand. The suspension design in the 5 ton will always bounce. Replacing the worn dog bones may help but it wont eliminate it. At Pismo beach I took the valve core out of the rear tires on my old 931a2 with 16.00's. Driving around in the sand with zero air pressure really helped but it would still bounce when climbing a sand hill.
@MAdams: Thanks for the airing down advice for sand. I was running 25psi all around thinking that was plenty low. But your advice makes sense since there are 4 big tires in the rear carrying an empty cargo bed. I do have the factory bead-lock donuts installed - so, next time I'm gonna give your suggestion a try - I'm determined to put THOR at the top of that darn hill :) Can you Imagine the look on the RZR drivers if a 5ton is greeting them at the top? Of course it will be the Slowest damn hill climb Oldsmobile Hill has seen :) I will say, the double-takes that occurred as I drove the 5ton through the dunes to get to the hill - lots of thumbs up which was fun.
Crew: thanks for the feedback and insight - THOR is grounded until all 12 bushings are replaced.
Now to read up on the posts regarding how to perform this service.
 
Last edited:

Lovetofix

Member
87
62
18
Location
Morrison,TN
On the torque rod end project:
One thing I did differently than most folks was to take all six torque rods off of my M817 at once. This has to be done on flat concrete to work and be safe. And you have to have lots of solid wood cribbing. I had to do it this way because of circumstances but would do it like this again if the need ever arises. So much more efficient!

The problem that can come from removing all at once, is that if an axle shifts they can be a real pain to get everything lined up again.
I kept that from happening by jacking up the frame first letting the axles hang and stacking wood blocks between the rubber bumpers and axles. Then when you jack up and SOLIDLY crib the axles, (I don’t trust even the biggest jack stands with my life) the weight of the bed pins the axle in place.

I followed Wes’s/Simp’s instructions and found them spot on, especially the part about using a BIG hammer on the frame socket that holds the rod end. Once all the nuts were off, I had all six on the ground in under 30 minutes. I did the whole job completely by myself and it wasn’t that bad.
Once the new ends are pressed in, a small ratchet strap in a loop run around the tapered section of the rod ends is enough to pull the tips together to get it back in place with zero effort. I can try and find my pictures if that would be of any help.

Note: I made my own tool to get those hidden nuts off without needing four letter words.

Good luck! And have FUN!


Sent from my iPhone using Tapatalk
 

vvwilkins

Active member
106
116
43
Location
Riverside CA
On the torque rod end project:
One thing I did differently than most folks was to take all six torque rods off of my M817 at once. This has to be done on flat concrete to work and be safe. And you have to have lots of solid wood cribbing. I had to do it this way because of circumstances but would do it like this again if the need ever arises. So much more efficient!

The problem that can come from removing all at once, is that if an axle shifts they can be a real pain to get everything lined up again.
I kept that from happening by jacking up the frame first letting the axles hang and stacking wood blocks between the rubber bumpers and axles. Then when you jack up and SOLIDLY crib the axles, (I don’t trust even the biggest jack stands with my life) the weight of the bed pins the axle in place.

I followed Wes’s/Simp’s instructions and found them spot on, especially the part about using a BIG hammer on the frame socket that holds the rod end. Once all the nuts were off, I had all six on the ground in under 30 minutes. I did the whole job completely by myself and it wasn’t that bad.
Once the new ends are pressed in, a small ratchet strap in a loop run around the tapered section of the rod ends is enough to pull the tips together to get it back in place with zero effort. I can try and find my pictures if that would be of any help.

Note: I made my own tool to get those hidden nuts off without needing four letter words.

Good luck! And have FUN!


Sent from my iPhone using Tapatalk
Thanks for the tips & guidance! I think I'll give your & Wes's method a try. Pictures if you have them handy are always appreciated.
 

Lukes_deuce

Active member
441
123
43
Location
Long Island, NY
Im glad your replacing the dog bone bushings, as they look like their done. One sentence of your first post has me thinking - " I've also noticed that while cruising down the road at +55mph the rear wheels are constantly bouncing - even with fresh tires" The dog bones do not add any suspension dampening to the rear axles. They are control arms to keep the axles centered.

I cant comment on sand operations, as Ive never had my truck on the beach. But on the highway, you shouldnt have the rear wheels constantly bouncing. Whats your tire pressure for highway driving? Do you have any balancing system inside the tire? windshield washer fluid, golf balls, balancing beads? I highly doubt the dog bones will help bouncing on the highway.

Also for the upper dog bones, try to find a "striking wrench" Its a closed wrench you can hit with a sledge. I have Proto J2636SW. Makes short work of those 2 nuts recessed in the trunnion.
 

Jbulach

Well-known member
Steel Soldiers Supporter
2,587
2,041
113
Location
Sunman Indiana
On the torque rod end project:
One thing I did differently than most folks was to take all six torque rods off of my M817 at once. This has to be done on flat concrete to work and be safe. And you have to have lots of solid wood cribbing. I had to do it this way because of circumstances but would do it like this again if the need ever arises. So much more efficient!

The problem that can come from removing all at once, is that if an axle shifts they can be a real pain to get everything lined up again.
I kept that from happening by jacking up the frame first letting the axles hang and stacking wood blocks between the rubber bumpers and axles. Then when you jack up and SOLIDLY crib the axles, (I don’t trust even the biggest jack stands with my life) the weight of the bed pins the axle in place.

I followed Wes’s/Simp’s instructions and found them spot on, especially the part about using a BIG hammer on the frame socket that holds the rod end. Once all the nuts were off, I had all six on the ground in under 30 minutes. I did the whole job completely by myself and it wasn’t that bad.
Once the new ends are pressed in, a small ratchet strap in a loop run around the tapered section of the rod ends is enough to pull the tips together to get it back in place with zero effort. I can try and find my pictures if that would be of any help.

Note: I made my own tool to get those hidden nuts off without needing four letter words.

Good luck! And have FUN!


Sent from my iPhone using Tapatalk
Whats the advantage of taking all six off at the same time? Also trying to remember if the arms are supposed to be installed with the suspension in the neutral position, as if the truck was sitting on level ground on it’s suspension?
 

vvwilkins

Active member
106
116
43
Location
Riverside CA
Im glad your replacing the dog bone bushings, as they look like their done. One sentence of your first post has me thinking - " I've also noticed that while cruising down the road at +55mph the rear wheels are constantly bouncing - even with fresh tires" The dog bones do not add any suspension dampening to the rear axles. They are control arms to keep the axles centered.

I cant comment on sand operations, as Ive never had my truck on the beach. But on the highway, you shouldnt have the rear wheels constantly bouncing. Whats your tire pressure for highway driving? Do you have any balancing system inside the tire? windshield washer fluid, golf balls, balancing beads? I highly doubt the dog bones will help bouncing on the highway.

Also for the upper dog bones, try to find a "striking wrench" Its a closed wrench you can hit with a sledge. I have Proto J2636SW. Makes short work of those 2 nuts recessed in the trunnion.
@Lukes_duece, Thanks for the wrench part # - great suggestion. Regarding wheel balancing: I'm reluctant to put fluids, balancing beads etc which may impact operation of the CTIS (took me 9months of debug to get it working so I don't want to risk jacking it up :) ). I've briefly looked into the balance rings used by big-rigs but have not found a set that I feel would be compatible with 20" super-single wheels. If anyone does know of a set that are compatible, please share.
 

Lovetofix

Member
87
62
18
Location
Morrison,TN
Whats the advantage of taking all six off at the same time? Also trying to remember if the arms are supposed to be installed with the suspension in the neutral position, as if the truck was sitting on level ground on it’s suspension?
The advantage is getting to do everything as a batch setup. I had to travel 30 minutes one way to use a press so it made it all the more necessary. With very little extra work it saves time to remove all the old ends at once then cleanup and paint the rods then press in the new ends. It just saves time not to jump back and forth six times.

On the “preload.” There is a certain amount of space you are to have between the rubber bumpers and spring brackets on the axle for installation. I put all the torque rods back in their sockets and started the nuts on before jacking the frame back up to set the proper spacing before torquing the nuts down. All done per the TM’s instructions.


Sent from my iPhone using Tapatalk
 

Lovetofix

Member
87
62
18
Location
Morrison,TN
Thanks for the tips & guidance! I think I'll give your & Wes's method a try. Pictures if you have them handy are always appreciated.
I am afraid all my pictures from that job got lost when I switched phones. I went looking for them and came up empty. If you run into any difficulties I would be happy to try and help. I’m nowhere near the mechanic that Wes is but feel free to message me and I can share what I learned through redoing all of mine.


Sent from my iPhone using Tapatalk
 

US6x4

Well-known member
Steel Soldiers Supporter
1,181
2,064
113
Location
Wenatchee, WA
You might find this video helpful. When I get to that point I will probably try his method along with other tricks I've read about on the forums:

 
Top
AdBlock Detected

We get it, advertisements are annoying!

Sure, ad-blocking software does a great job at blocking ads, but it also blocks useful features of our website like our supporting vendors. Their ads help keep Steel Soldiers going. Please consider disabling your ad blockers for the site. Thanks!

I've Disabled AdBlock
No Thanks