

L B
New member
- 20
- 8
- 3
- Location
- Sumter, SC
New to the site and I figured I would write this up since I couldn't find it posted it anywhere, but this is what I did when the holes for the starter bolts on my M1028 got beyond where a helicoil or standard insert would save them.
Background (Feel free to skip, repair is below)
I purchased this truck back in November and checked for the starter support bracket, but didn't realize it wasn't actually bolted to the block; it was just sitting against it. Broke a starter bolt trying to start it one morning and the lack of front support caused the starter to tear up the ring gear on the flex plate. Once I got the bolt extracted, I realized that there were already helicoils installed with longer bolts. The helicoils seemed weak but I got it all back together and dealt with the dead spot on the ring gear until I had time to fix it.
Once I got to repairing it, I found out that a PO had set the helicoils back roughly 3/4" then drilled the bottom portion of the hole out to 1/2" so they could install sleeves to keep the bolts straight. It might have worked if the hole through the sleeve wasn't so small that it flattened the threads and if the holes for the helicoils weren't crooked (so crooked that when I put a 33/64" drill through square to the block, there was a hole in the side of my hole). I removed the sleeves since they were spinning on the drill bit. Replacement helicoils wouldn't work, and the biggest insert I could find required a .484" tap drill, and I didn't have the money or time to remove the engine and take it to a shop, so I went this route.
Repair Materials
So this is the next step up from the biggest available insert for M10x1.5 threads, if you ever find yourself where that won't work. This allows you to still use the OEM bolts, but I wouldn't recommend going any larger - wall thickness will become a problem. I went to the next tap drill size up from .500", which was 33/64" (.5156") for 9/16 - 18 threads. I brought a drawing of the inserts and a drill guide to a machine shop and had them made (prices vary but expect to spend $100-$200).
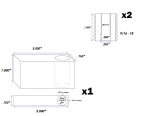
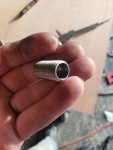
The inserts are 1.000" long, 9/16 - 18 outside threads, and M10x1.5 inside threads with a .395" counterbore, .300" deep. The closest reamer the shop had was .397" for the counterbore, so I had them redo the knurling on the bolts to fit snug.
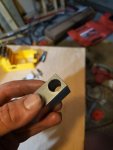
The drill guide is just a 1x2" block that is 3/4" wide and has a 33/64" hole (tap drill) centered .375" from one end. This is so you can drill straight and square to the block. A drill with a magnetic attachment works instead of this guide, if you just happen to have one.
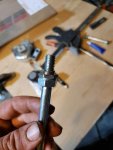
I also made a homemade insert install tool out of a spare M10x1.5 bolt and a couple of nuts. I just locked two nuts together on the bolt, then ground half the outer nut away until only a cylinder was left around the bolt threads that was a smaller diameter than the outer diameter of the insert.
(Pictures of the insert, drill guide, install tool, and the drawing [not to scale] for the insert and drill guide are attached)
You will also need a 9/16 - 18 plug tap, 9/16 - 18 bottom tap, a 33/64 drill, and red Loc-tite.
Repair
The repair is fairly straight-forward. You will need to remove the front driveshaft and transmission dust cover if not already removed.
Drill your holes out to 33/64 using the drill guide to check that you are square with the block, and drill to just over 1".
Run your plug tap, then bottom tap through the holes to 1".
Make sure your threads are clean, and test fit the inserts by hand. They should run in almost flush if not completely flush.
Once your holes are tapped and the inserts test fit good, put a belligerent amount of red Loc-tite on the outside threads of the inserts and run them in with your install tool until they are tight or the tool bottoms out. Let it sit for a few minutes, then test fit your bolts before installing the starter.
This repair got my truck going again when I honestly thought I was SOL, so if anyone finds themselves in a similar situation, I hope this helps.
-LB
Background (Feel free to skip, repair is below)
I purchased this truck back in November and checked for the starter support bracket, but didn't realize it wasn't actually bolted to the block; it was just sitting against it. Broke a starter bolt trying to start it one morning and the lack of front support caused the starter to tear up the ring gear on the flex plate. Once I got the bolt extracted, I realized that there were already helicoils installed with longer bolts. The helicoils seemed weak but I got it all back together and dealt with the dead spot on the ring gear until I had time to fix it.
Once I got to repairing it, I found out that a PO had set the helicoils back roughly 3/4" then drilled the bottom portion of the hole out to 1/2" so they could install sleeves to keep the bolts straight. It might have worked if the hole through the sleeve wasn't so small that it flattened the threads and if the holes for the helicoils weren't crooked (so crooked that when I put a 33/64" drill through square to the block, there was a hole in the side of my hole). I removed the sleeves since they were spinning on the drill bit. Replacement helicoils wouldn't work, and the biggest insert I could find required a .484" tap drill, and I didn't have the money or time to remove the engine and take it to a shop, so I went this route.
Repair Materials
So this is the next step up from the biggest available insert for M10x1.5 threads, if you ever find yourself where that won't work. This allows you to still use the OEM bolts, but I wouldn't recommend going any larger - wall thickness will become a problem. I went to the next tap drill size up from .500", which was 33/64" (.5156") for 9/16 - 18 threads. I brought a drawing of the inserts and a drill guide to a machine shop and had them made (prices vary but expect to spend $100-$200).
The inserts are 1.000" long, 9/16 - 18 outside threads, and M10x1.5 inside threads with a .395" counterbore, .300" deep. The closest reamer the shop had was .397" for the counterbore, so I had them redo the knurling on the bolts to fit snug.
The drill guide is just a 1x2" block that is 3/4" wide and has a 33/64" hole (tap drill) centered .375" from one end. This is so you can drill straight and square to the block. A drill with a magnetic attachment works instead of this guide, if you just happen to have one.
I also made a homemade insert install tool out of a spare M10x1.5 bolt and a couple of nuts. I just locked two nuts together on the bolt, then ground half the outer nut away until only a cylinder was left around the bolt threads that was a smaller diameter than the outer diameter of the insert.
(Pictures of the insert, drill guide, install tool, and the drawing [not to scale] for the insert and drill guide are attached)
You will also need a 9/16 - 18 plug tap, 9/16 - 18 bottom tap, a 33/64 drill, and red Loc-tite.
Repair
The repair is fairly straight-forward. You will need to remove the front driveshaft and transmission dust cover if not already removed.
Drill your holes out to 33/64 using the drill guide to check that you are square with the block, and drill to just over 1".
Run your plug tap, then bottom tap through the holes to 1".
Make sure your threads are clean, and test fit the inserts by hand. They should run in almost flush if not completely flush.
Once your holes are tapped and the inserts test fit good, put a belligerent amount of red Loc-tite on the outside threads of the inserts and run them in with your install tool until they are tight or the tool bottoms out. Let it sit for a few minutes, then test fit your bolts before installing the starter.
This repair got my truck going again when I honestly thought I was SOL, so if anyone finds themselves in a similar situation, I hope this helps.
-LB
Attachments
-
 34.4 KB Views: 76
 -
 31.2 KB Views: 74
 -
 29.6 KB Views: 72
 -
 35.1 KB Views: 75