• Steel Soldiers now has a few new forums, read more about it at: New Munitions Forums!

  • Microsoft MSN, Live, Hotmail, Outlook email users may not be receiving emails. We are working to resolve this issue. Please add support@steelsoldiers.com to your trusted contacts.


939 Battery Box Upgrade on 809

MyothersanM1

19K M1 Armor Crewman
Steel Soldiers Supporter
1,954
402
68
Location
Culver City, CA
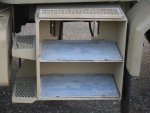
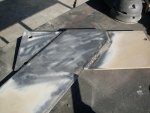
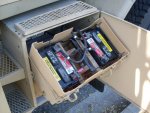
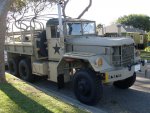
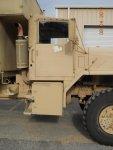
I have had my eye on a 939-series upgrade battery box for sometime now. I thought it would be a nice to modify one these boxes for use on M818 (all 809 series trucks should be able to use this mod). Well, I came upon a rather affordable kit locally with benefit of no shipping costs. I spent a little over a third of what I have been seeing these kits selling for.

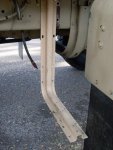
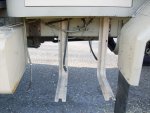
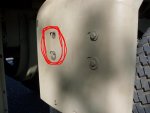
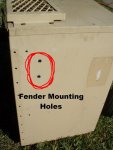
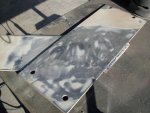
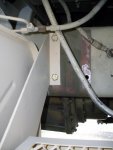
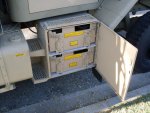
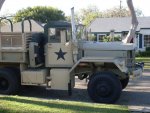
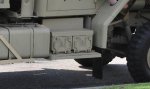
Using only two batteries for my truck, the bottom compartment could be used for extra storage. I feel it has a cleaner look that the standard 809-series battery set-up. The box and side steps fit perfectly between the fender and fuel tank. The fender does become an integral part of the installation…more on that later.

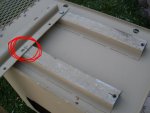
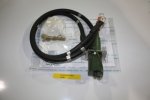
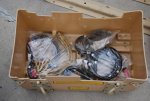
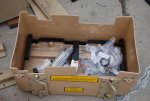
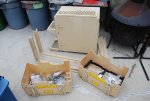
The kit includes the steel box, two plastic battery boxes w/ hold-downs, two 45-degree frame brackets (which will become fodder for mounting modifications), eight battery cables of varying lengths (eight according to packing list…my kit had nine) and a small bucket load of hardware (to include bus bars, retention cables and a bunch of NBW’s). In fact, the only things you don’t get are battery terminals and j-bolts.

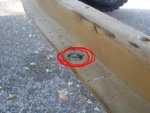
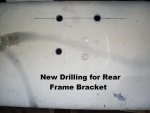
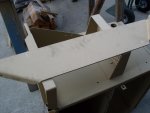
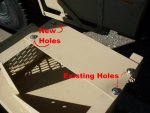
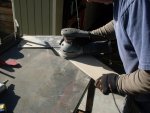
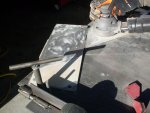
I am going to chronicle my installation in the next several postings. Mind you, it is a simple install. BUT, the kit was designed for a different vehicle. So, some drilling, cutting and welding were required. I will post the full instruction sheet to include the packing list provided with the kit,
 

Attachments

MyothersanM1

19K M1 Armor Crewman
Steel Soldiers Supporter
1,954
402
68
Location
Culver City, CA
Bracket Installation

Obviously, the first thing is to remove was the original battery box set-up. Everything goes down to the frame…the only thing left are the battery cables; hot lead, the 12VDC accessory lead and the ground lead.

I flipped the steel box on its head to loosely mount the frame brackets. Here’s where things start to change. The 809 cab sits lower to the frame than the 939. This calls for the frame brackets to attach to the frame on the long leg and short legs support the steel box. The brackets have identical holes drilled in them. On the short leg, I used the outer most hole as the pilot. Match up the back hole, mark and drill (see pics. for details). Drill a fairly good size hole…it makes it easier to mount later.
Note: The steel box mounts to the inner holes on the brackets.

While the brackets are dry fitted to the steel box. I measured the inside distance of the frame brackets for proper frame mounting. I was an even 13”.

I then moved on to the frame prep and mounting of the brackets. The top three holes of the brackets long leg are used. The front bracket can use one existing hole from the old bracket. The other two had to be drilled. I measured 13” from the rear edge of the front bracket and mark. Measured and marked holes for drilling…use a helper to hold the bracket for more accurate marking. I drilled the holes for the rear bracket and mounted both brackets. I then dry fitted the steel box onto the brackets to get a good look of the new set up.
 

Attachments

MyothersanM1

19K M1 Armor Crewman
Steel Soldiers Supporter
1,954
402
68
Location
Culver City, CA
Step support/span bracket

The two 45-degree support bracket would not work with the 809 install as provided. The box hangs lower in relation to the frame for these brackets to be effective. Here was where the thinking really began.

The front bracket is flat and the rear has approximately 1 ½” lip along its edge. Using the flat bracket, I made a span bracket laying it across the side steps and marked for cutting. I cut the bracket and drilled holes to match existing holes the bottom step. The lower step is already drilled out, but the top is not. I marked 1” in and 1” down and drilled the top step. The bracket was drilled to match. The span bracket was bolted onto the steps using the hardware provided in the kit.
 

Attachments

MyothersanM1

19K M1 Armor Crewman
Steel Soldiers Supporter
1,954
402
68
Location
Culver City, CA
Front support

I decided to use the fender rear support arm to hold up the front of the steel box. I removed the two inner bolts on the fender support bracket, dry fitted the steel box and marked the box for drilling. I drilled for 3/8” bolts then mounted the box to the frame brackets. For stand off between the fender and steel box, I slipped two flat washers and a ½” shaft collar over each bolt and tightened it all up. Make sure to install the fender bolts prior to final frame bracket attachment.
 

Attachments

MyothersanM1

19K M1 Armor Crewman
Steel Soldiers Supporter
1,954
402
68
Location
Culver City, CA
Step support/span bracket modification

After bolting up to the frame brackets and fender support arm, the box felt a little flimsy when I stood on the step. I decided I would modify the rear angle bracket and attach it the span bracket between the two steps. With the help of my neighbor, we cut the lip off of the rear angle bracket. I wanted to keep the lip for strength and rigidity, but it was to wide to fit between the steps and the fuel tank.

The good news was the existing the frame holes for the original frame brackets matched the holes on the rear angle bracket, so that all stayed. I dry fitted the angle bracket the frame and marked where it met the span bracket on the steps. Both brackets were then removed, welded together and overburden removed. We ended up giving the new bracket a good sanding and cleaning. I primed and repainted the new bracket.

For ease of installation, I removed the top side step from the steel box. I loosely bolted the top step to the new rear support bracket. The top side step was bolted loosely back in its place on the steel box, the rear support bracket to the bottom step and to the frame. Everything was snugged up. I climbed up the steps and it was solid as rock.

The frame attachment is now complete. Everything else pretty much follows the instruction sheet minus the items unique to 939-series trucks.

Note: I removed the steel box door for (1) to sand and repaint and (2) ease of installation. If you choose to remove the door, bare in mind it is a little difficult to reattach once the steel box is installed. So, give a little leeway to assemble the door prior to tightening everything up.
 

Attachments

MyothersanM1

19K M1 Armor Crewman
Steel Soldiers Supporter
1,954
402
68
Location
Culver City, CA
End notes

The box upgrade actually looks better on my truck than I imagined. It is a little different procedure climbing into the cab, but it all works.

The plastic battery boxes are easier to remove than the original set up. There are steel cables that retain the plastic boxes when pulled out to make maintenance easier. I am using the bottom box to store my slave cables.

There are bus bars provided in the kit, which attach to the back of the top compartment. All electrical connections are routed through these bus bars. This makes complete battery removal much easier…no messing around with battery terminals. Using the multitude of cables provided, I replaced the majority of all the older cables. However, I did reuse the existing terminals.

I have a NATO slave connector kit on order and I have to compltet the 12VDC accessory attachment. Those will be the icing on the cake.

I hope I have been thorough enough describing this project. Feel free to contact me if you are endeavoring in this mod and have any questions.

Thanks for viewing this post.
 

Attachments

cranetruck

Moderator
Super Moderator
Steel Soldiers Supporter
10,350
74
48
Location
Meadows of Dan, Virginia
Nice job! I like the tilt feature.
There must be different versions of the M939 series battery boxes, I have a box (junk) that was installed under the passenger seat for four batteries from a '96 M925.
 

islandguydon

Well-known member
Steel Soldiers Supporter
3,724
782
113
Location
Michigan
I aspire to have a battery box like yours. Please let me know if any more of those kits come up and are available. I like the extra storage vault, good place for the slave cables and the like.

You get 1 REP point and 2 Thumbs up from me for your perseverance and ingenuity for a job well done.[thumbzup][thumbzup]
 

MyothersanM1

19K M1 Armor Crewman
Steel Soldiers Supporter
1,954
402
68
Location
Culver City, CA
Nice job! I like the tilt feature.
There must be different versions of the M939 series battery boxes, I have a box (junk) that was installed under the passenger seat for four batteries from a '96 M925.

This kit is designed to replace that battery box set up. I don't think I like the idea of having four batteries in the cab and, especially, under the seat. Take a look at the .pdf instruction sheet, step 3-1...it spells out how the under seat battery box is turned into the BII box. This kit calls for removal of the original 939 BII box, so it is kind of a one for one exchange.

With my install and the fact I'm only using two batteries it lends itself to more storage capacity. If I had to upgrade back to four batteries it is just a matter of installing cables and two batteries.

For you 939 guys I have attached a pic of a 939 upgrade. No, that's not truck in this pic.:sad:
 

Attachments

Last edited:

MyothersanM1

19K M1 Armor Crewman
Steel Soldiers Supporter
1,954
402
68
Location
Culver City, CA
I aspire to have a battery box like yours. Please let me know if any more of those kits come up and are available. I like the extra storage vault, good place for the slave cables and the like.

You get 1 REP point and 2 Thumbs up from me for your perseverance and ingenuity for a job well done.[thumbzup][thumbzup]

PM Sent.

If anyone else is interested, PM me I can forward info I have regarding obtaining these kits.
 

emr

New member
3,211
24
0
Location
landing , new jersey
Very cool indeed, i learned something i did not know for the 939, i think one has to lose a storage box to gain under seat storage, in my 925 i would rather have the storage where it is because i would go into there out side when needed, and when out on road its kind of high to get under the seat and in bad weather no one has to get out. to access tools etc. , batts are fine under there for me, but i think it is super cool though,Now... as for the 809 series, there are the same batt boxs for them and the deuce, plastic upgrades,with out the hardware for the 939 available I had a few sets. the handles can go on the end or the side, I think its cool they made a kit to use them on a 939 series though , thanks for the info....
 

Csm Davis

Well-known member
4,152
376
83
Location
Hattiesburg, Mississippi
From what I can tell that box is for use with the uparmored cab but I have seen some on the 931a1 & a2's some as battery boxes and some as BII boxes. I am going to use a standard 939 BII box on my 816 and move my batteries inside between the seats. My assistants don't like to climb in the trucks with that box on them and I checked the other day with two a1's side beside an the battery box is more awkward to climb than the standard 939 BII box, that all said I enjoyed reading your install and I actually like the look of your box, but with my bad back I need the easy access of the 939 standard box. :driver:
 

MyothersanM1

19K M1 Armor Crewman
Steel Soldiers Supporter
1,954
402
68
Location
Culver City, CA
From what I can tell that box is for use with the uparmored cab but I have seen some on the 931a1 & a2's some as battery boxes and some as BII boxes. I am going to use a standard 939 BII box on my 816 and move my batteries inside between the seats. My assistants don't like to climb in the trucks with that box on them and I checked the other day with two a1's side beside an the battery box is more awkward to climb than the standard 939 BII box, that all said I enjoyed reading your install and I actually like the look of your box, but with my bad back I need the easy access of the 939 standard box. :driver:
Thanks for the compliments. You are right about the steps. It takes a bit getting used to climbing into the cab. The trick is starting with the right foot. The old set-up is easier to use, but I thought the top step got a little precarious sometimes. I had it move under foot a few times which was a little disconcerting.

According to the included literature the kit are designed as a Battery Relocation Accessory Kit for the 939, 939A1 & 939A2 trucks. Doesn't seem like it was particularly designed for up-armored cabs. I do know a guy out West who builds MRAP mock-ups for the filming industry and he uses these boxes on both sides of the frame.
 

Hoefler

Active member
1,096
20
38
Location
White Bear Lake,MN
Get them from ANDY1234-he is a SS fella. I purchased from him-he is in St Loiue. Kit is fully complete and new-no junk. They look great and hardly anybody else has one on their truck. More women are waving at me when they see me now. Pretty sure its my new battery box.
Pete
 
Top
AdBlock Detected

We get it, advertisements are annoying!

Sure, ad-blocking software does a great job at blocking ads, but it also blocks useful features of our website like our supporting vendors. Their ads help keep Steel Soldiers going. Please consider disabling your ad blockers for the site. Thanks!

I've Disabled AdBlock
No Thanks