• Steel Soldiers now has a few new forums, read more about it at: New Munitions Forums!

  • Microsoft MSN, Live, Hotmail, Outlook email users may not be receiving emails. We are working to resolve this issue. Please add support@steelsoldiers.com to your trusted contacts.


Actuator, Air Fan Clutch for M923a1

wheelspinner

Well-known member
Steel Soldiers Supporter
3,744
1,508
113
Location
North Carolina - FINALLY !
Here is the one that wasn't working out of my M936A2. If you are talking the bulb (probe) it ends approx 1&1/2 inches from the base of the main unit. This is an Evans unit.
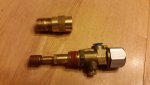
I really needed these pictures today. I had my truck (923A2) hooked up to tow my deuce to NC. Figured I better get a shakedown out of the way so I took the combo about 5 miles for a fuel-up. Coming back up the hill, started getting hot, up to about 220, with no sign of the fan......

I figured the shutter-stat was most likely the culprit and took it all apart, and found no real problem. Hmmmmm.

I did notice that the probe was not tightened all the way in (I mistakenly thought it should be ! ) and tightened it all the way in and tightened the locknut. Seemed like it should be good.

When I went to put it all back together is when I found the REAL problem with mine.......the air hoses were switched in was on out, and out was on in. DOH!

Now the new problem was that by tightening in the probe all the way, it sends the unit to "fail-safe" and runs the fan continuously (This is good to know information)

So........back apart it all comes, now that I know the air hoses were wrong, and most likely the problem all along, I decided I better readjust the probe length (which is why I said I really needed these pictures ! )

After filling the cooling system yet again, and getting it hot enough, finally got the fan working as it should.

So, long story short, never assume anything and check everything. Had I noticed the switched air lines, this would have been a 30 second fix.

Shutter Stat.jpg
 

Alexsha

New member
318
3
0
Location
Cache Valley, UT
For those that have taken apart their actuator, does the 90* outlet elbow have what looks like wire stuffed into it, or should it be completely open like the inlet elbow?
 

Alexsha

New member
318
3
0
Location
Cache Valley, UT
Yes mine had a mesh like filter in it.
The mesh filter is on the inlet side of the actuator body. What I'm referring to is the 90 degree elbow that screws into the outlet. It looked like a 1/8" brass wire was stuffed in there filling the whole thing. I'm going to take it apart again tomorrow for a better cleaning and I'll take a picture.
 

bigwhale

New member
26
1
0
Location
alaska
If you do the electric manual switch conversion , correct me if im wrong , but would'nt the supply air (120psi) from truck that crosses over the top of the engine have to be constantly leaking (have to be forced to vent to atmosphere ) to keep the fan in an "off, not engaged" position? Where did you pipe in the vent(output of the switch when bypassing the supply to the fan clutch) to keep it from venting and wasting air ? It seems that when you manually bypass the actuator with the engine running ( I tried this) and supply the raw compressed air from the engine to the fan clutch it causes the fan to engage and lock to cool the engine, therefore if you have this conversion with the electric switch mention above, you would have a constant air leak to the atmosphere to keep the fan from engaging when the engine is below 190 degrees?? Please confirm this. Thank you. Please take some pictures of the piping.
 

M35A2-AZ

Well-known member
Steel Soldiers Supporter
3,213
381
83
Location
Tonopah, AZ
If you do the electric manual switch conversion , correct me if im wrong , but would'nt the supply air (120psi) from truck that crosses over the top of the engine have to be constantly leaking (have to be forced to vent to atmosphere ) to keep the fan in an "off, not engaged" position? Where did you pipe in the vent(output of the switch when bypassing the supply to the fan clutch) to keep it from venting and wasting air ? It seems that when you manually bypass the actuator with the engine running ( I tried this) and supply the raw compressed air from the engine to the fan clutch it causes the fan to engage and lock to cool the engine, therefore if you have this conversion with the electric switch mention above, you would have a constant air leak to the atmosphere to keep the fan from engaging when the engine is below 190 degrees?? Please confirm this. Thank you. Please take some pictures of the piping.
Yes you are right, the system has to vent the air when it turns off.
I just went though this with my AC install. You have to use a solenoid that vents when it closes.
 

Attachments

bigwhale

New member
26
1
0
Location
alaska
Thank you M35-A2 , but there was a member here whom set up an air solenoid system with a manual switch in the cab that im thinking that must be normally closed that blocks the air from going through to the inlet side of the fan clutch to "trick" the clutch in not sensing air so that it does not lock on. My currently defective air actuator in my 923 , constantly supplies air to the fan clutch thus engaging the fan. Im wondering if someone here has a parts list and pictures other than the current ones on this thread that show the routing of the pipes/hoses with this modification along with the wiring and mounting of the air solenoid. Im thinking an ordinary single pole solenoid that is normally closed 24 volt would work, but where to mount it? With the fan constantly on , the motor looses some horses that it desperately needs and leads to premature wear of the fan clutch.
 

M35A2-AZ

Well-known member
Steel Soldiers Supporter
3,213
381
83
Location
Tonopah, AZ
I also put a manual switch in my cab to turn on the fan. Yes the solenoid needs to be a n/c one.
But most of the truck ones will do both, you just have to move the vent.
I do have the stock actuator if you need one, I'm going to switch over to all elec. ones in my trucks.
 

bigwhale

New member
26
1
0
Location
alaska
I am thinking of doing the same, but need some kind of part list and how you constructed yours. It looks like in your previous picture , that you have a thermostat controlled electric tap into the water crossover piping then two electrical leads going to a flat solenoid but thats where the usefulness of the picture stops, how did you connect it and where did you get the thermostat from and what kind or brand of solenoid is it? What do you mean by moving the vent? If I was to place the solenoid inline with the truck's air compressor supply and the exit air line going directly to the fan clutch and with the electrical portion via manual cab switch controlling the air portion and you energize the switch (close) it will send the supply air opening the solenoid to the fan clutch engaging the fan. The problem I see here is that when you are done cooling the engine via cab switch, the air will stay bottled in the exit portion between the fan clutch and the output of the solenoid with no way to exit and keep the fan running , when its no longer desired. I am curious how persons here are doing this.
 

M35A2-AZ

Well-known member
Steel Soldiers Supporter
3,213
381
83
Location
Tonopah, AZ
You are over thinking this like I did before the little light came on.
You just remove the stock fan actuator and put in a two wire elec. fan switch.
Then you use the same hoses that went to the old actuator and hook them up to the solenoid. set it up for n/c.
No new hoses to add.
The solenoid can be used as a N/C or N/O all you do is move the vent on the solenoid to the right port.
For the A0 and A1 trucks use a 190 and the A2's use a 200 degree.
This way the truck can turn on the fan or you can turn on the fan.

I used a parker C3DK1175DC23AD solenoid
and a Horton 190 degree fan switch 993617

Do not make fun of my drawing, LOL
 

Attachments

bigwhale

New member
26
1
0
Location
alaska
M35 AZ --- Doing some more thinking about what you did to your truck. You mentioned using a N/C thermal switch which means 24 volts will be continuously supplied energizing the solenoid , so if the solenoid is n/c which means that the air is halted to the fan clutch preventing air passing to the clutch to lock the fan on. When the temp gets to 190 degrees the juice stops flowing to the solenoid and it opens the N/C solenoid letting air pass through to the clutch activating the fan? Am I thinking right here? And also the NPT sizes that the solenoid has are female so the existing connections on the air hoses fit right in without an adaptor? Please confirm. Thanks again! If you have more picts of what you did that would be great also.
 

M35A2-AZ

Well-known member
Steel Soldiers Supporter
3,213
381
83
Location
Tonopah, AZ
M35 AZ --- Doing some more thinking about what you did to your truck. You mentioned using a N/C thermal switch which means 24 volts will be continuously supplied energizing the solenoid , so if the solenoid is n/c which means that the air is halted to the fan clutch preventing air passing to the clutch to lock the fan on. When the temp gets to 190 degrees the juice stops flowing to the solenoid and it opens the N/C solenoid letting air pass through to the clutch activating the fan? Am I thinking right here? And also the NPT sizes that the solenoid has are female so the existing connections on the air hoses fit right in without an adaptor? Please confirm. Thanks again! If you have more picts of what you did that would be great also.
Sorry if I said that, but on the M939's you need to use a N/O solenoid.
Some over trucks you may need to use a N/C solenoid.
 

Ford Mechanic

Active member
1,805
6
38
Location
Edenton, NC
How about use a front axle engage switch and just have some air lines made up. I would bet it would be just as cheap and alot simpler. The axle engage switch already has the auto vent when you turn it off also.
 

Ford Mechanic

Active member
1,805
6
38
Location
Edenton, NC
My air actuator failed recently and I just got a replacement from Memphis Equipment for $177. Has anyone used this unit? From the numbers stamped on it, it looks to be a 200*F unit. And with the adapters they sent with it it looks to be a little shorter when assembled than the stock unit.


Pics coming I've got to look it up to remember how to do it in tap a talk. ....
 
Last edited:

Floridianson

Well-known member
Steel Soldiers Supporter
7,390
2,437
113
Location
Interlachen Fl.
How about use a front axle engage switch and just have some air lines made up. I would bet it would be just as cheap and alot simpler. The axle engage switch already has the auto vent when you turn it off also.
Ran that buy in post #83 and to me that would be the K.I.S.S.
Also there is the lift axle air switch that would work.
 
Last edited:

bigwhale

New member
26
1
0
Location
alaska
I put in the 24 volt solenoid and mounted it on top of the crossover pipe where the top radiator is bolted . I temporarily disconnected the ether button to hooked the power to the solenoid to the existing ether pushbutton. It works like a champ! The fan engages when i push the ether button when i push and hold it. When I get the cash for the thermal switch that will be placed inline with the normally closed solenoid. You need a normally closed solenoid 24 volts the parker # 71315SN1GN00 24V-DC 1/8 IN SOLENOID VALVE. The existing air lines mate right up without modification. It cost me $6.80 + shipping. Thats the way to do it without paying huge bux for a replacement fan actuator. I plan on taking out the push button and putting a toggle in its place to keep it on when needed. You will need a normally open 190 horton type thermal switch that closes when engine heats to 190 degrees then it completes circuit and energizes the solenoid.
 

Strouty

Member
55
10
8
Location
Maine
I am having trouble with air leaking and it appears that it is the fan actuator/shutter valve. I took mine apart and cleaned it. When I was trying to disassemble it I was not sure how it all came apart, so I loosened the thermal probe nut (jam nut?) and then realized a good smack on the bench was how to get the inner valve apart. When I put it back together, I tightened the nut, but someone here said that makes the fan stay on all the time. Where is the nut supposed to be on the probe? Should it be a little loose or what?

I put new o-rings on for the two smaller ones, but the third larger one doesn't look like an o-ring, it looks flat. Is this because it is worn or is it a special seal?

Regardless, after getting it all back together it is constantly venting out the hole in the end of the unit and still bleeds the air down in a few minutes after turning off the truck.

It will be easy to take apart now, so any suggestions for me?
 
Top
AdBlock Detected

We get it, advertisements are annoying!

Sure, ad-blocking software does a great job at blocking ads, but it also blocks useful features of our website like our supporting vendors. Their ads help keep Steel Soldiers going. Please consider disabling your ad blockers for the site. Thanks!

I've Disabled AdBlock
No Thanks