• Steel Soldiers now has a few new forums, read more about it at: New Munitions Forums!

  • Microsoft MSN, Live, Hotmail, Outlook email users may not be receiving emails. We are working to resolve this issue. Please add support@steelsoldiers.com to your trusted contacts.


Adding An Auxiliary Fuel Tank - M1028

combat jump

Member
143
4
18
Location
Raleigh, NC
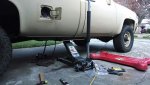
The tank is ready to install

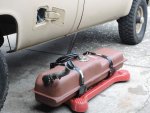
The brackets are from LMC Truck. I also sprung for the "silencing pads" which appear to be nothing more than tar paper. They fit under the steel straps.

Adapting the filler neck hose assembly (a junkyard find) to fit this model of Chevy took some doing. I'll find out if its all correct when I lift the tank into place.

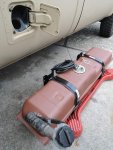
The top of the sending unit has two terminals that I am not familiar with; and that take a special type of connection. One is for an internal fuel pump (not used in this model), so nothing is connected. The other is for the sending unit. I soldered a wire to this (not having the connector) and coating it with "liquid tape" to keep it water tight. Silicone caulk was my second option.

The hoses are a bit long. I'll cut those to length once the tank is attached.

Not shown is a hole I drilled through the engine firewall near to route some wires. I'll get a photo of that later. This will be for the selector switch. I'm thinking of putting the switch in the plastic dash, sharing the same area as the ammeter.

I hope to finish this next weekend.
 

Attachments

combat jump

Member
143
4
18
Location
Raleigh, NC
Tank is in.

The tank is in. Plumbing and electrical work remain.
Note that the brackets are different (front and rear), and front strap bolt goes into a different hole in the bracket than the rear does (doh!) My pic from yesterday shows the wrong hole. It should go into the lower of the two holes (just like the main fuel tank).

The bracket nuts are difficult to get a wrench on (or get the washer and nut started). I used a pair of fish hook removing pliers to reach between the tank and frame to hold the nut.

I used a board across the jack so as not to dent the bottom of the tank - its thin metal.
 

Attachments

1956_4x4

New member
368
0
0
Location
Crestview, Florida
The tank is in. Plumbing and electrical work remain.
Note that the brackets are different (front and rear), and front strap bolt goes into a different hole in the bracket than the rear does (doh!) My pic from yesterday shows the wrong hole. It should go into the lower of the two holes (just like the main fuel tank).

The bracket nuts are difficult to get a wrench on (or get the washer and nut started). I used a pair of fish hook removing pliers to reach between the tank and frame to hold the nut.

I used a board across the jack so as not to dent the bottom of the tank - its thin metal.
Good info on the brackets. Thanks.

Smitty
 

combat jump

Member
143
4
18
Location
Raleigh, NC
Put a Fork In It - Its Done!

This is where I drilled a hole through the firewall (an inch below the paint spot) to route the two switch wires. I used 16 gauge wire for all (18 is required by the valve, so "if more is better, too much is just right").
Actually, I drilled from inside the cab. Remove the glove box and drill small pilot holes to locate the right place. The cable protector seen in this photo is the actual run I had installed. I also put a rubber grommet in the hole to prevent chafing.
IMG_20140216_105925283.jpg

This is the switch (salvaged from another dual-tank Chevy at Pick-N-Pull). Using an air cut off tool, I cut, then filed an opening in the aluminum panel (painted black - thought it was plastic) in the same rectangular opening as the ammeter.
IMG_20140216_100208281.jpg

Notice the white zip ties - necessary to keep the switch from coming apart. Get one, and you will see why.
IMG_20140216_100232390.jpg

Here is how it looks with the switch mounted in the panel. Some filing and grinding required.
IMG_20140216_100255747.jpg

I also taped and labeled the leads from the valve connection (per the instructions included with the valve) so I wouldn't screw something up while under the truck. It didn't help: I managed to connect the "Aux Sending" to the "Fuel Gauge" wire anyway... BUT... due to my labeling, I quickly found out why my half-full main tank read overfull on the gauge, and changed the connections. Then it worked!
IMG_20140216_100358056.jpg

I added a 10 amp fuse holder (connects to the switch, per the diagram included with the valve) before connecting to 12V. No fires needed, thank you.
IMG_20140216_101502811.jpg

This is how the valve looks when wired up. Use a ratcheting 1/2" dog bone wrench to attach the valve (trust me on this: if you don't have one, buy one before attempting this!) I used small "C" clamps and vise-grips to clamp the hoses before cutting them to insert the valve. Turns out that only a small amount of diesel dripped out, and they were not needed.
IMG_20140216_124425389.jpg

Another look at the finished dash switch.
IMG_20140216_111029595.jpg

The cover plate installed, the valve and wiring is protected. I used cable armor whenever possible, and zip-tied the cables to keep them out of the way.
IMG_20140216_125745926_HDR.jpg

Also, I sealed every connection with "liquid tape" to water proof the wiring. I fully expected to have to bleed the fuel lines, but the truck started with no hiccups! Next, I'm driving down to fill my new 20 gallon tank.

Overall, I've been wanting to add more fuel storage for 3 years. I have tried adding a bed mounted transfer tank (it leaked), and finally opted for the under bed aux tank. This way, no space in the bed has to be given up for a transfer tank. The switch is on the dash, and changing tanks could not be easier. All the parts are available, and anyone with reasonable skills can do this. I am glad to have 40 gallons of diesel in by truck now!
 

Attachments

Last edited:

Recovry4x4

LLM/Member 785
Super Moderator
Steel Soldiers Supporter
34,014
1,814
113
Location
GA Mountains
Does the gauge get wired through the switch? Looks excellent and that extra 20 gallons pushes you past kidney capacity.
 

combat jump

Member
143
4
18
Location
Raleigh, NC
Recovery,
You don't need to touch the gauge in the dash - just cut the wire from the main tank, and route it to the connector to the new tank selector valve. The valve connector has an output that then splices into the cut wire to the gauge. This way, when you select the tank with the dash switch, the gauge is also changed to the selected tank!
 

combat jump

Member
143
4
18
Location
Raleigh, NC
Follow up: Well, the tank has been in for one year and working great! Just a single glitch early on -I discovered that selecting a tank with the dash button would cause the fuel gauge to display the opposite tank! (I knew which was fuller). All it took was to swap the wires at the valve under the truck to from the correct sending unit. I HIGHLY recommend this upgrade! It is such a relief to know that when I'm on a long trip and getting low on fuel, that an extra 20 gallons is only a dash switch select away.
 

Atrange07

New member
13
3
3
Location
Cedar Rapids/ Iowa
do you think you could write a up a complete parts list of what you used?

Also for whoever said put on the passenger side 20 gallon and the suburban 40 gallon between the frame. would you need to wire in two switch and 2 valves to be able to switch to all 3 different tanks?
 
Last edited:
Top
AdBlock Detected

We get it, advertisements are annoying!

Sure, ad-blocking software does a great job at blocking ads, but it also blocks useful features of our website like our supporting vendors. Their ads help keep Steel Soldiers going. Please consider disabling your ad blockers for the site. Thanks!

I've Disabled AdBlock
No Thanks