kiotiugly
New member
- 21
- 0
- 1
- Location
- Western Kentucky
I noticed the other day that my truck, which is still very much new to me, seemed to have too much air pressure - the gauge in the cab was pegged out beyond 120 psi. I looked on the site and found the information for adjusting the air governor. I tried last night, and here's my questions:
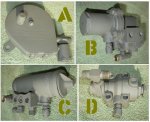
1. Is the governor located on the firewall inside the engine compartment (maybe just to the passenger side of center)? I know this is a silly question, but if it is, the governor on my truck looks somewhat different than the one shown in the TM.
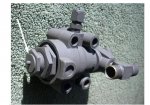
2. I tried to adjust the governor (if that is indeed what it is) as the manual indicated - loosen the jam nut, turn the screw (although on mine, it is another nut) and tighten the jam nut.
3. After doing the above, I started the truck and it run the PSI up to about 70 - so I re-adjusted and go the psi to level off at about 100-105. I thought that I had fixed the problem.
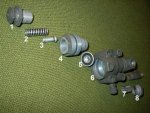
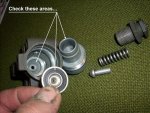
4. Then I started hearing a *POP*-shhhhh noise followed by a *click* about every thirty seconds. I checked at the governor (or whatever it is I adjusted) and that is where the air *POP*-shhhh is coming from - I can feel the air come out of it through the end, which has a little rubber cover over something that looks kind of like a grease fitting.
So here's the crux of this:
Did I indeed adjust the governor? Are there different types of governors?
Why is it making that air-dumping noise?
Is that noise okay or a sign of something bad? I never noticed that it made that noise before, but the gauge was always pegged out too. Maybe it just made it, but a lot more infrequently.
Thanks for all the help. Take care.
1. Is the governor located on the firewall inside the engine compartment (maybe just to the passenger side of center)? I know this is a silly question, but if it is, the governor on my truck looks somewhat different than the one shown in the TM.
2. I tried to adjust the governor (if that is indeed what it is) as the manual indicated - loosen the jam nut, turn the screw (although on mine, it is another nut) and tighten the jam nut.
3. After doing the above, I started the truck and it run the PSI up to about 70 - so I re-adjusted and go the psi to level off at about 100-105. I thought that I had fixed the problem.
4. Then I started hearing a *POP*-shhhhh noise followed by a *click* about every thirty seconds. I checked at the governor (or whatever it is I adjusted) and that is where the air *POP*-shhhh is coming from - I can feel the air come out of it through the end, which has a little rubber cover over something that looks kind of like a grease fitting.
So here's the crux of this:
Did I indeed adjust the governor? Are there different types of governors?
Why is it making that air-dumping noise?
Is that noise okay or a sign of something bad? I never noticed that it made that noise before, but the gauge was always pegged out too. Maybe it just made it, but a lot more infrequently.
Thanks for all the help. Take care.