• Steel Soldiers now has a few new forums, read more about it at: New Munitions Forums!

  • Microsoft MSN, Live, Hotmail, Outlook email users may not be receiving emails. We are working to resolve this issue. Please add support@steelsoldiers.com to your trusted contacts.


Another One Bites the Dust ... New M37 Owner

100acre

Member
442
16
18
Location
Bonners Ferry, Idaho
m37

I am currently bugging someone to sell me a 1949 m37 in great shape what would be a fair price to pay? A picture of it is in my albums when it was in service to a fire dept and has since been parked in a barn. Tanks a lot.
 

Attachments

nattieleather

Well-known member
1,884
134
63
Location
Cleveland, OH
Must be the way the truck was sitting and the way the picture was taken, but it looks a little off. If it can be made to run and is in fair condition I'd give $1500-2000 for it. That's just what I would pay.
 

Oldfart

Active member
1,063
26
38
Location
Centennial,CO
Its probably not a 1949. The following is from Wikipedia

The six prototypes of the vehicle were produced in early to mid 1950 based on the WC series Dodge vehicles used in World War II, with the first pre-production pilot vehicle rolling off the assembly line on 14 December 1950.[3] Many of the components on the M37 are similar or identical to the World War II vehicle and many deficiencies of the previous series were corrected in the M37. Notably, a conventional pickup truck style bed replaced the platform on the World War II vehicle, simplifying production. The powerplant was identical to the World War II era WC vehicles line, as was most of the drivetrain. The straight-six cylinder engine was derived from a 1930s era passenger vehicle engine that was widely produced. This was in line with a long standing military procurement strategy that attempted to use commercially produced vehicle variants in military service. Many of the accessories on the M37 engine are identical to the engines from that era. There was significant drivetrain and powerplant commonality with the WDX series civilian Power Wagons. Outside of the fenders, there were sheet metal differences between all the vehicles.
Production of the M37 began in earnest in January 1951, with approximately 11,000 vehicles produced by the end of the year. By mid-1954 63,000 of the vehicles had been produced. In 1958 a number of modifications to the design resulted in the new vehicles being designated as M37B1. From mid-1958 until the end of production 47,600 M37B1 vehicles were produced. Approximately 4,500 Canadian M37CDNs were also produced between 1951 and 1955. These vehicles continued in service worldwide in the Israeli and Greek militaries.
In total, between 1951 and 1968 115,000 M37s were produced. Spare parts for these vehicles are widely available and inexpensive to procure. Many deficiencies with aging design became apparent in the 1960s, including a tendency of the connecting rods to fail at high rpms due to the long cylinder stroke of the engine. As the average speed of the vehicles in the military increased, these engine failures became commonplace due to the low gear ratio of the vehicle, which was originally designed as a multipurpose vehicle capable of transporting heavy loads of ammunition. It was common in the 1970 and 80s to encounter many of these vehicles with failed engines in government auctions. Many of the vehicles were transferred to civilian agencies and some are still in use today in rural
 

1943ht

Active member
478
94
28
Location
Batavia, OH 45103
Wendell, good to hear from you .. sad news, but what a privilege to have meet the SGT at the parade ..I remember that he could still fit into his WWII Uniform and he wore it with great pride that day .. A true American Hero.
Appreciate the box find .. can you e-mail me at mkoloc44@yahoo.com and let me know the particulars so we can get that shipped here for the HT

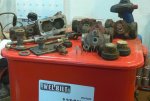
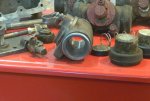
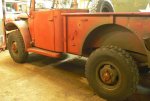
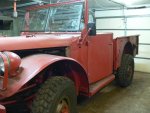
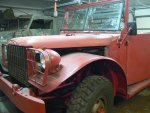
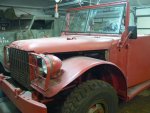
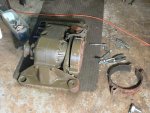
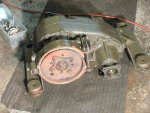
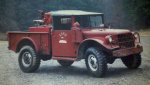
Zout, your project vehicle looks incredible .. glad to see that engine in place .. PB told me the engine that I picked up for you was a no go .. bummer, was hoping it was good .. at least the components on it were usable as the other engine that I donated from my 37 project proved to be usable even if it was bored out at one time .

OF Concur on the manufacture date WC vs M37 .. interesting fact regards the thrown rod/high RPM info .. might explain why so many of these engines have been bored out after being sold by Uncle Sugar.

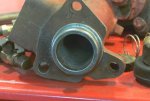
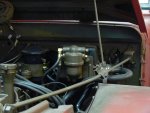
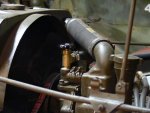
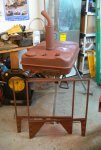
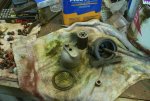
Started on my fuel system this week .. knew my tank had a couple of pinhole leaks after going thru the sandblast, so I yanked it and did some cleaning of the bad areas and soldered the holes up … hot water cleaned the tank at the local car-wash and then used Muratic acid to clean the interior ..couple of more rinces, and the tank looks like new .. Went thru the fuel pick-up unit, filter cleaned inside and out and new gasket and installed a NOS fuel sending unit. The filter material is interesting stuff on the fuel pickup unit in the tank and is the same material used in the fuel filter on the firewall.

Went thru all the fuel lines and the vapor lines from the front of the vehicle and the firewall fuel filter to the tank as I had gone thru the other lines during the engine rebuild .. used Acetone and air to do the final rinse and the lines came out clean as a whistle .. would have been a big mistake to have just soldered the tank and installed without cleaning the interior of the tank and the fuel lines as there was a build-up of old fuel gunk from sitting all those years and sediment in the tank.

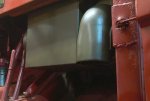
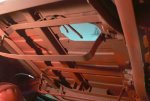
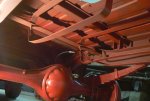
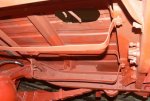
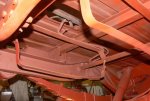
Last part of this project before I paint and install was cleaning and priming the tank area underside of the M37. Wire brush, scraper, lots of elbow grease and then a wipe down cleaned the area nicely and it is now primed.

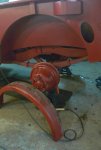
Yanked the rear fenders so that I can replace my welting and prime and paint that area when I paint the tank area …

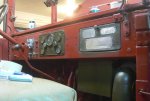
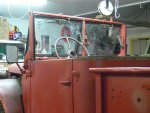
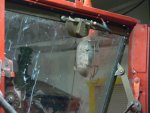
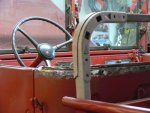
Last week went thru the door hardware and window frames to include all of the mechanism and adjusted the door hinges. Window frames are primed and ready for paint .. Will paint when I do the tank and the underside of the M37. Have all new window sweeps, clips and door gaskets to install after paint.
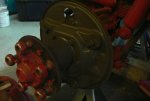
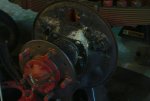
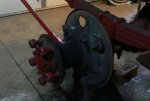
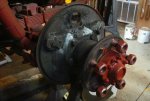
Brakes are next.
 

Attachments

Last edited:

Oldfart

Active member
1,063
26
38
Location
Centennial,CO
43 Half Tack (Still marvel over that find)
Your tank rebuild looks really nice. It is interesting that you found a fuel filter in the tank to be the same as the one on the firewall. Ghostdriver's M43 tank filter is a sort of organic molded fiber porous sleeve. My M37 firewall filter is a series of thin brass sheets cut out in a pattern to allow fuel to be screened. Hard to describe how the thin brass sheets are stacked to make a fuel screen. They are held together much the same way as the filter in the fuel tank. I wonder if the later firewall filters went to the porous sleeve.
 

1943ht

Active member
478
94
28
Location
Batavia, OH 45103
OF, let me clarify, I too have that porous fiber filter element in both the tank and firewall filter ... same shape on both but slightly different internal mounting hardware as the tank filter is designed to accommodate the fuel-line pick-up.. the copper disk filter you describe is similar to the fuel filter on my halftrack ... must be around a 1000 very thin discs stacked on one another in that filter and the filter itself is very big..not something you'd want to drop when its apart 8)
 
Last edited:

Oldfart

Active member
1,063
26
38
Location
Centennial,CO
OF, let me clarify, I too have that porous fiber filter element in both the tank and firewall filter ... same shape on both but slightly different internal mounting hardware as the tank filter is designed to accommodate the fuel-line pick-up.. the copper disk filter you describe is similar to the fuel filter on my halftrack ... must be around a 1000 very thin discs stacked on one another in that filter and the filter itself is very big..not something you'd want to drop when its apart 8)
43HT
Yes, it would not be good to spread those disks around or get them bent. I am guessing the differences in the firewall filter would be that the porous fiber filter is a newer design used beyond some issue date as an improvement. I did notice that when we worked on all the tar like goo we found in Ghostdriver's M43 tank the porous fiber filter dried out and got larger. We spent lots of time cleaning and making sure the pores were open, then we set the filter aside for several days while we worked on the tank. I checked Ghostdriver's assembly of the filter and it was nice and tight when it was finally put back in the tank. We had difficulty getting fuel to the fuel pump so we pulled the filter pick up assembly again and we found the filter had shrunk so it was loose in the bracket assembly. We re-tightened the assembly and it remained tight through the several days we were fiddling with the fuel lines. Our fuel delivery problem was the fact our lines were all dry and we had no prime to the fuel pump. Lots of hand pumping just would not create any kind of suction in the line to move fuel forward. We primed the lines with an elevated gas can and a rubber hose to the tank line and every thing was operational until we suffered our engine breakdown.
 

1943ht

Active member
478
94
28
Location
Batavia, OH 45103
Gutted the dashboard wire the last couple of days .. rebuilt my own harness for the Circuit breakers and cleaned all those connectors before reinstalling.

I actually wired up two separate leads with Parker connectors off of the 2 circuit breakers that are not in current use on the truck .. one of them is going to be used for the original spotlight and pedestal that is being mounted on the driver side fender, going to use the other lead for my cab heater blower power source .. the heater has the resister built into the fire wall but I will have the option to use the lead for power to the resister .. :idea:

Not sure how that will work as I may have to wire that directly to my power side of my battery switch due to amperage .. believe those breakers are all in the 15 amp range but at least I have the option .. the other thought was to use that lead for an interior light that I picked up( from a 113 or Tank) .. Blue/White lens combo .. brand new and 24 volt with Parker connections .. would come in handy on my trip

Also installed my 1957 NOS ((Douglas Connectors) front harness .. and made all the connections to the refurbished light and ignition switch, rebuilt headlight harness and refurbished front lights and BO driving lamp ... everything has gone together as it should except for some sharp stuff under the dash .. hands and fingers have taken a beating ..

Good Item: NOS harness was very inexpensive and still in the original Dodge box ..
bad Item: Most of the original tape labels had dried up and fallen off the wires .. my ohm meter has taken a beating aua .. lots of patience (NOT) later everything is traced and labeled with small tape tags .. wish I could find some of those little metal number tags so that I could do a more professional job on the wire marking .. apparently some replacement harnesses did not have those metal tags and for my homemade rear harness that would also be handy

Also went thru and rebuilt my voltge regulator harness .. went from a 4 wire to 2 wire harness as my truck no longer has a rectifier or AMP meter

Rear harness is all laid out (no metal number tags) :deadhorse: and I will began soldering and crimping my wire ends after the holidays and my honeymoon :beer:

Finished up my headlight dimmer switch this AM and reinstalled .. last that I can do due to holiday commitments.. Was impressed by how solid that switch construction is .. mounting screws came right out with a little WD-40 application .. OHM meter test shows all the circuitry to be intact on the switch .. been making a judicious use of dialectic grease on reassembly of all my wire components .. its very helpful with all the connections!

CHEERS and Happy Holidays To All!!!
 
Last edited:

1943ht

Active member
478
94
28
Location
Batavia, OH 45103
M37 Update

[FONT=&quot]M37 Update: Heater rebuilt and reinstalled (Yes, I painted everything behind before I installed) to include the original rebuilt fan control switch and a new 24V blower motor (Napa). Dash panel completed (Oops, Need to remove tape from the gauges) to include all new wiring harness new bulbs.. everything works now to include the panel bright and dim lights and high-beam indicator.[/FONT]
[FONT=&quot]
[/FONT]
[FONT=&quot]Tore into the brake system this past weekend and was very impressed with the simplicity and rugged design. I especially like the hub removal system built into the design, insert three bolts and the drum come right off. Was hoping to be able to rebuild my master and wheel cylinders, but after taking a couple of the wheel cylinders and the master cylinder apart, I’ve determined that the bores are too pitted to be rebuilt and the aluminum pistons are badly pitted/corroded and in a couple of cases they are missing chunks of their outside edges. The master cylinder has a rebuild tag dated 7-66 and marked rebuilt at Ft. Benning. Won’t compromise on these components and even with the cylinder hone and lots of effort, the bores still had pitting and if rebuilt I believe that I’ll eventually have leaks, mushy brakes and in a “Worse Case Scenario” brake failure if I need to push them in an emergency stop.
[/FONT]
[FONT=&quot]
[/FONT]
[FONT=&quot]I decided to just go with NOS all the way around. Have reviewed some interesting threads on SS regards M37 brake system re-builds and I’ll be sure to go thru each NOS component before I install. Understand that others have found cups installed backwards and other stuff in NOS brake parts. Will also ensure that I coat all those components with new brake fluid before installing. Using DOT 3 as I have a couple of gallons of new stuff in the shop and that was the type used on the M37 brake system when she was re-built in 66. John at Midwest has all the goodies I need and I’ll pick those items up on WED after my VA appointment …plan on returning the rebuild kits I picked up there in SEP as I now have no need for them![/FONT]
[FONT=&quot]
[/FONT]
[FONT=&quot] Have lots of clean-up to do on each wheel backing-plate and it looks like the left rear axle seal has been leaking. The brake drums are in excellent shape with absolutely no appreciable wear and they are as smooth as the proverbial baby skin [/FONT]J[FONT=&quot]. Have new brake shoes to install, but to err on the side of caution, I plan on replacing all of my axle seals before installing the new shoes and NOS brake goodies. Did the first one last night, drivers side front is done and ready to go. That will also give me the opportunity to examine, check and repack or replace my wheel bearing as needed and to change out the gear lube in both of my axles. . PIC’s attached.[/FONT]

[FONT=&quot][/FONT]
[FONT=&quot]Cheers, Markus
[/FONT]
 

Attachments

1943ht

Active member
478
94
28
Location
Batavia, OH 45103
Weekly Update

Brakes rebuilt and bled and seals replaced... used a neat little bleeder kit that I picked up at O’Riley Auto... kit with all kinds of goodies, adapters, fittings hoses etc. Just attached it to the bleeder and pulled vacuum until all the air was bled out. Brakes are firm and after adjustment of the brake shoes are ready to be broken in on the drums. I have to adjust the emergency brake next.

After finishing the original fuel filter and installing with a new bowl gasket on the firewall mount in front of the voltage regulator, I used that same vacuum pump and brought fuel from the repaired / sealed / installed fuel tank up to the filter using that pump. I then disconnected the fuel line from the carb, inserted a kit fitting onto the line and pulled fuel up to the carb from the filter and the tank as the system is a sealed. Slapped the line back onto the carb and twisted her tail... with a little choke she started right up and for the 1st time since I started the project ran on fuel from the gas tank.

Let the beast run for a good 20 minutes. The fuel gauge indicated about ¼ tank of fuel which would have been correct given the 6 gallons that I poured into it. AM-Meter showed a nice charge from the generator and the temp gauge was registering around 160 degrees. The Oil gauge was not functioning and I am pretty sure that my oil sending unit has to be replaced.

One thing I noticed was that the engine seemed to be running a little rich on idle... adjusted the idle mix screw but other than a change in RPM did not notice any significant change in the smell... any suggestions on my options. I have not put the engine on timing light yet and that may be the issue... but I’m pretty convinced that I need to lean out the carb.

Installed my NOS battery box this afternoon and a new ground cable. I have 2 new Optima Batteries that I will be installing next week as soon as they ship. Decided that I’m going to design aluminum billet housing for them that will keep them nice and snug in the box. The B-Box lid is used and I had to do more than a little tweaking to get it to fit nicely and to latch and open on the two hinges. I’ll shoot some Pics when the batteries arrive and are installed next week.
 

1943ht

Active member
478
94
28
Location
Batavia, OH 45103
Project Update

Baby has a new pair of shoes :D

Finished priming and painting my wheels Wed... Installed new liners and tubes and then took 5 tires and wheels over to the local TA Truck stop and installed the tires... they have a cage and I felt better about using that to seat the new tires.

Installed the water shut-off for the heater and hooked up the hoses … I have heat and the new blower really puts out.Finished my windshield frames and the new rubber installation and slapped them both into the frame.

Was so excited that I decided to take my baby for her 1st run :beer:

Check this out: Its 12 degrees here this afternoon with a wind-chill of about 100 below zero... I slapped on a pair of denim overalls, a balaclava, gloves and sunglasses and climbed into the open cab and cranked my baby up. She snorted to life with the 1st try and was ticking like a Swiss watch... I backed out of the shop and within 3 minutes my poor testicles had shriveled up to the size of raisins as they sought “Shelter from the Storm”. :grd:

Julie and the pups were watching from the front door glass as I flipped on my lights and eased down the driveway. I swear she was wearing one of those black arm band thingies, the kind you see on widows after a funeral.

Headed into town to the ‘Quick Trip” gas station combination convenience store. That trip is 3.6 miles from the house (one-way) and I felt every frozen inch as I ran my baby thru the gears. Hit a top end of 35 before my face drop off from the wind-chill. Pulled into the station, went inside and left the M37 idling.

Several comment’s later about how cool the truck looked and some very sympathetic looks (You know the kind of looks people give the victim at an accident scene) :oops: from patrons and staff watching thru the glass. I gratefully sipped a nice hot cup of coffee on the house and then ventured outside and filled my rebuilt fuel tank. Proud to say no leaks anywhere and again several cars drove by in the lot and stopped to comment... Of course I noticed that not one single person got out of those cars to get a closer look … There’s Your Sign, Markus.

Drive back was even colder and the sh*t eating grin on my face was still frozen in place when I hit the garage door opener and drove into the shop, stopping nicely on that new rebuilt brake system. I am now sitting down in my family room with a nice glass of scotch having just climbed out of a very hot shower and having crawled into my thermals... the shivering has subsided, and am now trying to talk Julie into going for a spin with me tomorrow. Just heard some muttering about being committed…not sure what that’s about! aua
 

Attachments

1943ht

Active member
478
94
28
Location
Batavia, OH 45103
More Progress

Took my second spin yesterday afternoon as the weather warmed up to a balmy 40* and noticed during my short but sweet run that the temp gauge was pushing 200* .. thought Ummmm should be at 160.

Pulled her into the shop and puled the thermostat .. NOS from Dodge Power Wagon that was installed during the engine rebuild .. cleaned the gasket area up and made a new gasket.

Decided to test the thermostat so I heated up some water and threw in a thermometer .. when the water hit 160* suspended the thermostat and nothing happened .. kept it the pan of water and it finally opened at 190* .. which would consistent with the 200* reading on the gauge. Swore I ordered a 160 thermostat .. but can't say with complete certainty as my invoice and other paperwork from GA is still packed away.

This AM, I checked the M37 cross-parts list and found a 160* Napa thermostat (THM-55) for $8 at my local Napa dealer. Installed it this afternoon and she is now running right at 160*.

Finished the battery box installation this evening and snapped a couple of pics I decided to go with Optima batteries as I am using them in my M818 and like the way they hold a charge and how well they hold up under more challenging conditions ..
 

Attachments

Last edited:

1943ht

Active member
478
94
28
Location
Batavia, OH 45103
Update

Have driven my project several times in the last week and have noted a vibration in the drive-train. Ran the beast over to my buddy Todd’s farm as he has a hoist in the shop and I have never had my baby up high enough to really check things out.

Loosened up all the drain and fill plugs on the axles, tranny and the transfer case so that I could change out the gear lube .. couple of the fill plugs are toast and were replaced on the spot. Had planned on replacing all of my U-Joints and while looking things over found that I could move the transfer case at least a half inch in the mounts. After looking that over determined that it had only three of the four bolts attaching it to the two cradles and two of those bolts were loose even with the wire ties.

Dropped the drive-shaft's and the transfer case Monday and from the amount of dirt in the bolt hole of the missing bolt, it has probably been missing for years. In fact the three remaining bolts are almost worn in half from all of the movement over time and it would have been only a matter of time before they would have failed.

I finished cleaning up the transfer case today to include installing a new Emergency Brake and much needed hardware. Dropped the 3 shafts off at the local machine shop so that I could get the new bearings pressed in. Mike is set up for that and has better equipment for that task. Bearings were much better price at Midwest Military rather than Napa or Car-Quest and the Neapco# 2-1400 (2 lgh. X 1.231 dia. Cap) bearings, (four required) are no longer available.

Drained and filled the axles and tranny before closing up the shop tonight. Tranny oil was nasty and I flushed with some clean oil before filling .. there was no metal on the bottom of the tranny and I even ran a magnet inside to see if I could pick anything up. Will install the transfer case and shafts by the weekend.
 

Attachments

Last edited:

1943ht

Active member
478
94
28
Location
Batavia, OH 45103
Completed install of all the rebuilt drive shafts and the transfer case this weekend. Axles, Transfer Case and Tranny have new lube and plugs. Took the beast out for a spin before the weather turned to crap … vibration is gone and she tuned right up to a steady 40+ MPH.

Finished my horn button install yesterday using a rebuild kit plus a much needed insulator... the kit came with everything needed to rebuild the horn button to include a new column wire and Douglas Connector. The only item not included is the insulator which you need to order separately. I now have a horn that is surprisingly loud J. Getting that nut off the column was the challenge... used my gas torch setup to get that nice glow and she came right off... lots of rust and crud accumulated around that nut as it lit up like the Fourth of July when I put the flame to it .. Of course I was careful not to damage the steering wheel with the heat... Used anti-seize compound on the new nut and the shaft.

Also completed the install / wiring of my searchlight …. It’s not an original M37 set-up but I’ve had the spotlight for quite a while so I fabricated up a mount and ran the wire etc... Looks pretty good (My Opinion) and functions just like it should.

My project tonight was to sandblast all of the hardware that supports the bed canvass … All in all it came out nicely and the new top bow wood fits like a glove. All ready to be primed and painted as soon as I get my carriage bolts set up.

Still on track to paint the beast by the second week of Mar.

Will post some pics tomorrow.
 
Last edited:

68t

Active member
375
55
28
Location
Michie, ,tn
Mark ,all i can say wow . You sure are going all the way with the m37. I hope to get a ride on it down the road.:beer:
 

1943ht

Active member
478
94
28
Location
Batavia, OH 45103
Wendell, That might be a possibility if the Clarksville thing pans out :D

Some more pics: Home made spotlight mount, rebuilt horn button on column and sandblasted bow parts ..was missing the lower stakes but have some on the way from the Snake River gang.

Have some more cleanup to do on the cab where my hard-top sat all those years .. almost ready for the final minor bodywork and paint!
 

Attachments

Last edited:

jets1959

Member
594
9
18
Location
Lakewood, WA
Wendell, That might be a possibility if the Clarksville thing pans out :D

Some more pics: Home made spotlight mount, rebuilt horn button on column and sandblasted bow parts ..was missing the lower stakes but have some on the way from the Snake River gang.

Have some more cleanup to do on the cab where my hard-top sat all those years .. almost ready for the final minor bodywork and paint!
In picture #2 your steering wheel is quite cracked. Check on the classic car forums. There is a Marine epoxy that is used to fill the cracks and then painted. They use it all the time it doesn't shrink and once painted you can never tell there was a repair. Hope this helps. Excellent work so far and the spot light mount looks very military.:grd:
 

1943ht

Active member
478
94
28
Location
Batavia, OH 45103
Thanks for the advice Dwayne ... great minds thing alike and I was already on the hunt for a good epoxy to do just that! Did a similar repair on my 56 MGA back in the day and it came out quite well .. I'm pretty sure that the epoxy compounds have improved since then and I'll post an update on the steering wheel repair when I get er done.

//Cheers//
Mark
 
Top
AdBlock Detected

We get it, advertisements are annoying!

Sure, ad-blocking software does a great job at blocking ads, but it also blocks useful features of our website like our supporting vendors. Their ads help keep Steel Soldiers going. Please consider disabling your ad blockers for the site. Thanks!

I've Disabled AdBlock
No Thanks