• Steel Soldiers now has a few new forums, read more about it at: New Munitions Forums!

  • Microsoft MSN, Live, Hotmail, Outlook email users may not be receiving emails. We are working to resolve this issue. Please add support@steelsoldiers.com to your trusted contacts.


Anyone replaced a rear fender on a HMMWV?

820jeep

Member
232
16
18
Location
Fort Worth Texas
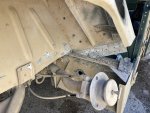
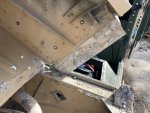
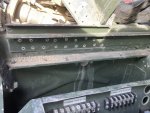
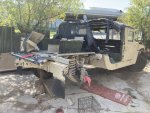
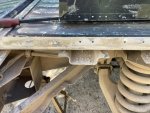
Just getting started replacing a damaged right rear fender. Removing Tail light and side maker light, unhooking fuel filler neck and starting the long process of drilling-grinding rivets. Has anyone done this before? Have any pointers or suggestions? Thanks, Bob
IMG_0317.jpeg
 

chucky

Well-known member
Steel Soldiers Supporter
6,536
18,745
113
Location
TN .
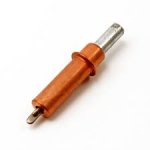
Spring loaded center punch to center your drill bit better and the same sise bit as original hole so you dont stretch the holes out having to hammer the heads off they should fall off when you pull the bit out ! LOL You will just have to get the rivet heads off your drill bit with a pair of pliers !
 

cwc

Active member
Steel Soldiers Supporter
302
142
43
Location
Sweeden, KY
My son and I replaced a rear fender over the summer. I found the Youtube video by AMTAK2 to be helpful. One thing we did different was that we completely removed and reattached the piece across the front attachment point (behind the rear seat area) rather than cutting a v-notch in it and bending it. For removing the rivets, we mostly used an air chisel with the point ground into a punch matching the pin diameter, knocked the pins out, drilled through the heads with a larger drill until the heads came off, then punched out the remainder. This went really fast with two working on it after getting the technique right.

The Cherrymax rivets are really hard to set manually, so I took advice in other threads here on SS and bought the Milwaukee M12 rivet gun, actually the 2550-22 kit that includes two batteries, charger, the nose pieces and carrying case. It did a good job setting the rivets. We had a bit of trouble initially with it pulling and stopping when the trigger was pulled, which seemed to be a problem with the feed of the mandrels into the catch chamber. A little shake after each rivet seemed to make it work a lot better, or maybe it just took a while to break in.

TM9-2320-280-24P (Figs 197 & 199) is useful for identifying where the various lengths of rivets are used. The -3 length rivets are readily available, but other lengths are harder to find. I ended up buying several lengths from Skybolt Aerospace Fasteners (e.g. CR3213-6-4, CR3213-6-7 and CR3213-6-9). The Cherrymax rivets are sensitive to the grip length and won't pull right if they are too long or too short for the material. For example, the -3 rivets work for a range of 3/16 down to 2/16 (1/8"), so they work for either three or two thicknesses of the fender material, such as when riveting the connection between the fender and the floor of the bed. In a few places the rivets were too long, and pulled better with a 3/16" rivet washer on the back side; these washers are about 1/16" thick and are a hardware store item. As I recall, the -9s at the back of the fender that pass through the heavy structural member pulled better (tighter) with a washer on them. Also, you might find some rivets for sale that are oversize, i.e. increased diameter for dealing with damaged holes. If you use oversize rivets you will probably want to get the matching drill. As I recall, the standard rivet uses a #10 drill (0.193"), and oversize Cherrymax rivets use a #5 (0.205").
 

Attachments

chucky

Well-known member
Steel Soldiers Supporter
6,536
18,745
113
Location
TN .
I know this is sacrilege but I sometimes use a wood chisel, having a handle sometimes comes in handy.
LOL do the humv use aluminum rivets ? I bought a school bus back years ago that had been hit hard in the rear drivers corner but the rain gutter up was good i bet i drilled and removed 500 rivets in the corner and then decided to add baggage bays underneath both sides so i drilled and installed anther 500 at least and to this day i get sick to think ive got to drill and replace rivets ! If you dont want to go back with rivets you could plug weld the holes easy with a wire gun and hold either a carbon black block or copper block in behind where your filling the hole up !
 

cwc

Active member
Steel Soldiers Supporter
302
142
43
Location
Sweeden, KY
Spring loaded center punch to center your drill bit better and the same sise bit as original hole so you dont stretch the holes out having to hammer the heads off they should fall off when you pull the bit out ! LOL You will just have to get the rivet heads off your drill bit with a pair of pliers !
This works good too - after knocking out the pins then run through with a 3/16 drill, you'll have a whole stack of the heads on the drill bit.
 

Mogman

Moderator
Staff member
Moderator
Steel Soldiers Supporter
5,928
8,267
113
Location
Papalote, TX
My son and I replaced a rear fender over the summer. I found the Youtube video by AMTAK2 to be helpful. One thing we did different was that we completely removed and reattached the piece across the front attachment point (behind the rear seat area) rather than cutting a v-notch in it and bending it. For removing the rivets, we mostly used an air chisel with the point ground into a punch matching the pin diameter, knocked the pins out, drilled through the heads with a larger drill until the heads came off, then punched out the remainder. This went really fast with two working on it after getting the technique right.

The Cherrymax rivets are really hard to set manually, so I took advice in other threads here on SS and bought the Milwaukee M12 rivet gun, actually the 2550-22 kit that includes two batteries, charger, the nose pieces and carrying case. It did a good job setting the rivets. We had a bit of trouble initially with it pulling and stopping when the trigger was pulled, which seemed to be a problem with the feed of the mandrels into the catch chamber. A little shake after each rivet seemed to make it work a lot better, or maybe it just took a while to break in.

TM9-2320-280-24P (Figs 197 & 199) is useful for identifying where the various lengths of rivets are used. The -3 length rivets are readily available, but other lengths are harder to find. I ended up buying several lengths from Skybolt Aerospace Fasteners (e.g. CR3213-6-4, CR3213-6-7 and CR3213-6-9). The Cherrymax rivets are sensitive to the grip length and won't pull right if they are too long or too short for the material. For example, the -3 rivets work for a range of 3/16 down to 2/16 (1/8"), so they work for either three or two thicknesses of the fender material, such as when riveting the connection between the fender and the floor of the bed. In a few places the rivets were too long, and pulled better with a 3/16" rivet washer on the back side; these washers are about 1/16" thick and are a hardware store item. As I recall, the -9s at the back of the fender that pass through the heavy structural member pulled better (tighter) with a washer on them. Also, you might find some rivets for sale that are oversize, i.e. increased diameter for dealing with damaged holes. If you use oversize rivets you will probably want to get the matching drill. As I recall, the standard rivet uses a #10 drill (0.193"), and oversize Cherrymax rivets use a #5 (0.205").
I was going to post that video until I saw he was cutting a v notch in the brace
 
  • Like
Reactions: cwc

Vapor Trail

Well-known member
197
260
63
Location
Kentucky
My son and I replaced a rear fender over the summer. I found the Youtube video by AMTAK2 to be helpful. One thing we did different was that we completely removed and reattached the piece across the front attachment point (behind the rear seat area) rather than cutting a v-notch in it and bending it. For removing the rivets, we mostly used an air chisel with the point ground into a punch matching the pin diameter, knocked the pins out, drilled through the heads with a larger drill until the heads came off, then punched out the remainder. This went really fast with two working on it after getting the technique right.

The Cherrymax rivets are really hard to set manually, so I took advice in other threads here on SS and bought the Milwaukee M12 rivet gun, actually the 2550-22 kit that includes two batteries, charger, the nose pieces and carrying case. It did a good job setting the rivets. We had a bit of trouble initially with it pulling and stopping when the trigger was pulled, which seemed to be a problem with the feed of the mandrels into the catch chamber. A little shake after each rivet seemed to make it work a lot better, or maybe it just took a while to break in.

TM9-2320-280-24P (Figs 197 & 199) is useful for identifying where the various lengths of rivets are used. The -3 length rivets are readily available, but other lengths are harder to find. I ended up buying several lengths from Skybolt Aerospace Fasteners (e.g. CR3213-6-4, CR3213-6-7 and CR3213-6-9). The Cherrymax rivets are sensitive to the grip length and won't pull right if they are too long or too short for the material. For example, the -3 rivets work for a range of 3/16 down to 2/16 (1/8"), so they work for either three or two thicknesses of the fender material, such as when riveting the connection between the fender and the floor of the bed. In a few places the rivets were too long, and pulled better with a 3/16" rivet washer on the back side; these washers are about 1/16" thick and are a hardware store item. As I recall, the -9s at the back of the fender that pass through the heavy structural member pulled better (tighter) with a washer on them. Also, you might find some rivets for sale that are oversize, i.e. increased diameter for dealing with damaged holes. If you use oversize rivets you will probably want to get the matching drill. As I recall, the standard rivet uses a #10 drill (0.193"), and oversize Cherrymax rivets use a #5 (0.205").
Great description CWC, thank you. I have to do one soon too so that'll be very helpful.
 

820jeep

Member
232
16
18
Location
Fort Worth Texas
My son and I replaced a rear fender over the summer. I found the Youtube video by AMTAK2 to be helpful. One thing we did different was that we completely removed and reattached the piece across the front attachment point (behind the rear seat area) rather than cutting a v-notch in it and bending it. For removing the rivets, we mostly used an air chisel with the point ground into a punch matching the pin diameter, knocked the pins out, drilled through the heads with a larger drill until the heads came off, then punched out the remainder. This went really fast with two working on it after getting the technique right.

The Cherrymax rivets are really hard to set manually, so I took advice in other threads here on SS and bought the Milwaukee M12 rivet gun, actually the 2550-22 kit that includes two batteries, charger, the nose pieces and carrying case. It did a good job setting the rivets. We had a bit of trouble initially with it pulling and stopping when the trigger was pulled, which seemed to be a problem with the feed of the mandrels into the catch chamber. A little shake after each rivet seemed to make it work a lot better, or maybe it just took a while to break in.

TM9-2320-280-24P (Figs 197 & 199) is useful for identifying where the various lengths of rivets are used. The -3 length rivets are readily available, but other lengths are harder to find. I ended up buying several lengths from Skybolt Aerospace Fasteners (e.g. CR3213-6-4, CR3213-6-7 and CR3213-6-9). The Cherrymax rivets are sensitive to the grip length and won't pull right if they are too long or too short for the material. For example, the -3 rivets work for a range of 3/16 down to 2/16 (1/8"), so they work for either three or two thicknesses of the fender material, such as when riveting the connection between the fender and the floor of the bed. In a few places the rivets were too long, and pulled better with a 3/16" rivet washer on the back side; these washers are about 1/16" thick and are a hardware store item. As I recall, the -9s at the back of the fender that pass through the heavy structural member pulled better (tighter) with a washer on them. Also, you might find some rivets for sale that are oversize, i.e. increased diameter for dealing with damaged holes. If you use oversize rivets you will probably want to get the matching drill. As I recall, the standard rivet uses a #10 drill (0.193"), and oversize Cherrymax rivets use a #5 (0.205").
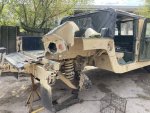
Thank you, lots of good information. This kind of help was what I was looking for.
 
  • Like
Reactions: cwc
Top
AdBlock Detected

We get it, advertisements are annoying!

Sure, ad-blocking software does a great job at blocking ads, but it also blocks useful features of our website like our supporting vendors. Their ads help keep Steel Soldiers going. Please consider disabling your ad blockers for the site. Thanks!

I've Disabled AdBlock
No Thanks