BDGR
Active member
- 21
- 116
- 28
- Location
- Central TX
This is very optimistic of me, but I'm am going to try to keep a build/restoration thread going for the XM757 that I'm going to ATTEMPT to restore. Don't count your chickens. This will take a while.
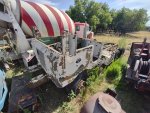
Early this month, I stumbled across a vague facebook ad for "military trucks" in Fort Worth, immediately knew they were of the 656 family, and jumped on them. I regretted not saving a local M656 so I took the chance to fix that. The seller as a wood product company. The seller said they were the tractor versions, that the camo one ran at some point, but didn't know on the white one and were basically bare frame trucks. They got them from the neighboring county itself about 11~ years ago and planned to use them to pull logs out of the woods if they had to do that themselves. They never had to so the trucks just sat that entire time. Finally they were scrapping everything in the field they were stored in but refused to let them be destroyed so up for sale they went. The 2 conditions I was told was they had to go to the same home and they would not just be parted out. Basically one of them had to be put back on the road. Done deal, let's go.
I don't really want to talk about the H311 that was getting them home. Just...No.
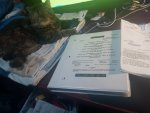
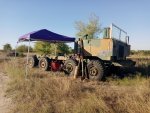
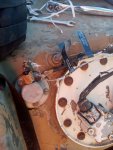
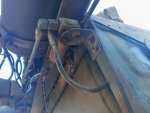
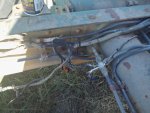
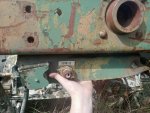
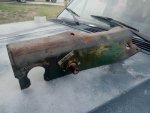
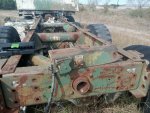
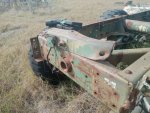
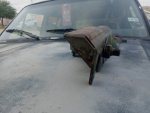
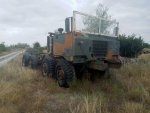
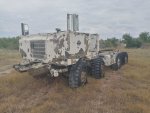
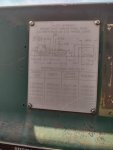
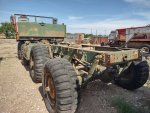
Now they are stored at the local museum I volunteer at owned by fellow member TMOMW. I am crawling on them when I have the time and can stand the heat trying to assess things and make notes. Real work isn't going to start until temps drop. They are both XM757s tractors with winches from early 69. They are both missing their fifth wheels, rear decks, soft top frames, winches, bumpers, pintles, lights, and second fuel tanks. Since I have no bumpers, I have no bumper numbers. The camo one has the white trucks windshield. Lots of wiring and air lines have been cut. They need cleaned up to get some more info.
For now, I do enough info to make a plan with. I was told by the seller that the day before I showed up to pay and get the titles, one of their mechanics supposedly got the camo truck to start. They never figured out which one so I couldn't talk to the mechanic but they were adamant. Fuzzytoaster said he looked at them and said the white one's engine was DOA but the camo one has hope. That fits my insane scheme to restore the camo one as original as possible and then resto-mod the white into a truck I could drive without being afraid of breaking irreplaceable parts. I plan to start with the camo one and will be the focus of this thread. The white one will only be parts as a last resort unless I plan to replace said part anyways, but on the back burner for a few years.
The 3 goals for this winter work season aren't too big. 1st is document the entire vehicle with pictures to refer back to later. 2nd is pull and label the wiring harness out of the white one to send off with TM pages to get a new one made for the camo one. 3rd is to sand and repaint the camo one with its current camo scheme. The goal isn't to make it show quality, just nicer to work with rather than paint flakes EVERYWHERE. It's a stretch goal. I still have a few tasks for the museum that need to get done this winter.
I am going to try to keep as much as possible in this thread so if anyone ever tries this again, it's all in one place.
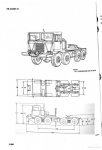
Thanks to Fuzzytoaster for the TM PDFs.
Early this month, I stumbled across a vague facebook ad for "military trucks" in Fort Worth, immediately knew they were of the 656 family, and jumped on them. I regretted not saving a local M656 so I took the chance to fix that. The seller as a wood product company. The seller said they were the tractor versions, that the camo one ran at some point, but didn't know on the white one and were basically bare frame trucks. They got them from the neighboring county itself about 11~ years ago and planned to use them to pull logs out of the woods if they had to do that themselves. They never had to so the trucks just sat that entire time. Finally they were scrapping everything in the field they were stored in but refused to let them be destroyed so up for sale they went. The 2 conditions I was told was they had to go to the same home and they would not just be parted out. Basically one of them had to be put back on the road. Done deal, let's go.
I don't really want to talk about the H311 that was getting them home. Just...No.
Now they are stored at the local museum I volunteer at owned by fellow member TMOMW. I am crawling on them when I have the time and can stand the heat trying to assess things and make notes. Real work isn't going to start until temps drop. They are both XM757s tractors with winches from early 69. They are both missing their fifth wheels, rear decks, soft top frames, winches, bumpers, pintles, lights, and second fuel tanks. Since I have no bumpers, I have no bumper numbers. The camo one has the white trucks windshield. Lots of wiring and air lines have been cut. They need cleaned up to get some more info.
For now, I do enough info to make a plan with. I was told by the seller that the day before I showed up to pay and get the titles, one of their mechanics supposedly got the camo truck to start. They never figured out which one so I couldn't talk to the mechanic but they were adamant. Fuzzytoaster said he looked at them and said the white one's engine was DOA but the camo one has hope. That fits my insane scheme to restore the camo one as original as possible and then resto-mod the white into a truck I could drive without being afraid of breaking irreplaceable parts. I plan to start with the camo one and will be the focus of this thread. The white one will only be parts as a last resort unless I plan to replace said part anyways, but on the back burner for a few years.
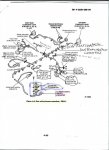
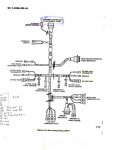
The 3 goals for this winter work season aren't too big. 1st is document the entire vehicle with pictures to refer back to later. 2nd is pull and label the wiring harness out of the white one to send off with TM pages to get a new one made for the camo one. 3rd is to sand and repaint the camo one with its current camo scheme. The goal isn't to make it show quality, just nicer to work with rather than paint flakes EVERYWHERE. It's a stretch goal. I still have a few tasks for the museum that need to get done this winter.
I am going to try to keep as much as possible in this thread so if anyone ever tries this again, it's all in one place.
Thanks to Fuzzytoaster for the TM PDFs.
Attachments
-
 137.6 KB Views: 36
 -
 140.4 KB Views: 38
 -
 46.7 KB Views: 32
 -
 174.5 KB Views: 32
 -
 55.2 KB Views: 27
 -
 192.5 KB Views: 34
 -
 222.6 KB Views: 31
Last edited: