• Steel Soldiers now has a few new forums, read more about it at: New Munitions Forums!

  • Microsoft MSN, Live, Hotmail, Outlook email users may not be receiving emails. We are working to resolve this issue. Please add support@steelsoldiers.com to your trusted contacts.

Blowing up batteries

aaron1009

New member
52
0
0
Location
Birmingham, AL
Where to begin? My Gen1 light has been slightly lit for a couple weeks. Not brightly lit like it is when the key is in the accessory position, but just bright enough to be seen glowing at night. I've been getting a bit of belt squeal lately, so I figured maybe it was just a product of lower voltage from the alternator. My gauge sits about 1/3 of the way into the green which is where it's been always been.

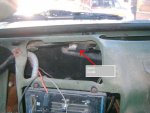
Skip to last night. I start hearing the belt squeal at highway speed. As I slow down at the off ramp I smell eggs. Sulfuric acid. Look at my volt gauge to see the needle on the line between the green and red. I limp it to the conveniently placed Advance Auto and open the hood to see a smoking rear battery. Not smoldering, more like steaming. The acid had spewed out the battery's vents. I buy a new Optima Red, toss it in and hit the road. Volt meter is still reading on the border of being too high, but I shrug it off thinking the new battery may be giving me that reading.

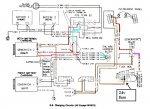
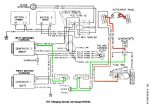
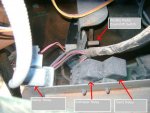
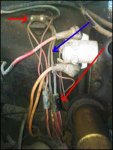
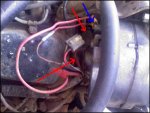
I get to the house and begin swapping belts. Turns out, the top bolt on the passenger alt is stripped out. It tightens down, but not as tight as I'd like. I tighten the bottom bolt down snugly. Crank the truck and yay no belt whine. I let it run while I watch the belts. The passenger belt seems to slack a bit as it comes up off the crank before it hits the alt pulley. I don't give it much thought since my voltage still reads between the green and red on the gauge. I did go ahead and check all my voltages at idle which are as follows:

Passenger alt: 27v
Driver alt: 14v
Rear Battery: 12.6v
Front Battery:14.4v

I hop in and go for a ride. Not long after, I smell burned rubber and hear a thunk under the hood. A glance at the gauge shows a sharp drop in my voltage. It was now reading just over the yellow. I pull over and find my new passenger alt belt laying in the bay, chopped in half. I also notice a hissing sound coming from the rear battery. This turns out to be the vent on the top spewing it's contents.

I am at a loss at to what could be giving my charging system fits. I can pass off the belt being thrown off to the stripped bolt to being tight enough to withstand the tug from the crank at driving RPMs, but the battery spewing and my Gen1 light are really stumping me, especially when all my voltages are reading what they have read since the day I bought it.


aua Any help is greatly appreciated.
 

Warthog

Moderator
Super Moderator
Steel Soldiers Supporter
13,775
227
63
Location
OKC, OK
Have you ever rebuilt the alternators? From your description it sounds like the GEN2 voltage regulator is bad and cooked the rear battery.
 
Last edited:

Warthog

Moderator
Super Moderator
Steel Soldiers Supporter
13,775
227
63
Location
OKC, OK
That is the kit I have used many times. The TM 9-2320-289-34 manuals covers the rebuild. There is also a DelcoRemy manual that covers the same thing but some people find easier to understand and follow. I posted the PDF just yesterday as it is no longer available on the DelcoRemy website.

The parts in the kit are made in China and I have had an issue with one diode-trio but overall it is okay.

It takes me about 20-30 minutes to rebuild one. That is taking time to drink some liquid refreshments along the way.

The DelcoRemy manual does not cover the "isolated-ground" of our alternators, which the -34 does. Just take your time, take pictures of each screw, washer and component you are removing and you will be fine.

If/when you change out the bearings be sure to use a socket to backup the case, because it you don't you can crack the housing.


If your mounting bolt is striped out, you can put in a HeliCoil or go to the junkyard and buy an alternator from an mid-80's Cadilllac and use the front half.
 

Attachments

Last edited:

Barrman

Well-known member
5,192
1,647
113
Location
Giddings, Texas
Or, just put in a longer bolt and put a nut on the back. I take it you are talking about the top adjustment bolt in the bracket with the slot for sliding in and out?
 

aaron1009

New member
52
0
0
Location
Birmingham, AL
Ok, just put in an order for two 27si rebuild kits. The belt isn't on alt 2 and my Gen1 light is still slightly glowing so I'm just going to rebuild them both.

@Barrman: Yes, I am referring to the top adjustment bolt. I'll probably try to recut the threads, then if that doesn't work out I'll just employ a longer bolt+nut.

I just hope I haven't ruined the new Optima I just put in.


EDIT: Warthog, you mentioned the voltage regulator. Is this housed internally within the alt, or is it a part I need to order? Available from any part store? --- Nevermind, just saw that it is included in the rebuild kits!
 
Last edited:

aaron1009

New member
52
0
0
Location
Birmingham, AL
UPDATE:

Alright, both alts are rebuilt. I'm still not getting a charge to my rear battery. When I test the "BAT Terminal" I'm seeing about 27v. When I test at the rear battery terminals at idle I only see 12.6v.

Alt 1 is putting out around 14.4 and I see the same at the front battery during idle.


Thing is, my wiring seems to be a little hacked. From day one, my alt 2 plug was plugged off. I believe this was to get around the Gen2 light. I've been told that a stock configuration see this plugged up. I'm terrified that this is my problem somehow.

I will attach a couple of pictures of the wiring to the back of alt 2. Can someone point me in some sort of direction?

:confused:
 
Last edited:

Warthog

Moderator
Super Moderator
Steel Soldiers Supporter
13,775
227
63
Location
OKC, OK
This will take a little while to figure out. One step at a time.

What other wires are hacked?

First step.

In your pictures the 2pin connector is unpluged. Remove the other one from the GEN1 and lets check voltages.

With the key off you should see the following:

GEN1 red wire - 12v
GEN2 red wire - 24v
nothing on the brown wires

With the key on - engine off

GEN1 brown wire - 12v
GEN2 brown wire - 24v

Also clean the terminals with Electrical Contact Cleaner and a small cardboard nail file if needed. You might also use some di-electric grease when you reinstall the plug.

If you see those voltages then the alternator excitor wiring should be okay. This includes the dash wiring and the idiot lights for GEN1 and GEN2.

Moving on you need to check the big red wires. Trace the cut one from the GEN2 all the way to the Positive Terminal Block behind the rear battery. They hacked it for some reason. It may be okay but check it anyway.

Then check the other big red wire (yours has a white strip, some are faded) from the GEN2 Ground terminal to the 12v positive terminal block by the Brake Master Cylinder. Check the fusable link.

Check those items and report back.

Warthog
 

Attachments

Last edited:

aaron1009

New member
52
0
0
Location
Birmingham, AL
Voltages good with key off, getting 12v on Alt1 brown with key on and nothing on the Alt2 brown wire with key on.

The guy who sold me the truck said that this was done to get around the Gen2 light. He said that if either alt was bad only the Gen1 light would be lit. This was done in case a bulb blew and downed an alt.

Attached is a pic of where the red wire with the white stripe ends up. Where is the fusible link located? EDIT--- You mean the 20amp inline link on the pink wire that attaches to the positive terminal on the back of Alt2?

Thanks for the wiring diagram.
 

Attachments

Last edited:

aaron1009

New member
52
0
0
Location
Birmingham, AL
This will take a little while to figure out. One step at a time.
Moving on you need to check the big red wires. Trace the cut one from the GEN2 all the way to the Positive Terminal Block behind the rear battery.

Thanks so much for helping me out by the way. It's greatly appreciated.

After checking again, it seems as though the red wire DOES in fact make it back to the positive terminal block.

It's getting dark here so I'll triple check tomorrow and give more details.
 
Last edited:

Warthog

Moderator
Super Moderator
Steel Soldiers Supporter
13,775
227
63
Location
OKC, OK
So we need to find out what the trouble is with the small brown wire on GEN2.

I have attached the wiring diagram for the GEN2 excitor circuit. I have changed the colors of thw wires to make them easier to read.

The wires are brown, brown w/red strip and orange.

1. Check the 24v fuse at the very bottom of the fuse box.
2. Remove the GEN2 relay and check for 24v on the brown/red wire. If you don't have 24v then check the idiot light and socket to find the problem
3. Install a jumper wire from the brown wire at the alternator and check the brown wire circuit from the alternator to the GEN2 relay. If the circuit is open then you will have to remove the dash pad and check the Diode.

http://www.steelsoldiers.com/cucv/50551-cucv-switches-diodes-relays.html
 

Attachments

aaron1009

New member
52
0
0
Location
Birmingham, AL
1. Check the 24v fuse at the very bottom of the fuse box.
10A fuse looks good.


2. Remove the GEN2 relay and check for 24v on the brown/red wire. If you don't have 24v then check the idiot light and socket to find the problem
Turns out I don't even have a Gen2 relay. I checked the voltage to the Brown/Red wire and I'm seeing 24v. I swapped my Voltmeter relay into the Gen2 socket and saw 24v at the brown wire in the plug but I'm still only seeing 12.3v at the rear battery at idle.

3. Install a jumper wire from the brown wire at the alternator and check the brown wire circuit from the alternator to the GEN2 relay. If the circuit is open then you will have to remove the dash pad and check the Diode.
Since I'm reading 24v at the plug with my borrowed Voltmeter relay in the Gen2 socket, is this step still necessary?

Thanks!
 

Warthog

Moderator
Super Moderator
Steel Soldiers Supporter
13,775
227
63
Location
OKC, OK
If you do indeed have 24v at the brown wire at the GEN2 plug, then you can skip step 3 as the diode is okay.

The inside circuit is functioning now so we will move on the engine wiring.

1. Lets check the big red and white wire. Check for 12v at the 12v Terminal block (diamond shape terminal) and then check for 12v at the Ground terminal at the GEN2 connection (picture 1 and 2 - red arrows)
If you have 12v then that wire is good along with the fusable link (picture 1 - blue arrow)

2. Now lets check the big red wire going to the 24v Positive terminal Block.
Check the wire for any broken connections between the positive terminal on GEN2 (picture 2 - blue arrow) and the terminal block behind the rear battery (no picture at this time). A problem spot is the blue fusable link at the terminal block.

3. If the first two steps are okay then clean and reinstall the 2pin plug at GEN2 and start the engine.

You should see ~14.4v at the 12v Terminal Block, 14.4v at the GEN2 Ground Terminal on GEN2 and ~29V at the GEN2 positive terminal.

If you still don't see the above voltages then the rebuild may not have worked.
 

Attachments

Last edited:

aaron1009

New member
52
0
0
Location
Birmingham, AL
1. Lets check the big red and white wire. Check for 12v at the 12v Terminal block (diamond shape terminal) and then check for 12v at the Ground terminal at the GEN2 connection (picture 1 and 2 - red arrows)
If you have 12v then that wire is good along with the fusable link (picture 1 - blue arrow)
Everything tests out fine here.

2. Now lets check the big red wire going to the 24v Positive terminal Block.
Check the wire for any broken connections between the positive terminal on GEN2 (picture 2 - blue arrow) and the terminal block behind the rear battery (no picture at this time). A problem spot is the blue fusable link at the terminal block.
I did a open/close check by taking the wire loose at the positive block and the positive alt terminal. The wire shows closed, so it must be good along with the link.

You should see ~14.4v at the 12v Terminal Block, 14.4v at the GEN2 Ground Terminal on GEN2 and ~29V at the GEN2 positive terminal.
Engine running, I'm seeing 14.4 at the terminal block, grounded to the neg terminal of the front battery. If I ground the same way, I see 14.4v at the ground terminal of Gen2, and 27v at the positive terminal. However, if I ground to the neg terminal of the rear battery, I see 0v at the ground terminal and only 12v at the positive. Is this normal and I'm not thinking it through or...?

Looking at the diagram you supplied me yesterday, I'm wondering what the second wire is that is visible in the second picture (the one with the splice jacket, not the twist cap). --EDIT: I see now in the diagram that is the diagnostic wire.-- It attaches to the positive terminal of Gen2 along with the big red wire. It contains a fusible link and appears to end up at the positive terminal block. When I try to do an open/closed test on it I find it to be open. Could this be a problem?
 
Last edited:

Warthog

Moderator
Super Moderator
Steel Soldiers Supporter
13,775
227
63
Location
OKC, OK
Going back to an earlier post, did you ever find the burnt wire? When you had the alternators rebuilt, what did they replace?

Back to this issue

Are you checking for voltage at the Positive Terminal Block behind the rear battery or the Positive Terminal on the GEN2?

All the wiring looks to be in working condition. All the reading look correct for the wiring.

Double check the voltages on the 2pin plug for the key on and key off reading. If they are good then your rebuilt alternator may be the issue. And make sure the terminals are clean on the plug and the posts.

You can swap the alternators and see if the proble follows the alternator or if it doesn't help.

I know it is frustrating, but we have to test each issue until we find the cause.

The small orange wire is for the STE/ICE diagnostic circuit. It goes to the round Cannon Plug below the ashtray. It souldn't cause any of the problems.
 
Last edited:

aaron1009

New member
52
0
0
Location
Birmingham, AL
Going back to an earlier post, did you ever find the burnt wire? When you had the alternators rebuilt, what did they replace?
I don't recall mentioning a burnt wire. I rebuilt both alts myself using the kit I linked earlier in the thread. One thing I was curious about was that inside Alt2, I had to drill a pilot hole for a connecting bolt that linked the regulator and the heat sink. When I opened Gen1, this detail was absent.

Are you checking for voltage at the Positive Terminal Block behind the rear battery or the Positive Terminal on the GEN2?
I'm checking the positive terminal on Gen2. This is where I'm reading ~27v while running.

All the wiring looks to be in working condition. All the reading look correct for the wiring.

Double check the voltages on the 2pin plug for the key on and key off reading. If they are good then your rebuilt alternator may be the issue. And make sure the terminals are clean on the plug and the posts.

You can swap the alternators and see if the proble follows the alternator or if it doesn't help.

I know it is frustrating, but we have to test each issue until we find the cause.
I'll double check all my voltages this afternoon. I won't be able to swap alts until tomorrow, but I'll do that as well. It is a bit frustrating, as I enjoy driving my truck and hate that it's limping. But I can't tell you how much I value your help. :p

I suppose it's worth mentioning that since I've owned the truck, my Gen2 light has never been lit. I have however, tested the bulb and found it to be in working order. I know we tested the circuit but I find it strange that my volt gauge used to be in the green while the Gen2 light was off. This supports the claim that the previous owner somehow wired around the Gen2 light.

EDIT: Voltages to the Alt2 plug are

Key off:
Red - 24v
Black w/ stripe - 0v

Key on:
Red - 24v
Black w stripe - 24v
 
Last edited:

aaron1009

New member
52
0
0
Location
Birmingham, AL
*UPDATE*

Truck has been down over the holidays. Haven't found much time to work on it and have started banging my head against the wall when I do find time. So, I decided to take it to a certified mechanic. They were very "anxious" when I told them it was a 24v charging system I was having issues with. Dropped it off yesterday around 8am. By 3pm they had called me to let me know it was ready to be picked up.

Me: "What was wrong?"
Him: "It was broke, brotha."
Me: "Um...ok. Do both Gen lights come on a key up? Is the volt gauge in the green?"
Him: "Dunno, but it's fixed."

Well, he was right. Turns out, I had been shipped the wrong regulator, apparently. On top of that, I uncovered another mystery. In my Alt2, someone had drilled a hole in the regulator and bridged it to the rectifier (if memory serves). This was not the case in the Alt1. I found this strange when rebuilding them myself but put everything back the way in the way I found it. He said this was a problem (perhaps why my Gen2 light has never been lit?).

In any case, truck has both Gen lights at key up and volt gauge is in the green once again. Back to being 'Ol Reliable!

On the way home I smell coolant and look in the floor to find a puddle of liquid on the passenger side. Time to find the heater core. I hate these trucks.

:doh:
 

cfish

New member
173
0
0
Location
Eastern/NC
Have you ever rebuilt the alternators? From your description it sounds like the GEN2 voltage regulator is bad and cooked the rear battery.
This is exactly what happened to my passenger alt. Exactly what he described is what happened to me. My pax alt over volted and eventually burnt up. I disconnected the battery as soon as I saw it bubble up. My voltage reg went belly up and the alt way over volted the system. New alt and everything is A OK.
 
Top