sellbooze
New member
- 76
- 2
- 0
- Location
- Odessa, Florida
My Deuce brake light switch stopped working and needed replacement. I bought a replacement kit from Erics Military supply for about $60. The kit came with the wrong size compression elbow for my truck. Kit comes with a 1/2 and I needed the 3/8. NAPA did not have this so I went down to Amazon Hose and Rubber in Tampa and picked it up for about $4. Kit also came with a threaded plug that you will use to plug up the hole where the old switch is removed from ; a brass elbow that has 1/2 inch male thread and two 1/2 female threads; pneumatic brake light switch with a 1/2 in male thread ; and two electric plugs that fit the new swtich . The plugs consist of two rubber boots , two plastic sleaves , and two connectors.
I will show how I did mine. If you have a better way please share with the class....
First located the Air Pack.

Then removed the skid/cover plate. After you remove the plate put one bolt back in to hold the Air Pack still and in place while you work on it. Unplug the wires from the old style switch , and remove switch.


When removing switch , have a towel and the plug for the hole ready so you dont spill too much brake fluid. this is what you should have.


Remove air line (and the reducer ,if you have the 3/8 line)


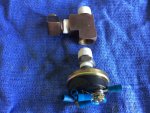
Teflon all the male threads except the compression fitting threads. You will have to put the first elbow on first , then the compression elbow.

Once its all together it will look like this.

Now install new switch , and install new compression fitting and reattach airline.

I will show how I did mine. If you have a better way please share with the class....
First located the Air Pack.
Then removed the skid/cover plate. After you remove the plate put one bolt back in to hold the Air Pack still and in place while you work on it. Unplug the wires from the old style switch , and remove switch.
When removing switch , have a towel and the plug for the hole ready so you dont spill too much brake fluid. this is what you should have.
Remove air line (and the reducer ,if you have the 3/8 line)
Teflon all the male threads except the compression fitting threads. You will have to put the first elbow on first , then the compression elbow.
Once its all together it will look like this.
Now install new switch , and install new compression fitting and reattach airline.