• Steel Soldiers now has a few new forums, read more about it at: New Munitions Forums!

  • Microsoft MSN, Live, Hotmail, Outlook email users may not be receiving emails. We are working to resolve this issue. Please add support@steelsoldiers.com to your trusted contacts.

Brake Proportioning Valve

bushhawg73

Member
122
0
16
Location
Columbia, Missouri
I have done a lot of searching on this subject and so far have discovered that several members have removed their brake proportioning valve. My question and what I can not find the answer to is what they replaced them with.

I live 80 miles from my dads shop where my M1008 is currently at. I like to buy parts during the week and that saves me time when I go over and work on the truck.

If anyone can help point me in the right direction I would be very greatful for the help.
 

Brent.Cain

New member
55
1
0
Location
Canal Winchester, OHIO
They don't replace it with any thing on the back you have ur valve and the rubber hose that goes to the rear end if you disconnect the upper feed line to the valve and the rubber hose from the metal lane you can screw the main feed line onto the rubber hose but why are you doing this? Most ppl do it cause that valve is leaking or they do a rear disk brake conversion but if there aint nothing wrong with yours leave it alone chase you could end up having to run an all new line if u brake it at that valve
 
Last edited:

Brent.Cain

New member
55
1
0
Location
Canal Winchester, OHIO
Also if yours aint broke or leaking and you just wanna try and get a lil better braking leave it in place and cut the rod off the diff and just toque that rod up and that opens that valve
 

doghead

4 Star General /Moderator
Staff member
Super Moderator
Steel Soldiers Supporter
26,247
1,168
113
Location
NY
Brent, it sounds like your talking about the load proportioning valve at the rear. I think the OP was asking about the proportioning valve under the front of the engine(front to rear bias).
 

rlwm211

Active member
1,648
18
38
Location
Guilford, NY
The rear load compensating valve for the brakes does what it obviously says it does. Namely it prevents rear brake lockup under hard braking with little or no load in the truck. The prevents a potential loss of control especially if this occurs while cornering. I would be cautious in considering removing this device.

The front brake proportioning valive does two things. One is that it ensures that you still have brakes if one of the two circuits starts leaking by shuting that circuit off and turning on a warning light so you are aware of the problem. The other function is to bias the braking so that the disc brakes in front receive an equal amount of effort from the master cylinder as the rear. In most cases if the brakes are properly adjusted, the proportioning valve does literally nothing at all.

The front proportioning valve is an almost fool proof device that has been used on all GM trucks since the late 60's and up until the advent of rear antilock brakes and now 4 wheel antilock brakes. Since the failure rate on this device is practically nil, I would strongly suggest leaving well enough alone and not worry about it.

This is just my two cents and all I can say is that I have been dealing with the GM truck braking system for almost 30 years and believe I am pretty well informed to the operation and what works and does not work on these.

If you do decide to remove the front proportioning valve, you may wish to consider installing a valve in the rear brake line to control the amount the rear brakes work and these are available at Summit, or Jegs and are common in race cars.

RL
 
Last edited:

bushhawg73

Member
122
0
16
Location
Columbia, Missouri
I want to get rid of it for a few reasons. First the truck is lifted so the control rod or lever is not hooked up. The other reason is I am planning on doing a disc brake conversion to the rear brakes. Thanks for all the help. For some reason I was under the impression that a brass block would need to be installed in place of the valve.

Note and sorry for the confusion - I am talking about the rear valve. I have no intention of messing with the valve at the front of the truck.
 
Last edited:

doghead

4 Star General /Moderator
Staff member
Super Moderator
Steel Soldiers Supporter
26,247
1,168
113
Location
NY
So, you are talking about the rear load proportion valve? (not the front valve?)

You can simply disconnect the rod and adjust the position of that valve to wherever you like it. I wouldn't, but you can...
 

Sharecropper

Well-known member
Steel Soldiers Supporter
1,818
952
113
Location
Paris KY
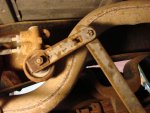
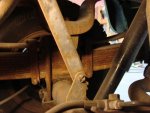
bushhawg, I am finishing the 5" lift of my M1028 now, and I plan to fabricate a longer actuator rod for the rear brake proportioning valve. I will probably build the thing this weekend and will post photos then.

The photos here show the rod and valve in their stock, unaltered position. I have since removed the rod from the valve. I had to grind off the rivet at the bottom to get the rod off, then once I had it on my bench I used a thin cut-off wheel to remove the top rivet from the arm. After I removed the arm from the valve, I discovered that the valve simply spins round and round with no stop, however there is a space in the circle which you can feel is easier to turn. Before removal I used a Majic Marker and marked a vertical line on the rotating part of the valve so I would know where it was after the rod and arm were removed. After removal I discovered that the marker line was exactly in the middle of an "easy spot" in the rotation of the valve. In the stock position, this "easy spot" starts at 4:30 and ends at 7:30. Once you rotate the valve by hand a few times you will understand and recognize this space inthe rotation that fels easier. My marker line was exactly vertical in the middle of this easy spot.

I am raising my M1028 5", so I am fabricating a new connector rod exactly 5" longer than stock. I bought a piece of stee from the hardware store and plan to cut it to length and drill a 3/8" hole on each end, then connect it to the valve arm and axle bracket with two bolts, nylon washers, and locking nuts. I will leave the locking nuts slightly loose to allow for movement.

The arm attaches to the valve with a nylon insert, so at any time you can change the orietation of the valve by simply removing the nut and arm, then rotating the valve one way or the other, and then reinstalling the arm and nut. Just remember to clean the rotating part of the valve and apply a vertical mark on it before you disassemble. If you have already removed the arm, its no big deal, just rotate the valve several times until you learn to recognize the easy spot, then orientate it so the arm attaches exactly half way through this arc.

After I get my truck finished I plan to take it to a brake shop which has the floor sensors to measure the precise braking power of each wheel. I will then be able to adjust the valve properly to provide the correct amount of braking force to the rear wheels with no load. Then as a load is placed into the bed, the actuator rod will be in the proper position to rotate the valve counter-clockwise and increase the braking force.

Hope this helps. More photos coming this weekend.
 

Attachments

bushhawg73

Member
122
0
16
Location
Columbia, Missouri
Sharecropper, your explanation was very good and easy to understand. I just have made my mind up to remove the valve, install rear disc brakes and go from there. If the pressure is to high and I start locking up the rear end to soon I will install an adjustable valve inline. Thanks for the input and by all means post you modification. The people are what make this site so great. By the way I have seen your build and it looks very sweet. It gave me many ideas.
 

doghead

4 Star General /Moderator
Staff member
Super Moderator
Steel Soldiers Supporter
26,247
1,168
113
Location
NY
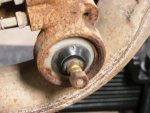
If you look very close on the end of the shaft(on the valve) there is a dot. It is a position indicator.
 

Brent.Cain

New member
55
1
0
Location
Canal Winchester, OHIO
Bushhawg73 I just got done with doing my rear disk brake set up and I love it my brackets came from blue torch fab you want to run the larger over 3" calipers to reduce the rear lock up and watch ur pads cause if you run the larger calipers you have to run the smaller brake pads cause of the clearance mp me and ill send u my number and ill give you more info
 

Sharecropper

Well-known member
Steel Soldiers Supporter
1,818
952
113
Location
Paris KY
bushhawg, I already done the rear disc brake conversion. See my thread at http://www.steelsoldiers.com/cucv/52121-rear-disc-brakes.html .

IMHO it will be easier to fabricate a new rod than to remove the valve. The valve is there for a reason. When you remove it, you also remove the ability to proportion the braking power to the rear discs. Seems to me that you would be unnecessarily removing an option if you rmoved the valve.
 

Sharecropper

Well-known member
Steel Soldiers Supporter
1,818
952
113
Location
Paris KY
Doghead, I see that little dot. In the stock position with the factory arm attached, it was almost straight up, but rotated slightly clockwise. If the weight of the bed was added, I believe the dot would be straight up. Do you think that is the designed position?
 

Attachments

doghead

4 Star General /Moderator
Staff member
Super Moderator
Steel Soldiers Supporter
26,247
1,168
113
Location
NY
Yes, that is how mine was when I cut my link and extended it the right amount for my lift.

Maybe a few other 1008 owners could look and confirm the same.
 

Sharecropper

Well-known member
Steel Soldiers Supporter
1,818
952
113
Location
Paris KY
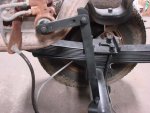
Here's my new brake actuator rod installed. I fabricated it from a piece of 1" x 3/16" flat steel stock obtained from the hardware store. I connected it with short 3/8" bolts and nylon lock nuts, left a little loose to allow for movement. I also used a nylon friction washer between the moving parts.

The length of the rod should be such that, when installed, the rod and valve connecting arm should be 90 degrees of each other. The first rod I made was too long, as I simply added 5" to the stock rod length to compensate for a 5" lift. However I did not take into considerations the fact that the rod doesn't go straight up, but is angled forward towards the valve. So I shortened it 1" and now the rod and arm are correct. I bolted everything up except the valve, then rotated it until the dot on the valve body was straight up, but just slightly clockwise because I have not installed the bed yet. Once the bed goes on the frame will be slightly lower which will cause the valve to rotate slightly counter-clockwise to the straight-up position.

Hope this helps you guys.
 

Attachments

FMJ

In Memorial
In Memorial
4,210
37
0
Location
Las Cruces, NM
I need to add a valve to the back of my 1009, I put a 14 bolt in it, and the other day I was snoozing a bit and saw a light change a little late and had to dig on the brakes, the rears locked up completely and I slid the backs about 50-75 ft, doing my best dirt track racer imitation. . .

I've got a scrapper 1008 I can steal one out of.
 
Top