-
Steel Soldiers now has a few new forums, read more about it at: New Munitions Forums!
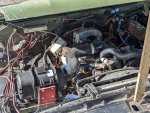
Center mount Turbo M1008
- Thread starter 87cr250r
- Start date

More options
Who Replied?


 .
.Barrman
Well-known member
- 5,485
- 2,245
- 113
- Location
- Giddings, Texas
Looks Like a fun project. Did you also add a 4L80E?
- 599
- 699
- 93
- Location
- Okinawa, Japan
Nice. Can you post a few more pics? I plan on doing this with my rig as well. I'm thinking about lifting the body 2 inches to make it a 'little' easier.
Anything you want. I had to cut right up to the rivet nuts for the glow plug ballast resistor. I have not renwed the body mounts yet.
I went this route with the intention of adding air conditioning in the future.
You're going to have to build a small doghouse to clear the exhaust but the gas pedal position is going to be significantly impacted.
I went this route with the intention of adding air conditioning in the future.
You're going to have to build a small doghouse to clear the exhaust but the gas pedal position is going to be significantly impacted.
- 599
- 699
- 93
- Location
- Okinawa, Japan
Hmmm. That's what I was wondering about (the drivers side/gas pedal). Thank you.Anything you want. I had to cut right up to the rivet nuts for the glow plug ballast resistor. I have not renwed the body mounts yet.
I went this route with the intention of adding air conditioning in the future.
You're going to have to build a small doghouse to clear the exhaust but the gas pedal position is going to be significantly impacted.
nyoffroad
Well-known member
- 978
- 743
- 93
- Location
- Rochester NY
Just an idea, how about changeing the 'gas' pedal from a floor mount to a hanging one? Kind of like a clutch or brake pedal. Sometimes an extra set of eyes see's things in a different light.Hmmm. That's what I was wondering about (the drivers side/gas pedal). Thank you.
Definitely an option.
The way it sits right now, I only ran in to one of the mounting holes. The arm also has the wrong bend to it and hits exhaust and the eventual doghouse. I'm going to try putting the 3rd bolt hole in the doghouse and use standoffs on the other two. Then I just need to reconfigure the arm for clearance and to restore pedal position.
I will also need to put the truck in low range and twist it up against the brakes to see how much clearance it really needs. I know these things flex the frame so much without sway bars that the engine fan hits the radiator shroud.
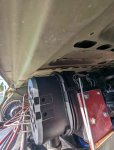
Does anybody know the name of the fittings where the oil cooler hoses tie in to the aluminum crossover pipes?
The 6.5 GEP block has 1/2 NPT holes and the 6.2 is 3/8. No big deal, that's what bushings are for. The trouble is one of the hoses interferes with the van style exhaust manifold. A 45 degree adapter to JIC will work fine but I don't know the type of fitting on the other end of the hose. It looks like 3/8 NPT but has an o-ring at the end of the male thread. I was hoping an outfit like Earl's would have a hose end. I don't want to buy a stainless braided hose kit. I have beef with stainless braided hose.
The 6.5 GEP block has 1/2 NPT holes and the 6.2 is 3/8. No big deal, that's what bushings are for. The trouble is one of the hoses interferes with the van style exhaust manifold. A 45 degree adapter to JIC will work fine but I don't know the type of fitting on the other end of the hose. It looks like 3/8 NPT but has an o-ring at the end of the male thread. I was hoping an outfit like Earl's would have a hose end. I don't want to buy a stainless braided hose kit. I have beef with stainless braided hose.
In case anybody is wondering they are called Tube-O fittings and have a 3/4-16 thread. They are available in Parker 26 series fittings. Make sure to have your divorce papers signed before you buy the hoses because your wife is going to kill you.

It's a runner. Had a terrible knock for a moment, cylinder 5 was being finicky. I couldn't find OEM rod bearings, only Taiwan, made me nervous. It cleared up. Must have been an injector. It was an eBay engine and I didn't want to burn money on injectors. New engine in new Energy Suspension mounts is super smooth. No more body buzz.
I haven't bastardized the wiring harness yet. Hopefully this pleases CUCVRUS. Waiting on adapters to convert SI to CS130 alternators. I'll have to extend the oil pressure sensor wire and then insulate the wiring on the firewall because of turbo but otherwise zero modifications to the stock wiring harness.
I haven't bastardized the wiring harness yet. Hopefully this pleases CUCVRUS. Waiting on adapters to convert SI to CS130 alternators. I'll have to extend the oil pressure sensor wire and then insulate the wiring on the firewall because of turbo but otherwise zero modifications to the stock wiring harness.


Guess I just got a bunk hose. Put a new one on and power steering works fine.
I got the air filter routing figured out today. A Donaldson PowerCore D080056 fits nicely between the batteries. It's meant for a 50hp industrial off-road engine but these things have so much capacity I think it will be fine on my 6.5.


I got the air filter routing figured out today. A Donaldson PowerCore D080056 fits nicely between the batteries. It's meant for a 50hp industrial off-road engine but these things have so much capacity I think it will be fine on my 6.5.
Was able to attach it to the front battery tray, piece of cake. It has over an inch of clearance under the hood. I wish I had gone a hair higher because the duckbill drain touches the inner fender. Next I need to track down affordable smooth bore clamps. I'll probably use Band-It. There is no need to separate any of the segments.
In glue I trust.
In glue I trust.
Attachments
-
 228.4 KB Views: 39
 -
 73.2 KB Views: 39
 -
 153 KB Views: 33

Barrman
Well-known member
- 5,485
- 2,245
- 113
- Location
- Giddings, Texas
That looks really good!
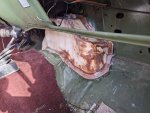
Got the doghouse fabricated. I used corrugated posterboard and hot glue to make the shape. 3/4 inch clearance around everything. I hope that's enough when the engine flexes in its mounts. Used 1"x3/16 Nomex tape to make the flange. The rest of it is lightweight woven roving and West System. No vacuum bagging so I used the 405 filler to help in the areas the glass wouldn't conform to. I did one layer of glass and then popped it off prior to the rest of laminating. This weekend I will integrate the gas pedal mount into the doghouse. I will have to extend the throttle cable and rebend the arm for the petal.


Attachments
-
 172.7 KB Views: 3
Gas pedal is done. I just need to put some better threaded inserts in the firewall for the upper two bolts and one in the fiberglass for the lower. I still need to drill and fasten the fiberglass plug to the firewall. Im debating well nuts or rivet nuts. I have limited acetylene right now so I have to keep my fabrication as simple and efficient as possible.
P.S. don't mind the brazing. All of the connections are brazed in one side and tacked on the other until I can get the truck driving to exchange my acetylene tank. All but one of the joints in photo are tacks or bleed through which is why they look bad.


P.S. don't mind the brazing. All of the connections are brazed in one side and tacked on the other until I can get the truck driving to exchange my acetylene tank. All but one of the joints in photo are tacks or bleed through which is why they look bad.
Attachments
-
 98.3 KB Views: 4
Last edited:
nyoffroad
Well-known member
- 978
- 743
- 93
- Location
- Rochester NY
Nows a hellve a time for me to think of it but, (don't ya just love that?) I reviewed this and wondered if you could gain the room needed by ditching the mechanical fan and clutch and going with an electric unit, that would give you quite a bit of room to move the engine forward several inches, toss in 2" body lift and I think you'd be where you needed.
The only down side I see might be front driveshaft angle, but guys do a 4" lift and that works so who knows? Just thinking! That tunnel turned out a lot better then I thought it would.
The only down side I see might be front driveshaft angle, but guys do a 4" lift and that works so who knows? Just thinking! That tunnel turned out a lot better then I thought it would.
I think moving the engine forward is how the Duramax conversions work. The body lift will certainly work to help, you'll probably clear the gas pedal but still need to bump a little sheet metal around the transmission tunnel. I think the stock HVAC ducts would still work with a body lift.
However, camping and transporting dirt bikes are my primary goal so I want to minimize lift of all types.
However, camping and transporting dirt bikes are my primary goal so I want to minimize lift of all types.
- 114,408members
- 167,298threads
- 2,355,050posts
- 1,328online users