• Steel Soldiers now has a few new forums, read more about it at: New Munitions Forums!

  • Microsoft MSN, Live, Hotmail, Outlook email users may not be receiving emails. We are working to resolve this issue. Please add support@steelsoldiers.com to your trusted contacts.


CUCV Alternator Rebuild Question

AZDeuce

Active member
484
38
28
Location
Tonopah, AZ
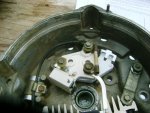
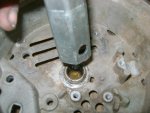
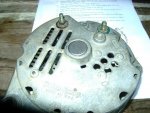
I screwed up. I forgot to draw a diagram of the inside of the ALT before I disassembled her. I figured I had run off a copy of the Delco-Remey manual I found on this site and was good to go as it had pictures.

But when I went to reassemble it I ran into a dilema, the picture doesn't match my ALT.

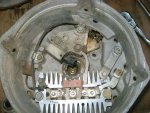
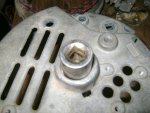
I'm sure that mines a military Alt as it has fiber cupped washers at all the ground points/assembly screws.

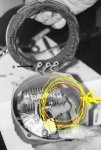
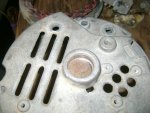
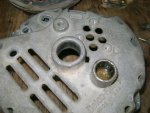
My problem is that there is a wire that runs across what looks like a condensor, I can't remember where to attach it!

DOH! (getting old sucks!)

Does anybody have a diagram of where this wire goes? Or at the least can tell me where it goes.

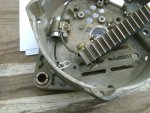
I can reattach it one of three ways, I'm pretty sure TWO of the must be wrong!

The easiest way it lines up is with two of the different "isolated ground screws" that hold the components to the case. I'm "pretty sure" thats wrng, as that would defeat the isolated ground I think.

Can anybody help me out?

Thanks!
 

AZDeuce

Active member
484
38
28
Location
Tonopah, AZ
Actually that doesn't help. That's basically the same set up as in the Delco-Remey manual I down loaded.

I have a seperate wire that goes across the top of the condensor,, and is held in place by a little sheet metal clamp. It has connectors on both ends that go to what?

Thanks for your help and the picture, but for some reason mines different.

I wonder if I could just leave the wire out?
 

AZDeuce

Active member
484
38
28
Location
Tonopah, AZ
WARTHOG THANKS! that was the wire in question.

I figured it out on my own (eventually) I noticed the clamp left the wire completely clean where it clamped the wire, the back side of the wire was cleaner than the rest of the wire but not as clean as where the clamp held it in place.

So once I determined that the wire could only go on that way, the ends came out at the same place as in your photo, I hooked it up accordingly, bolted the whole unit back together and put it on the truck.

WOO-HOO! It worked.......Mongo happy again!

It made no sense to me to hook it up that way as I would think even with the fiber washers on the head of the screw, the threaded body of the screw would be grounded out, but I figured since you don't need a isolated ground on the #1 Alt, only on the #2 one, that it "shouldn't" do no harm, so I went ahead and reassembled it just as your photo shows, but before I received the picture, but it did verify I accidently did something coreectly (for a change!).

I hooked it all up , and turned on the ignition and was very happy to see no "magic smoke" came out of the alternator. When I started the CUCV up, the #1 light finally went out.

I think we're all good to go now.

Thank you all for your input, and willingness to step up and help me out.
 

Buzz

Member
140
1
18
Location
Hamilton, Ohio
I have a question, I am overhauling gen 2 and after getting everything back together I checked resistance at the 3 studs and the case and I was getting some weird readings like 1.7 Mega ohms. I took it back apart and made sure I put the fiber washer and the plastic insulator under the bridge, it was ok then I figured that when the capacitor (condenser), was unhooked from the bridge my resistance readings went open or OL on the meter. My question is the condenser supposed to be insulated to keep the bridge from grounding through it? and if so what do you use to do it?
thank you,
buzz
 

markinnh

New member
66
0
0
Location
Hinsdale NH
Wow is all I can say! You guys are aces. AZ Duece, you mean your shop has good enough light to see where the wire is clamped? My arms arent long enough to see that!

On a side note, i need a front bearing for the left alternator, maybe the rear bushing too...

Any help with a currrent bearing number? I got AH-068-31 but cant seem to cross it
 

Warthog

Moderator
Super Moderator
Steel Soldiers Supporter
13,775
227
63
Location
OKC, OK
The alternator is a GM 27Si Type 100 unit.

Here is one company that I use for parts.

Alternator & Starter Parts Wholesale - Repair Kits - High Output Alternators

Contact them and they will get you the right bearings.

Here is the rebuild kit.

Alternator & Starter Parts Wholesale - Repair Kits - High Output Alternators - DELCO 27SI HEAVY DUTY REPAIR KIT

CUCV Electric also has rebuild kits. The owner is a member here.

http://www.cucvelectric.com/ *** No Longer in Buisness *** Hopefully he will be back at some point
 
Last edited:

Warthog

Moderator
Super Moderator
Steel Soldiers Supporter
13,775
227
63
Location
OKC, OK
If you can read dirrections in the TM, turn a screw driver and tighten some nuts, you can rebuild an alternator. The kits that CUCV Electric are selling can be found else where, He just happens to be a member here and has put together all the pieces. Plus he is a good guy.

Just be aware that by not following the directions you can end up with a BIG paperweight.

Alot of guys have cracked the housing attempting to replace the bearings.

You will also need an impact wrench to remove the nut for the pully. If you don't have one most parts houses will remove it for you.
 
Last edited:

Keith_J

Well-known member
3,657
1,313
113
Location
Schertz TX
I have a question, I am overhauling gen 2 and after getting everything back together I checked resistance at the 3 studs and the case and I was getting some weird readings like 1.7 Mega ohms. I took it back apart and made sure I put the fiber washer and the plastic insulator under the bridge, it was ok then I figured that when the capacitor (condenser), was unhooked from the bridge my resistance readings went open or OL on the meter. My question is the condenser supposed to be insulated to keep the bridge from grounding through it? and if so what do you use to do it?
thank you,
buzz

The condenser is a capacitor, it functions as a voltage spike absorber, the very high resistance you were seeing might mean it is defective but 1.5 megaohms is nothing in a 12 or 24 volt system. It needs to be connected to properly function, otherwise voltage will not be stable.
 
Me for one - so how do you remove the bearing? (properly)

I also found that the replacement rear cases you can get for the non-isolated (ie common version) easily can be made to work. Dremel off the guide posts that are to close to the diode trio heat sink, and enlarge the hole where the ground stud goes through the case to match the nylon bushing. Also, replace the pin in the brush holder with a toothpick or other wooden item (or pull it after reassembly and before remounting the alt) before hooking up the wires again - and disconnecting both batteries completely before working on the alternators is a good idea!

Finally, Lehr Auto Electric in Sacramento has found a source for 200A stators for those who want to upgrade their alternators to provide 200A x 24V total for winching etc (instead of OEM 100A x 24V). $150-$175. Will post when I get that upgrade finished. I am running dual group 31's in each of the battery trays as well as a 3 6TL's a side (6 total) between a camper and the box just behind the cab (between cab and wheelwell) as a "house" battery bank for boondocking/dry camping etc. The 200A system should allow recharge of that bank in about 3-4 hrs
 

Keith_J

Well-known member
3,657
1,313
113
Location
Schertz TX
200 amperes? I doubt that stator is anywhere near that even at an engine speed of 3400 RPM. With only the stator replaced, the number of windings must stay the same yet twice the area and mass of copper has to be stuffed into the volume. Unless the windings are silver:shock:.

I believe 140 amperes. But not 200.
 

Keith_J

Well-known member
3,657
1,313
113
Location
Schertz TX
Even if it is around 140 amperes, that would be a great improvement if you are swinging heavy loads. Could be oval magnet wire which has better winding characteristics.

Let us know how it turns out. I would be interested.
 

Warthog

Moderator
Super Moderator
Steel Soldiers Supporter
13,775
227
63
Location
OKC, OK
Me for one - so how do you remove the bearing? (properly)
This is not the only way but I have had great success with it.

Find a piece of pipe or a long socket that is slightly larger than the rear bearing and support the case from the inside with just the pipe.

From the outside use a socket that is slightly smaller than the bearing and very gently hammer the bearing out.

You can also use a press to do this but I don't have one.

Repeat the process to install the new bearing. Install it from the outside while supporting the case from the inside.

When the bearing is flush with the case you are done.
 

Attachments

MarcusOReallyus

Well-known member
4,524
808
113
Location
Virginia

Is this the correct rebuild kit for BOTH alternators? I know aboiut the fiber washer for isolated ground, that's why I'm asking. This kit doesn't have that. I'm thinking that's the only difference, so this kit should work if I reuse the fiber washer, or find a good substitute. (Hmmmm. Wondering if a teflon washer would work....)

Can anyone confirm?


(I'm dragging up an older thread because future searchers might find it useful to have the link and the answer to this question in the same place.)
 

AZDeuce

Active member
484
38
28
Location
Tonopah, AZ
I don't know about teflon, but see no reason why it wouldn't work, but I've stripped all of fiber washers out of dead isolated ground alternators and put them in newly bought alternators from Autozone and/or O'Rilly's, and installed them on the passenger side position with NO problem whatsoever. Hope this helps.
 

MarcusOReallyus

Well-known member
4,524
808
113
Location
Virginia
I've stripped all of fiber washers out of dead isolated ground alternators and put them in newly bought alternators from Autozone and/or O'Rilly's, and installed them on the passenger side position with NO problem whatsoever. Hope this helps.
That'll work! :beer:
 
Top
AdBlock Detected

We get it, advertisements are annoying!

Sure, ad-blocking software does a great job at blocking ads, but it also blocks useful features of our website like our supporting vendors. Their ads help keep Steel Soldiers going. Please consider disabling your ad blockers for the site. Thanks!

I've Disabled AdBlock
No Thanks