cucvrus
Well-known member
- 11,478
- 10,505
- 113
- Location
- Jonestown Pennsylvania

 Stripped out my bed wall and my rear cab closure. It was all attached to be removed. I also removed the bench seat. More progress later this week.
Steel Soldiers now has a few new forums, read more about it at: New Munitions Forums!

 Stripped out my bed wall and my rear cab closure. It was all attached to be removed. I also removed the bench seat. More progress later this week.

 Dug around and found a pair of decent front seats for an M1009. I need the passengers side inside center track for the passengers sub-frame assembly. Maybe you have that part laying around. Thanks for looking.
 This is an assortment of new reproduction parts for an M1009 rear gate. Window crank and all related parts.
 Been a while since I put one of these together. But I was up for the refresher course. Like riding a bike. Came right back to me.
  I wanted to make sure the lock cylinder fit in the handle. I had some that I had to return because they were not milled out correctly. This was a very good reproduction from Brothers.
  Spring and pawl very nice also. Better then others I have seen. Clutch was also very nice. I see someone made a lot of improvements to these parts.
  Lock cylinder fits snug and seats properly. I must remove to get the spring and pawl in place and seated.
  Fits nicely. The key is to fully compress the pawl into the driver and seat the lock cylinder.
  With the pawl and lock cylinder seated. The clutch gets attached with the E clip snap ring.
  The window crank is complete and ready to install. I must build a gate now.
 With that said. I hope that helps to get you back to having a nice window crank on your M1009 rear gate. I do Not know the purchase price of these after market parts. But they are very good quality. They have improved since the last ones I seen. Have a great day. I will post pictures of the rear roof repaint and the rear gate I am building from a parts gate I picked up. Not a military gate. But a decent salvageable one. Thank you for looking and have a great weekend. I hope that helped someone out.


 I went out back and removed an M1009 top from the roof of an M1010 box. Time to get it cleaned up. It has real tree 3 D camouflage on it. Moss is growing on the seals.

 Some one had a brain storm to put silicone caulk on the top of the seal. They did not clean it before adding the sealer. 0 adhesion.


 Looking better already. Have a great day. I have to get back to the projects. Grass is all mowed. Lunch is over. Have a great day.


 The top is all sanded and ready for paint. The window rubbers I cleaned up with enamel reducer and a wire tooth brush. They came out nice and black again. I dug all the sealer from the top of the side glass rubbers. I will re-caulk after I paint. Moving along I dug out one of my YOUPULLIT finds from a few years back. A nice 1983 K5 Diesel tailgate. Manual. It had dark tinted glass on the cap. I pulled them and put them in my Crown of Thorns M1009. The rear glass I used also but it was short lived. The rear glass was laminated in this year with the dark tint. I broke it getting a chain out of the back. Never knew
 it broke till I was cranking it up and seen the crack. I used my little grinder and shot blaster and managed to blast a hole in the center and both corners. Nothing a little welding and patch work won't fix. It has a crack up top like normal. Welders work wonders. Even brazing. Enough for one weekend. Work tomorrow. This fun stuff can't last forever. Have a great day. It was 91 degrees here. 3 more months.
 .jpg") Can hardly wait.
Can hardly wait.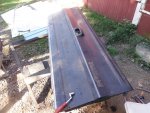


 I've got a lovely bunch of Blazer seats. here they are all standing in a row. The center one not so nice. But a wealth of needed parts.
  This is the pivot bolt out of the donor seat. Looks like these seats were wet for a long time. Not mine. They were dusty dry in the barn.
  All stripped down and almost ready for a couple coats of paint on these multi piece seat pedestals. these are the better seat bases. they do not crack the floor out like the stamped tin bases do. They seem to have better weight distribution. Ever notice the floors are built for each type of seat pedestal. One will not fit the other one in the factory holes. Very strange. Same as the center tunnel. Some have a bolt in center tunnel others do not. A little more cleaning and the seats are soaking in cleaner over night. i will scrub them up and dry them a few days and install them. Thanks for looking. have a great day. Nice weather. Nice and hot.
 The gate is all finished and ready for primer. Multi tasking and getting a lot done slowly on several projects. Thanks for looking. This gate will be very nice when completed. The Kids think I used Gold to weld the cracks. Have a great day. Stay cool.


 Moving right along. I have a few more things to do to get this project completed. The new owner is waiting. I have a hard time doing a fast job. I think it makes waste and poor workmanship.
  Hard at it here in Jonestown.


 I like painting outside on such a nice day.


 More progress. heading in the right direction. Soon the M1009 will be in someone else's care. I like it that way. I have so many projects and a few I am neglecting. Time to get working. I will post more later. Gotta Run. Enjoy the pictures. It's a Simple Task.
")