• Steel Soldiers now has a few new forums, read more about it at: New Munitions Forums!

  • Microsoft MSN, Live, Hotmail, Outlook email users may not be receiving emails. We are working to resolve this issue. Please add support@steelsoldiers.com to your trusted contacts.


CUCV Heaven, My build of a 1009 and 1008

WWRD99

Well-known member
Steel Soldiers Supporter
880
1,339
93
Location
York Pa
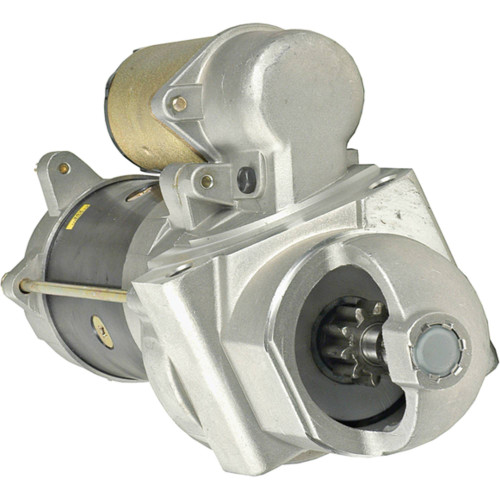
Last month I towed home a 1008...it didn't have batteries or a key...I replaced the batteries with brand new 6t's and replaced the interlock...it wouldn't turn over...I do all kinds of usual testing then head underneath only to find there is no starter!! I was extremely lucky that the battery cable was at a place not touching anything...it has the full 24 volts! Anyhow, with all the looking before I almost started a fire was I couldn't find the starter relay...I think I found the plug as it does react to the start position on one of the wires...My problem is sourcing the right starter now as most catalogs don't list a 24 volt starter only 12 volt...same goes for the relay...side note, this does have a new harness under the dash...kind of a bonus but does make me think the original burned up if the relay melted on hence why the starter is gone and the relay. Any advice on sourcing these 2 parts would be great!20210913_114511.jpg20210913_131004.jpg20210913_131033.jpg20210913_140226.jpg
 

M1009_SPAIN

Active member
65
144
33
Location
Spain
If you are looking for a starter, this is the one you need, I read the opinions and consult the TM and they coincide with the serial number, if memory does not fail me it is one of the last since there were two types of starter, some more square cylindrical and this one, but this one is fit for m1009 / 1008


Regarding the relay, it is the famous doghead relay, which many people run with a napa relay, but there are different opinions about it, I prefer not to hack it and put an original replacement that I think is being manufactured again.

I am wrong the same, those who know more than I can advise you better
 

WWRD99

Well-known member
Steel Soldiers Supporter
880
1,339
93
Location
York Pa
If you are looking for a starter, this is the one you need, I read the opinions and consult the TM and they coincide with the serial number, if memory does not fail me it is one of the last since there were two types of starter, some more square cylindrical and this one, but this one is fit for m1009 / 1008


Regarding the relay, it is the famous doghead relay, which many people run with a napa relay, but there are different opinions about it, I prefer not to hack it and put an original replacement that I think is being manufactured again.

I am wrong the same, those who know more than I can advise you better
That's perfect!! I'll get one of these on the way...very reasonable price too...I really want a stock relay...I have a blazer that has the big relay in it now that is stuck on that to start, I have to touch the relay bolt with the starter wire to start now...want to put it back to stock as well...I'll keep hunting for that relay.


Sent from my SM-G955U using Tapatalk
 

WWRD99

Well-known member
Steel Soldiers Supporter
880
1,339
93
Location
York Pa
Sorry I have to ask do you have the battery cable that runs to the starter with the correct end on it at the starter that clocks the cable in the right position. You Know. I have them also. heat shield, Have. Support bracket , Have.
Wonderful News! I have what looks like a clocked version of a battery end for the starter main power...it's not just an end of a round cable...I have no parts other than that in installing the starter...not even the 2 bolts that hold it to the engine...I have the old harness that they took out so I do have another pigtail to replace the relay in the blazer now as well...check your messages on here as I sent you one with my number in it...Sunday sound good if your around!!20210913_194329.jpg20210913_193432.jpg20210913_193118.jpg20210913_193126.jpg

On the M1009 note....I left my son outside the last several hours and came out to a almost removed drivers side floor pan...the supports look great...if they didn't I would have been looking for another tub...plus both of these are for my son...gives us a good time to learn how to do this stuff together...I have all new floor pans to put in already...found American made steel and pressed in Michigan that is as thick as the original and way oversized to fix any amount of rust loss...took almost a month to get...funny part with all this is...the good ol boys fixing this kept patching over rust holes but didn't remove the old metal...so water go in between the 2 and rotted everything.
 

WWRD99

Well-known member
Steel Soldiers Supporter
880
1,339
93
Location
York Pa
Update on the floor replacement in the Blazer...found more rust...imagine that...the support in front on the back seat had a good hole in it plus the upper support as well...they all rotted together so I may have found a common spot with 5 layers of steel there that tend to hold water and eventually fall apart...I had some good steel that I bent up to fit where the old supports failed...hopefully tomorrow the rear floor gets fitted then it gets taken apart again to paint! POR-15 will be my saviour! 20210918_204916.jpg20210918_204856.jpg
 

cucvrus

Well-known member
11,263
9,552
113
Location
Jonestown Pennsylvania
Just a little tip. Make sure your fit and adjust the door before welding all that together. With that much steel removed from the main body structure that door way can change shape and the entire body tub can sag. Fit the door and correct as needed before welding everything up. That is even to the point of changing the door pin bushings so you get an accurate fit and adjustment. Body lines are helpful to get alignment and opening and closing the door on a fresh door striker make a world of difference. Good Luck.
 

WWRD99

Well-known member
Steel Soldiers Supporter
880
1,339
93
Location
York Pa
Just a little tip. Make sure your fit and adjust the door before welding all that together. With that much steel removed from the main body structure that door way can change shape and the entire body tub can sag. Fit the door and correct as needed before welding everything up. That is even to the point of changing the door pin bushings so you get an accurate fit and adjustment. Body lines are helpful to get alignment and opening and closing the door on a fresh door striker make a world of difference. Good Luck.
We've fit the door several times so far...only had to adjust by using a sand paper grinder on the rocker ends to get it to fit real tight and even...very happy with the fit...I'm lucky since I worked in a shop that had a large body shop for 15 years so I got to see tons of different methods of doing about anything...some not so good due to flat rate! My son is having a difficult time dealing with all the prep and fitment that goes with this though and just wants to get to painting it!! It's been a huge learning experience for both of us in what we're getting into fixing up this blazer! I think we've gone through 2 dozen grinding wheels and 2 grinders cutting and cleaning out the old metal and welds! Taking our time is definitely happening since the end game is to have a new floor with the lowest possiblity of it rusting out like it did before. We bought a small table mounted break to make good 90° bends for making the parts we need too. Thanks for any advice as it is much appreciated and welcome!


Sent from my SM-G955U using Tapatalk
 

WWRD99

Well-known member
Steel Soldiers Supporter
880
1,339
93
Location
York Pa
Had some fun making some bumps and bends today...this floor is darn close but still needed fitted to the existing floor...at the front of the back seat is a pretty big hump that it didn't have so we had to make it with a railroad rail I had in the back yard...this thing has made a good bit if stuff and balances on it's round end too...we took a few tries to get it to fit right but got it pretty good!


Sent from my SM-G955U using Tapatalk
 

WWRD99

Well-known member
Steel Soldiers Supporter
880
1,339
93
Location
York Pa
I applaud your ingenuity, fit looks pretty darn good !
Thanks!! I wish I could say I have done this before to act like I know what I'm doing!!! We have time to double take everything to make sure things are fitting right and soon to be welded in tight! Doing this with my son is a blast too...he's really digging in and working hard to get this done!
 

Mullaney

Well-known member
Steel Soldiers Supporter
Supporting Vendor
7,251
18,795
113
Location
Charlotte NC
Thanks!! I wish I could say I have done this before to act like I know what I'm doing!!! We have time to double take everything to make sure things are fitting right and soon to be welded in tight! Doing this with my son is a blast too...he's really digging in and working hard to get this done!
.
I really love that piece of railroad iron for shaping the humps and bumps in the floorpan!
We have a chunk here that we rescued from a rail replacement project about a thousand yards up the road. It is perfect for forming a lot of shapes.
 

WWRD99

Well-known member
Steel Soldiers Supporter
880
1,339
93
Location
York Pa
So after a awesome trip up to the one and only CUCVRUS the other day...he's as cool in person as he is here online...so much info and just a all around nice guy...we got all kinds of stuff that the truck needed...also found out it's a 1028 with the way the bed is laid out...I had no idea...the drivers door has been changed...or the bed has lol...I got the front bumper mounts that I bolted on using half inch grade 5 bolts...I muscled it all on and got the front 4 bolts in...I can't say how happy we are now getting this front put together correctly! I had another front marker plate from another bumper we got a few months ago and the grill guard as well...the D rings are a great finish too...tomorrow is the tailgate and hopefully the starter install...wish me luck!


Sent from my SM-G955U using Tapatalk
 

WWRD99

Well-known member
Steel Soldiers Supporter
880
1,339
93
Location
York Pa
You need to borrow my brush guard straightener?
Wilton 22030 $185.99 Sledge Hammer, 20 lb., 30 In, Rubber/Steel | Zoro.com
Looks Great.
Yeah the guy we got that and the other bumpers from used it to lift up the truck to cut it apart! I'm not sure if I'll try to hard to bend it back...but yes I do have a massive 25 lb demo axe that might move it!...or destroy the hood and radiator if I miss!!!

Sent from my SM-G955U using Tapatalk
 

nyoffroad

Well-known member
895
601
93
Location
Rochester NY
Yeah the guy we got that and the other bumpers from used it to lift up the truck to cut it apart! I'm not sure if I'll try to hard to bend it back...but yes I do have a massive 25 lb demo axe that might move it!...or destroy the hood and radiator if I miss!!!

Sent from my SM-G955U using Tapatalk
Go for it! CUCVUS is right up the road if you miss!
 
Top
AdBlock Detected

We get it, advertisements are annoying!

Sure, ad-blocking software does a great job at blocking ads, but it also blocks useful features of our website like our supporting vendors. Their ads help keep Steel Soldiers going. Please consider disabling your ad blockers for the site. Thanks!

I've Disabled AdBlock
No Thanks