EDITED:
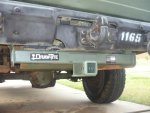
I bought the drawtight from a guy on ebay selling them a little banged up for cheap. I wire brushed off all the loose powder coat and rust spots, then hit it with a scotch bright medium pad to knock the shine off and prep it for paint... a little acetone after that to clean all the surfaces and then I hit it with Krylon (Satin) Italian Olive from WalMart. The color is actually not too far off. Got this all knocked out while I was waiting on my EOC thanks to this thread.
I pulled out one of the bolts that was in the hole where the draw tight mounted so I could be sure I was getting the right size... (needed a 3/4" open end wrench, some oil, and a impact wrench with 3/4" impact socket and about a 6" extension)... Hmm... yup 1/2" grade 8 bolt.. hmm that got a 3/4" head and nut... I thought these CUCV's were metric (should be a 10.9 bolt if it were really metric, but I digress). Off to Lowes... I picked up about $11.00 in grade 8 bolts from lowes and went to work. I made a few mistakes along the way but here's how I think it should have been done (the bolts below are a bit longer than needed, but you cannot get anything longer than the 1-1/" bolts in the forward holes... there just isn't enough room in the frame:
Buy:
--Hitch receiver
--Two 1/2-13 x 1-1/2" Grade 8 bolts (fwd bolts)
--Two 1/2-13 x 2" Grade 8 bolts (rear bolts)
--One 1/2-13 x 2-1/2" Grade 5 or better with nut (for sq tube replacement if bad)
--Two 1/2-13 x 4 " Grade 8 bolts (if tieing old pintle to new receiver)
--at least Four grade 8 nuts, flat washers and lock washers
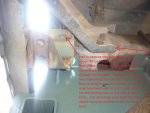
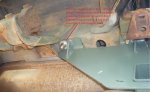
1. remove the sq tube that reinforces the pintle on the bumper, flip it over and put it back in without bolts. The square nuts on it should be slid so that they engage the safety chain hooks where they are creased and bent down as it will serve as a mandrel/anvil for step two.
2. Now to flatten out the safety chain tangs. I used a 4lb mini sledge, then followed that up with a 20ton bottle jack on some blocks to get the height right... I tried to use the bottle jack to even out the crease where the tangs were pressed down as best as I could. Having the sq tube in there made that easier as the sq nuts formed a sort of anvil to work it up against... I bumped my sq tube left and right with the 4lb hammer as I worked it flat.
3. Remove both the small grade 8 bolts that use the rear mounting hole in the frame, mine were very corroded so I replaced them with new.... they are about 1 1/4 and will work in the forward holes if you wanted to try and reuse, but I'd suggest just replacing and they are short enough that you won't have much extra thread to use to get the nuts started while the hitch receiver is not snug.
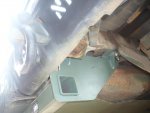
4. Attempt a dry fit of the drawtite hitch receiver.... expect to have to remove one of the grade 8 bolts that hold the sq tube with the d ring on it to allow the hitch receiver all the way up against the frame at the rear mounting bolt hole. Remove the bolt if required, or grind the hitch reciever to clear one or both of them. By removing one you should be able to put the receiver up on the side withouth the bolt removed and then swing the other in place... if not, remove both of them, or grind the receiver to clear. If you are going to bolt it to the bottom of the bumper to reinforce the pintle mount this would be the time to mark and drill the holes. Then place hitch receiver back on the deck.
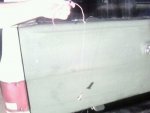
5. Using ~8" of solid wire with mono-filament tied to it, and one of the shorter/fwd bolts tied to the mono-filament (best if you get them tied at the very first or second thread of the bolt). Find the hole in the frame between the mounting holes big enough for the bolt to go through and fish the wire through it up and out the fwd mounting hole... pull the wire through and fish the fwd bolt down the hole. Repeat on other side.
6. Place the longer bolt in the frame just like you took them out (head on top of the frame rail)
7. Swing hitch receiver up in place, start nuts on bolts but do not tighten. See if you can place the grade 5 bolt in the hole removed on the shackle sq tube to swing the receiver up in place. If you can, do it now or you won't be able to do it later without removing the bumper bracing bracket. (remember... you could grind away the part of the receiver where it engages them bolts and make this a bunch easier).
8. Tighten all the grade 8 bolts, remember to use flat washers and lock washers. The forward bolts will engage the side of the frame rail if you are lucky, and you won't need a wrench inside the frame rail... if you need a wrench be prepared to be frustrated... I was able to fish a socket wrench with a 3/4 6pt impact in there from the bumper end of the frame rail and tighten one of them, but then we had to use a long handled screw driver to get it off where it wedged between the frame rail... then a magnet on a stick to fish the socket out...
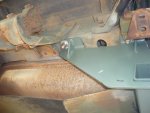
As I put it together without drilling holes where the pintle sq tube brace tied into the bumper down through the draw tite, and put in a couple of grade 8 bolts, I hope you can learn from my mistake. I just marked where to drill them, pulled the receiver back out, drilled, reinstalled and ran a bead of weld between the two... (with tons of help from Shade_Tree)
If this wasn't done, you'd definately weakened the already weak pintle, and would not be able to pull a trailer with it... untill its reinforced I would not trust it!
Hope this post helps!!!
(edited 19 Dec 2011)