• Steel Soldiers now has a few new forums, read more about it at: New Munitions Forums!

  • Microsoft MSN, Live, Hotmail, Outlook email users may not be receiving emails. We are working to resolve this issue. Please add support@steelsoldiers.com to your trusted contacts.


Dark Seas M1008 Project

Buck69

Member
52
89
18
Location
Northern British Columbia
No worries. Heading to the shop shortly to work on my service truck. Will take a look and some pics on both sides of the fire wall. It is pretty much opened up to the bare metal with just the harnesses in place at the moment.
In my mind, I am wondering if that ground wire (in yours) is connected to the wrong battery negative terminal as the one nearest the firewall will be 12v+. Just a thought. Will let ya know where mine goes.
 

DarkSeas

Well-known member
169
269
63
Location
Leland, N.C.
I am wondering if that ground wire (in yours) is connected to the wrong battery negative terminal as the one nearest the firewall will be 12v+. Just a thought. Will let ya know where mine goes.
The negative should be hooked to the 12V battery. Only 2 things on the negative of the 24V battery are the cable to the positive 12V and the cable that runs to the engine wiring harness block to supply it with 12V.

I will double check that tomorrow to make sure that's not where I'm going wrong.

Depending where that ground is coming from, I may have something shorting under the dash. But the location of it in the engine bay... it might be my ground off the alternator??

Cause when I took the old harness off, the ground from the driver alt was a lone wire to the intake stud at the front driver side, now that I'm thinking about it, the new ground wire Tom told me was built into the harness, we might have put it on the positive output of the alternator, which is why 12V was coming out only when the motor was cranking? The alternator was spinning and pushing 12V through the ground instead of the positive cable cause + and - are backwards?
 

Buck69

Member
52
89
18
Location
Northern British Columbia
Here is what I found on mine.
There are some small discrepancies with what is shown in the TM's.
Basically, the ground at the engine stud closes circuits to the fuel heater element, water in fuel sensor, glow plug module and temperature sensor.
I verified all with continuity tests and tagged the ground wires with a small yellow wires for clarity.
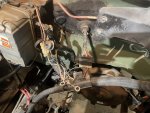
IMG_6867.JPG
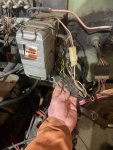
The harness before being opened up.
IMG_6870.JPG
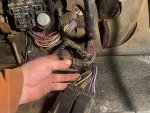
About 20" into the main harness, the ground wire is spliced into 2 other wires that run back to the fuel filter assembly. They are the grounds for the top fuel heater element and bottom water in fuel sensor. The wire then carries on into the cab.
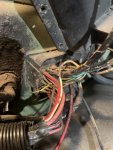
IMG_6871.JPG
IMG_6872.JPG
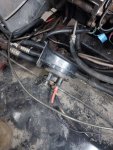
Inside the cab, it runs to the glow plug module where it shares a common terminal with another ground wire. That wire runs back in the engine comartment in the glow plug relay harness.
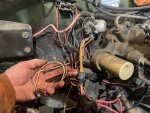
IMG_6874.JPG
It is the ground for the temperature sensor (switch?) It appears someone had changed the pigtail on my harness. It is actually the only thing I have found altered so far in this electrical system.
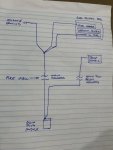
IMG_6877.JPG
Here is a basic diagram of the grounds.
IMG_6875.JPG
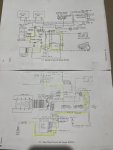
What I had printed from the TM's. It appears ground locations vary on these and some of the circuits are missing or conflicting to both each other and to what I found on mine. All grounds are black. On the lower page one of the grounds is tagged voltage (circled in pen). Maybe they missed the (-) neg in front of it. I could see it causing confusion regardless if someone was trying to bypass the module.
I have no idea how yours is currently wired? You may want to check the fuel heating element in the filter assembly. Mine measures 2.2 Ohms. A dead short on it would likely cause the ground wire to smoke if not fused correctly.
Hope this helps.
 

DarkSeas

Well-known member
169
269
63
Location
Leland, N.C.
@Buck69 really awesome writeup man, hats off to you for your thoroughness. I really appreciate it, and it's interesting to me because I feel like your truck and my new harness might be wired differently.

I have no glow plug wiring harness in my truck, it was tore up and there was no GP control module card in the truck so I just took everything out.

This black wire in question is part of the main harness that runs to the alternators, engine wiring block, bus bar, and the main plugs at the firewall.

I had a ground coming to my alternator with the main harness that wasn't accounted for on the other end, and I have a suspicion that's the other end of that ground and we have the alternator wiring backwards. Itll take me 20 seconds to check continuity at those ends see if my theory is correct tomorrow.

Otherwise I will follow your steps and see if mine is matching up to what you were seeing. The ground isn't acting like a ground, it's got 12V when the motor was cranking - we found out the smoke was coming from the engine/body ground strap, got that fixed up but it didn't answer why we still had 12V at something that should probably be a ground.

I will update tomorrow, big thanks again man, gave me somethin to chew on at work tomorrow.
 

DIVE DIVE

Well-known member
Steel Soldiers Supporter
217
778
93
Location
Chesapeake, VA
Interesting. So I see a ground strap to the firewall and I wanna assume that thick black cable is for a slave plug, I have 2 cables just like it in my engine bay I tied down for now till we get things running and charging properly.

I see you also have a small black ground coming from somewhere, is it part of your harness coming out of the loom? I had a wire like it, part of an original harness, but it was getting 12V of power when cranking. Odd.
The heavy gauge wire is the engine (starter) ground to the chassis. This is an important wire. It needs to ultimately complete the starter circuit back to the battery, either via the bus bar or chassis (assuming the battery is grounded to the chassis elsewhere).
 

DarkSeas

Well-known member
169
269
63
Location
Leland, N.C.
I've got the 12V battery ground going to the frame rail. I had it going to the negative bus and then the frame rail from the negative bus but my friends said i should be directly grounding the primary battery
 

Buck69

Member
52
89
18
Location
Northern British Columbia
No problem.
It sounds like your main ground is the problem. 12v only while cranking is a flag. The starter (engine) needs a heavy conductor to close it's path to battery ground as @DIVE DIVE mentions. I would leave that wire disconnected and perform a drop test on the ground side of the starter. It will quickly identify it if there is a problem.
If you are not familiar with that test, google starter voltage drop test. It is a quick way to identify high resistance in both the power and ground side of any circuit while it is loaded.
 

DarkSeas

Well-known member
169
269
63
Location
Leland, N.C.
Here's the update:

We cracked the DS injector lines and cranked the motor over a while. Fuel came out and we tightened them down. Had smoke coming out the driver tailpipe.

Worked the PS injectors, they bled and we tightened them back. Smoke out both tailpipes, she wants to run.

We pushed 12V to the glowplugs, and the third try she fired up. Didnt want to idle and died. Cranked it back up and kept some throttle on it. Let her warm up some, dumping smoke in the garage even though we pushed her back a few feet to get the tailpipes outside.

Threw the truck in reverse and backed out 5ft. Cut her off.

Fluids dripping bad off the back of the motor. It's diesel. It's coming from the valley under the intake. It's the bottom injector lines, definitely why she's running so rough, she's sucking air in those lines. It HAS to be the bottom lines, right?

Some positives: well she ran. On her own with some fuel and a little bit of glow plugs she ran. Rough, but she ran.

I had the 4x4 light and gen 1 light on my dash. I never seen the 4x4 light on before, and it went off when i set it back in 2hi (had it in 4 to lock the tcase to remove the front shaft).

My headlights work. High beams don't. My tail lights work. Brake lights work. Turn signals work front and rear.

We touched the LED block relay to 12V and my "high beams" worked.

The frickin radio worked. I hooked up my aux cord and played Where I've Been by Matt Mason. "Don't know where I'm goin, but I know where I've been." That old girls been sitting dead for 10 months now and started without much of a fight. Don't know where she's gonna go but she's been sitting in a yard and garage 10 months. That's where she's been.

Fired her back up and pulled back into the garage on her own power. Gonna pull the intake back off and fix the diesel leak tomorrow, maybe she will smooth out some for me. Cheers everyone. Have a great Monday, I sure did.
 

87cr250r

Well-known member
1,201
1,880
113
Location
Rodeo, Ca
If an injector line is leaking it won't make pressure to pop that injector. That would explain the roughness. Good luck getting a wrench on the bottom lines with the rest installed. They come off in pairs. Install and fully tighten two at a time. I forget the exact order.
 

DarkSeas

Well-known member
169
269
63
Location
Leland, N.C.
@87cr250r you're right. We're gonna have to take the intake and fuel lines back off and get that leak sorted this week.

Currently I'm going up to the shop to look around at some things: see if I can fix my horn broken wire, see if I can trace that 12V "ground" issue I'm having, and see if I can look into any other gremlins plaguing me.

Right now, I turn the key on and I just get a GEN1 light on the dash till the motors running and the 4x4 light works when the tcase is in 4wd. I'm supposed to get a GEN2 light as well, aren't I?

Is it true that a bulb being out in the dash could disrupt the whole exciter circuit and charging ability of the passenger alt? Might have to do some head scratching with that one.
 

DarkSeas

Well-known member
169
269
63
Location
Leland, N.C.
It's too cold to stay here as long as I wanted to today. I fixed the 12V wire going to the horn:
20230314_172512.jpg

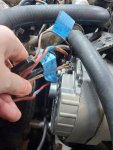
I also took a picture of the back of my passenger alternator:
20230314_172342.jpg
I've got the red and orange wires going to what I think is the positive terminal of the alternator. These go to the 24V bus bar.

The plug is the plug.

The red wire at the bottom is going to what I believe is the negative terminal of the alternator at the bottom left. This connects to the 12V bus bar.

I double checked where each terminate, but do I have these in the right spots on the alternator? Just starting my diagnosis of why I didn't have a GEN2 light come on.
 

DarkSeas

Well-known member
169
269
63
Location
Leland, N.C.
Okay well we got her running again tonight. She is DUMPING fuel and smoking bad. Even getting some fuel knock when we lay into it.

Even at idle she's smoking bad. Is my issue at the injector pump? Injectors? Is there some screw that controls the fuel input somewhere?
 

87cr250r

Well-known member
1,201
1,880
113
Location
Rodeo, Ca
I just got my new to me 6.5 started today. I had a questionable injection pump and it smoked and knocked terribly. I put a known good pump on it and it still had a knock that I isolated to cylinder 5 by cracking injector lines. By the time I isolated it,.the injector started firing correctly and the knock is gone now. Injectors apparently can cause a hell of a knock. I suggest you listen to a 300 bpm and 600 bpm metronome on YouTube as it will help you determine if the knock is in the top end or bottom end of the engine. The top end runs at 1/2 bottom end speed.
 

DarkSeas

Well-known member
169
269
63
Location
Leland, N.C.
I just got my new to me 6.5 started today. I had a questionable injection pump and it smoked and knocked terribly. I put a known good pump on it and it still had a knock that I isolated to cylinder 5 by cracking injector lines. By the time I isolated it,.the injector started firing correctly and the knock is gone now. Injectors apparently can cause a hell of a knock.
Interesting. I put 8 new (rebuilt) injectors in my motor cause it was slightly knocking and smoking bad when I very first got the truck. We thought some new injectors might fix the problem.

@cucvrus suggested I loosen the 3 bolts on the IP and rotate the pump a line thickness to the driverside to see if that helps any.

I honestly think this might be able to fix or help my issue, glad I don't have to tear down the timing cover to be able to adjust this for a quick check.

I also plan on compression testing the cylinders then likely pulling the new injectors back out for pop testing from there before I go into testing/rebuilding the IP. Cover all my bases first before I get into the expensive rebuild stuff.
 

Lil Pete

Member
19
52
13
Location
California
Well, I don't know whether to spit or wind my watch.
I was just feeling bad about replacing the cork gaskets on my valve covers when I found out about the black rtv hack.
My covers were leaking and the bolts were all loose.
I guess it's cork for now........
I'm doing the same thing and expecting a different result.
Crazy Right?
"Who said that?!"
 

87cr250r

Well-known member
1,201
1,880
113
Location
Rodeo, Ca
Black RTV isn't a hack. It's what it's supposed to be. The sheet metal flanges on the valve cover are too thin to properly compress a cork gasket. They were never intended to be used with gaskets. The double ended bolts prevent you from retorquing once other hardware is attached.

The same is true for the oil pan.

Don't use exhaust manifold gaskets, either.
 

DarkSeas

Well-known member
169
269
63
Location
Leland, N.C.
Too long since an update. We couldn't really see a way to loosen and adjust the pump without bending the fuel lines around, so we're deciding on a different route. The truck was smoking when I got it, Jr and Tom think it's the injector pump that's bad. Going to pull the IP out in the next few weeks and get it tested/rebuilt if needed by a local shop - this will probably happen sometime in July when I have some money freed up. If it is just a timing issue and the pump tests good, we can put it back in with correct timing and that should fix things.

The CUCV isn't forgotten, we were just over there last week looking over things and making a decision on the next step. Hope everyone is doing well.
 

DarkSeas

Well-known member
169
269
63
Location
Leland, N.C.
Gonna get back on things today, see if I can take down the rear driveshaft and get the u-joints off I need to get replaced (front where front shaft meets front hub and rear two at ends of rear shaft). I already had the front driveshaft off.

While I'm there I'm going to look over the IP stuff, rack my brain about the timing. I'm starting to understand from looking up threads the past couple of hours (sorry work) that the bolts I want to adjust to turn the pump are on the BACK of the IP - meaning OUTSIDE the motor. I was under the impression to advance the timing I'd have to get the timing cover off and all the belts and alternators off again to get to that. I did find out that if I do in fact need to take the IP off I can go through the oil fill neck hole with a magnetic 13mm socket. Hope I don't need to, but that does help.

What sucks is I got a new phone and my old one transferred a lot of pictures and videos, but not the video I had took of my issue and truck running. If the batteries still have juice in them I might see if I can crank up the truck get it idling again and take a quick video of the problem to post.

So, now that I'm on the same page (I think) that the adjustment is made by loosening the bolts on the outside of the motor, not the bolts under the timing cover, I think the only thing I can't get my head around is: how will I be able to turn the pump without twisting the steel fuel lines attached to the front of it? Am I supposed to tear down and remove the air cleaner, intake, fuel lines, THEN be able to adjust the pump? This might be a really bonehead question, but I can't say I've found any details on adjustment yet.
 

adf5565

Well-known member
Steel Soldiers Supporter
334
606
93
Location
Tioga, PA
Gonna get back on things today, see if I can take down the rear driveshaft and get the u-joints off I need to get replaced (front where front shaft meets front hub and rear two at ends of rear shaft). I already had the front driveshaft off.

While I'm there I'm going to look over the IP stuff, rack my brain about the timing. I'm starting to understand from looking up threads the past couple of hours (sorry work) that the bolts I want to adjust to turn the pump are on the BACK of the IP - meaning OUTSIDE the motor. I was under the impression to advance the timing I'd have to get the timing cover off and all the belts and alternators off again to get to that. I did find out that if I do in fact need to take the IP off I can go through the oil fill neck hole with a magnetic 13mm socket. Hope I don't need to, but that does help.

What sucks is I got a new phone and my old one transferred a lot of pictures and videos, but not the video I had took of my issue and truck running. If the batteries still have juice in them I might see if I can crank up the truck get it idling again and take a quick video of the problem to post.

So, now that I'm on the same page (I think) that the adjustment is made by loosening the bolts on the outside of the motor, not the bolts under the timing cover, I think the only thing I can't get my head around is: how will I be able to turn the pump without twisting the steel fuel lines attached to the front of it? Am I supposed to tear down and remove the air cleaner, intake, fuel lines, THEN be able to adjust the pump? This might be a really bonehead question, but I can't say I've found any details on adjustment yet.
You’ll be able to turn the pump with the lines attached. Should be 15mm nuts, just loosen them a little and you’ll be able to turn the IP. You’re only turning typically a few line widths and it’s extremely thin so it’s not much. You may have to remove the air filter but that would be it.
 

DarkSeas

Well-known member
169
269
63
Location
Leland, N.C.
You’ll be able to turn the pump with the lines attached. Should be 15mm nuts, just loosen them a little and you’ll be able to turn the IP. You’re only turning typically a few line widths and it’s extremely thin so it’s not much. You may have to remove the air filter but that would be it.
Excellent, thanks. I'll be reporting back tonight.
 
Top
AdBlock Detected

We get it, advertisements are annoying!

Sure, ad-blocking software does a great job at blocking ads, but it also blocks useful features of our website like our supporting vendors. Their ads help keep Steel Soldiers going. Please consider disabling your ad blockers for the site. Thanks!

I've Disabled AdBlock
No Thanks