• Steel Soldiers now has a few new forums, read more about it at: New Munitions Forums!

  • Microsoft MSN, Live, Hotmail, Outlook email users may not be receiving emails. We are working to resolve this issue. Please add support@steelsoldiers.com to your trusted contacts.


Davit crane mods for an M813 / A1 with 16.00R20s

US6x4

Well-known member
Steel Soldiers Supporter
1,182
2,067
113
Location
Wenatchee, WA
My big project for this year was to build a davit crane to handle my 16.00R20 spare tire and since Jim's price for a used crane at army6x6parts was decent enough I chose to modify an existing A1/A2 crane instead of starting from scratch.

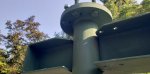
This ISO bed davit crane was the inspiration for how to get a crane tall enough and still fit inside the bed and cargo cover.
Tire crane_2.jpg

As you can see there's an extension piece on the upper mast which is what I needed to get the tire up and over the 20" tall fixed bed side. Here is what I did to make the crane work for my M813A1:

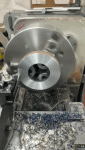
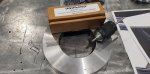
I had Jim send me this rougher condition crane instead of his nice one since I planned to hack & whack on it anyway and it arrived with all the pieces.
IMG_0270.jpg

20230426_092712.jpg

20230426_092731.jpg

20230505_131201.jpg

Once I was able to gather all the measurements off of this real crane I modeled up the modifications I wanted to make to get everything packaged just right and to add some capability to make a tire change easier. The 3D models show the mast both stowed away and also mounted for use.
USGI DAVIT CRANE ASSY.JPG

USGI DAVIT CRANE ASSY _SIDE.JPG

TIRE CRANE INSTALL.JPG
This bottom image kind of shows the tricky balance to sizing the extension tall enough to get the tire over the bed rail yet short enough that it would stowe beneath the cargo cover when not in use.


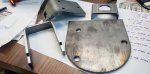
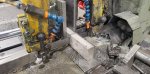
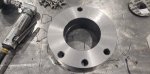
To start with, the bottom frame had a middle cross member for use with the original ramp that I cut off and it had a large plate that hung down below the angle iron rails. I added 8 spacers made from 1 15/16" shaft at 1" long to get the rails and the plate to be flush.
20230518_090841.jpg

20230809_150032.jpg
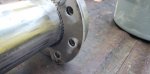
The spacers, 15' of hardened 5/16" transport chain and the mount for storing the mast were welded onto the frame.

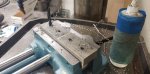
The mount is made of 1/4" steel with 3 grade-8 bolts welded on as studs.
20230809_145940.jpg

20230809_145920.jpg
 
Last edited:

US6x4

Well-known member
Steel Soldiers Supporter
1,182
2,067
113
Location
Wenatchee, WA
Here are some of the parts I designed and had laser cut at work. The gussets are missing but you can see the stowed mast base mount, the boat winch mount, the end stop hoop, and the new top cap for the trolley.
20230602_090147.jpg


With the base frame done, next up is the lower mast which needs its diagonal braces widened by 1" on each side to squeeze in the 17" tire. I made 4 spacers out of 1x2 stainless flat bar.
20230511_090646.jpg

20230524_111035.jpg

The lower mast also got grade-8 bolts welded in as studs which required trimming off the corners of the boxed brace mount to get the bolts into their holes.
20230825_161759.jpg


With the lower mast done now its time to make a new mast extension from scratch!
I started with a 3" sch. 80 pipe cut at 26" long and then made the flanges out of 6 1/2" round bar with a 3 1/2" hollow bore. I cut the flanges thick so they could get faced down to 1" thick. Then I used a really cool centering transfer punch to locate the asymmetrical bolt pattern from the original mast to the new flanges.
IMG_0686_1.gif

20230530_111225.jpg

20230601_140312.jpg

Now the flanges get timed together with the pipe seam located on the tension side of the mast, tack welded in place and setup in the turn table to get flux-core welded on both sides of both flanges. The flanges had large chamfers machined into them so the weld would have good penetration and lay fairly flush on the ends.
20230802_130420.jpg

20230811_164803.jpg

20230811_164924.jpg

I added an extra 1/4" reinforcement to each flange because I was worried about bolt pullout. I started making the 6.5" x 1" thick flanges not knowing that the crane would arrive with 7" x 3/4" flanges. The extra meat just gives the bolts a little more to hold on to.
20230811_164858.jpg

A large D handle was added to assist in assembling the upper mast.
20230811_164754.jpg

20230811_164842.jpg


Next up is the upper mast!
 

Attachments

Last edited:

US6x4

Well-known member
Steel Soldiers Supporter
1,182
2,067
113
Location
Wenatchee, WA
The upper mast has some really fun mods done to it in order to facilitate both moving the spare out of the bed and also bringing it back in. @HanksDeuce added a come along to his crane to help with this so I found a nice boat winch with a strap instead of a cable and made a mount for it to attach to the corner of the mast and also to allow a cargo strap to hook into it for extra support while in operation.
20230722_145357.jpg

20230722_145426.jpg


The trolley was in rough shape so it got disassembled, bead blasted, modified, painted, greased up, and then reassembled.
20230526_105927.jpg

20230722_145339.jpg

20230808_102643.jpg

20230808_103512.jpg
*this 3/16" steel cap with the hole in it was welded to the open end of the trolley body to have a place for the boat winch hook to connect to and you'll see why real soon.


The telescoping part of the mast also got some love. It got a second hole drilled to let it collapse in even further to tuck under the cargo cover and the end stop got a hoop to mount a rolling pipe to reverse the pull direction of the boat winch strap.
20230518_140957.jpg

20230808_103859.jpg

The toys I got for the upper mast are the West Marine 900 lb boat winch (Model 142015) with 12 ft strap and the Vestil 1000 lb chain hoist with 15 ft chain (Model HCH-1-15).
20230511_153956.jpg

And here is how they play together. Look closely at how the strap is routed for the two different functions:
20230826_171948.jpg


Now that some of the parts are painted we can bolt them together and start working towards a mockup!
20230826_171314.jpg

20230826_171245.jpg
 
Last edited:

US6x4

Well-known member
Steel Soldiers Supporter
1,182
2,067
113
Location
Wenatchee, WA
This is the first mockup attempt to see if reality matches the computer world and it came out pretty close...well, close enough.
20230826_171150.jpg

20230820_103306.jpg

20230826_170926.jpg

20230820_110414.jpg

I was really hoping that the original spare tire anchor parts wouldn't interfere but I won't know until I get a tire loaded up. The boat winch sat a little higher than expected but it doesn't push the cover up. I'll have to make a padded cover for it so it doesn't wear through the vinyl. Note how the end stop hoop is rotated downward when stowed away for extra clearance.

With the placement of the crane lined up and looking good 2.5" from the front and 8" from the side, I transfer punched and drilled 8 holes for the 1/2" bolts. It took an angle drill to clean up the underside of those holes. I didn't plan it this way but I missed every cross member below the bed and my 3" round washers also barely missed - whew! I'll take lucky over good anytime.
20230825_150632.jpg

20230825_150002.jpg

20230826_172411.jpg

20230826_172439.jpg


I used some Permatex rust treatment on the floor before bolting the painted crane down. The upper mast wiggles more than I like so I anchored it down on both ends to keep it from flopping around while I drive.
20230826_170703.jpg
 
Last edited:

US6x4

Well-known member
Steel Soldiers Supporter
1,182
2,067
113
Location
Wenatchee, WA
Now it's time to peal back the cover, remove some bows, and assemble this beast to do a function test!

20230827_173203.jpg

20230827_180207.jpg

20230827_180619.jpg

Wow this thing is tall!

20230827_195101.jpg

20230827_195636.jpg

20230827_185322.jpg

With the 525 lb tire suspended by the crane at full reach the telescoping tube pulled down slightly and that was it. No scary squeaks, groans, or popping. I really liked having the extra strap reinforcing the mast. There was plenty of tension on that strap once the tire was off the ground.

20230827_195717.jpg
With the tire at full up position the boat winch just effortlessly pulls the tire into the bed until the trolley stops against the stationary top tube at which point the tire gets lowered down into the frame.


20230827_200438.jpg

20230828_192501.jpg

20230827_200727.jpg

20230828_194340.jpg

The tire fits and it cleared the original spare tire mounting brackets until I cinched down the chain binder at which point the tire dug in slightly on that first ear for the cross pin. I came back later, removed the tire from the bed and cut off the offending ear to save my sidewall. I also cut off the excess binder chain and now only have a few small details to finish.
 
Last edited:

US6x4

Well-known member
Steel Soldiers Supporter
1,182
2,067
113
Location
Wenatchee, WA
A good sized ammo can got bolted to the crane to store accessories and tools and stuff. I'm planning to add grip tape to the lid so it can double as a step stool to get up high enough to crank on the boat winch. I had to drill two new holes closer inboard on that plate to get the ammo can far enough forward for the hinge to clear the front of the bed.

20230830_152830.jpg

20230830_154141.jpg

20230830_154535.jpg


A few more details and a video of the crane in action will be posted up as soon as I can get that edited together.
 

US6x4

Well-known member
Steel Soldiers Supporter
1,182
2,067
113
Location
Wenatchee, WA
The pair of Beachwood Canvas chain covers arrived today so one went on the hold down chain over the tire and the second one I put on the lower chain since it wouldn't fit over the hook of the chain that lifts the tire.

20230902_143652.jpg

20230902_144449.jpg

20230902_145844.jpg


Here is a funny picture I should've added before. I've been having my kid do some custom hauling with his John deere gator to transport heavy items from my painting area to the truck. He has fun and I save my back!
20230826_071916.jpg
 

US6x4

Well-known member
Steel Soldiers Supporter
1,182
2,067
113
Location
Wenatchee, WA
Awesome stuff here for sure, thank you for sharing!!
Oh, you betcha. I haven't contributed much lately so it's about time to throw out another thread. It's reassuring having a way to offload the spare and I'm hoping I never have to change a tire.
 

Superthermal

Well-known member
268
769
93
Location
Utah, Murray, United States
Given me some great ideas as I am still looking into how to make a double tire carrier that will fit my pair of 16.00R20 spares. I have an S-280 in the back of mine and I am considering having both on swing out "door"arms on the back, one will be outside the rear tailgate and the second inside the tailgate and latch together in the middle. Still working on the design.
 

US6x4

Well-known member
Steel Soldiers Supporter
1,182
2,067
113
Location
Wenatchee, WA
Given me some great ideas as I am still looking into how to make a double tire carrier that will fit my pair of 16.00R20 spares. I have an S-280 in the back of mine and I am considering having both on swing out "door"arms on the back, one will be outside the rear tailgate and the second inside the tailgate and latch together in the middle. Still working on the design.
The butcher truck that would come out to butcher our cattle had a similar setup to what I think you're talking about. It swung out from against the back door of the refer cargo box. It was strong enough to lift a 2000 lb bull (minus the guts)
 
Top
AdBlock Detected

We get it, advertisements are annoying!

Sure, ad-blocking software does a great job at blocking ads, but it also blocks useful features of our website like our supporting vendors. Their ads help keep Steel Soldiers going. Please consider disabling your ad blockers for the site. Thanks!

I've Disabled AdBlock
No Thanks