
brianp454
Member
- 572
- 12
- 18
- Location
- Portland, OR
General Mcgregor,
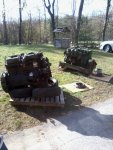
First, thank you for great documentation and good pics. Keep them coming! I would love to see more pics and get even more info to try to understand the root cause failure better. I know you want to get your truck running first, yet hope you will continue to share.
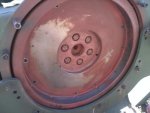
Second, your immediate issue with the pressure plate fasteners. Have you looked at the torque specs in table 1-1 in TM 9-2815-21034-2-1? You should be able to look at the size and head marking and get a pretty good idea. I don’t want to be the master of the obvious, but there is the old rule of thumb that if you use the standard combo wrench and a general good tug that should be in the right neighborhood (NOT a strict rule by the way). I’m very curious about why they are breaking. Perhaps they have been over-tightened in the past? Or your torque wrench working improperly? Or the torque you are way too much for the fastener?
Third, I’ve always been amazed studying fasteners stating with a day lecture when I took auto shop in HS and ever since as an engineer. People generally have no idea about fasteners in terms of why they are tightening them, how much, how little, how and why, sources of variation, how strong are they, how they fail, etc. If you are interested ARP has some great info at http://arp-bolts.com/pages/technical_installation.shtml and there’s lots of other good stuff on the web. I disassembled an engine that required barely more than a thumb and forefinger to remove the rod nuts! Talk about inadequate preload!
Last is the follow-up on your failure. Are you up to working with me or others here to understand this failure better? I’m sure you want to avoid it in the future and this may lead to better understanding for all of us.
Possible root causes of the failure appear to include connecting rod bolt inadequate pre-stretch, excessive connecting rod bolt pre-stretch or stretch during operations, connecting rod bearing failure, piston failure such as the wrist pin being pulled from the bottom of the piston, piston seizing in the bore while the piston was travelling down, did the big end of the rod fail or did the cap come off, etc.
Some things that seem to be OK to rule out include connecting rod beam failure (unlikely because all of the ends are there and it doesn’t seem to have been crushed by hydrostatic lock, the small end of the rod did not fail, are there others?
Some other ideas and questions:
What type to oil, filters, fuel, oil change intervals, etc. did this engine see?
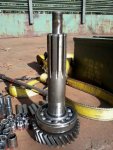
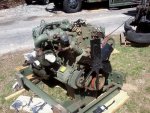
I noticed in one of the pictures that the connecting rod main beam is intact. This suggests it did not load up with fuel (hydrostatic lock) or fail in tension. The big end also seems to be intact, i.e. did not fail.
Did you find the rod bolts and rod cap? I’m curious about preload on all of your other connecting rod bolts. It would be most fun to record the torque required to loosen them and measure their stretch.
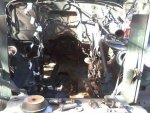
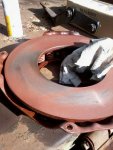
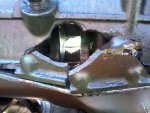
Is that bottom of the piston I see laying in the bottom of the oil pan? If so, is there other half still in the bore? Else you would have lost all boost at the least.
I wish I was on the right coast, but unfortunately I’m here on the left coast and far from GM.
Does anyone else on here have documentation or an engine with a catastrophic failure like this?
First, thank you for great documentation and good pics. Keep them coming! I would love to see more pics and get even more info to try to understand the root cause failure better. I know you want to get your truck running first, yet hope you will continue to share.
Second, your immediate issue with the pressure plate fasteners. Have you looked at the torque specs in table 1-1 in TM 9-2815-21034-2-1? You should be able to look at the size and head marking and get a pretty good idea. I don’t want to be the master of the obvious, but there is the old rule of thumb that if you use the standard combo wrench and a general good tug that should be in the right neighborhood (NOT a strict rule by the way). I’m very curious about why they are breaking. Perhaps they have been over-tightened in the past? Or your torque wrench working improperly? Or the torque you are way too much for the fastener?
Third, I’ve always been amazed studying fasteners stating with a day lecture when I took auto shop in HS and ever since as an engineer. People generally have no idea about fasteners in terms of why they are tightening them, how much, how little, how and why, sources of variation, how strong are they, how they fail, etc. If you are interested ARP has some great info at http://arp-bolts.com/pages/technical_installation.shtml and there’s lots of other good stuff on the web. I disassembled an engine that required barely more than a thumb and forefinger to remove the rod nuts! Talk about inadequate preload!
Last is the follow-up on your failure. Are you up to working with me or others here to understand this failure better? I’m sure you want to avoid it in the future and this may lead to better understanding for all of us.
Possible root causes of the failure appear to include connecting rod bolt inadequate pre-stretch, excessive connecting rod bolt pre-stretch or stretch during operations, connecting rod bearing failure, piston failure such as the wrist pin being pulled from the bottom of the piston, piston seizing in the bore while the piston was travelling down, did the big end of the rod fail or did the cap come off, etc.
Some things that seem to be OK to rule out include connecting rod beam failure (unlikely because all of the ends are there and it doesn’t seem to have been crushed by hydrostatic lock, the small end of the rod did not fail, are there others?
Some other ideas and questions:
What type to oil, filters, fuel, oil change intervals, etc. did this engine see?
I noticed in one of the pictures that the connecting rod main beam is intact. This suggests it did not load up with fuel (hydrostatic lock) or fail in tension. The big end also seems to be intact, i.e. did not fail.
Did you find the rod bolts and rod cap? I’m curious about preload on all of your other connecting rod bolts. It would be most fun to record the torque required to loosen them and measure their stretch.
Is that bottom of the piston I see laying in the bottom of the oil pan? If so, is there other half still in the bore? Else you would have lost all boost at the least.
I wish I was on the right coast, but unfortunately I’m here on the left coast and far from GM.
Does anyone else on here have documentation or an engine with a catastrophic failure like this?
")
