• Steel Soldiers now has a few new forums, read more about it at: New Munitions Forums!

  • Microsoft MSN, Live, Hotmail, Outlook email users may not be receiving emails. We are working to resolve this issue. Please add support@steelsoldiers.com to your trusted contacts.


Deuce dump project

jdr2710

Member
60
1
8
Location
Colorado Springs, CO
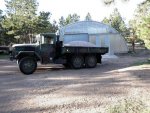
After seeing all the deuce dumpers on here I said to myself "I gotta have one of them!" That and I'll pay for 1/2 the hoist on the delivery savings when I gravel the drive as soon as I finish it!

I found the hoist for a heck of a deal from these guys (no affiliation)
Premium Supply - Home Page

I found it on eBay from a company in Florida, that drop ships from the place in Texas (search on dump hoist) $1200 shipped to my work where they forked it from the truck to my pickup no sweat. There was some confusion as the model number on the hoist was 416 (4" ram 16" throw) but the ram is actually a 5" 16" throw. I called the guys at premium and they confirmed that it is really a 516, with the 416 part number to compete with some other manufacturers. They claim it costs about the same for either size, so they just build the larger and re-label it. The other confusion was that the place in Florida shipped the pump, the place in Texas the hoist, but all the bits got here eventually.

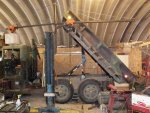
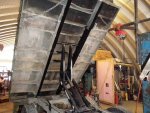
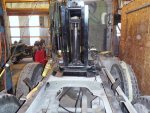
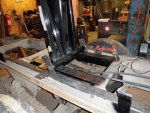
The unload was easy with the jib crane I've got mounted on one of the auto lift posts. Then came the fun of getting the box off the deuce. The door to my lift area is just a few inches too short for the exhaust & the crane I've got mounted to the front of the frame. So I had to roll it backwards on some steel pipe rollers to get it to where the hoist could support it. Once that was off the rest of the work has been easy.

I've got the hinges and hoist mounted, and the tank in place and pumping. It is a 12V pump, but I've got a 50 amp 24-12V battery equalizer so hopefully it will avoid killing the one battery. I've got the 24-12 setup to feed in parallel to one of the batteries, so whatever the pump draws beyond 50amp should come from the battery, then the equalizer should even out the batteries and hopefully all is well. I guess I'll see... Based on the pressure and the cylinder size and where I've placed the pivot point it should be able to lift about 8-9 tons.

I'll be uploading pics to this URL as I work (I'm too lazy/busy to do an actual web page yet, but you can check out the larger version of the pics there):
Index of /images/deuce/projects/dump

I'll update as I remember to take pictures!
 

Attachments

tie6044

Active member
Steel Soldiers Supporter
860
42
28
Location
Blaine, MN
Nice pics! Is the bed going to sit at the stock height (when down) or is it going to be higher off the frame?
 

Kohburn

New member
655
5
0
Location
SOMD
I've been thinking about this particular mod also sinc eI want to use the duece for my driveway and landscaping. otherwise it will involve full reverse and a solid application of the brakes to unload ;)
 

jdr2710

Member
60
1
8
Location
Colorado Springs, CO
Nice pics! Is the bed going to sit at the stock height (when down) or is it going to be higher off the frame?
The bed will be the original height, but sticks 14" farther back due to the crane you can just see in one of the pics. This particular hoist is a 'low profile' and needs only 8" from the top of the frame rails to the underside of the bed. The 6" of the bed rails got me close plus the wood spacer which I'll keep. To make up the remaining difference I notched two of the cross webs, welding the pieces of C channel I cut out back to the remaining section forming a box where there was a C, so hopefully the strength is pretty close to what was there before. I'll post some more pics of the bed modifications before & after I install it back onto the frame. My plan is to add a piece of 3/8" thick by 5 1/2" bar stock to box in the frame on the box rails so that the hoist has a solid point to push against. I'll do this boxing from the hinges to a couple feet in front of the hoist attach point (as much as a 20' stick from the steel store will reach.)
 

m16ty

Moderator
Moderator
Steel Soldiers Supporter
9,576
210
63
Location
Dickson,TN
Nice pics! Is the bed going to sit at the stock height (when down) or is it going to be higher off the frame?
When I was trying to figure out how I wanted to install my dump I found out that you have two options. You either have to raise the bed off the frame a little or loose the bumperettes. I raised mine about 1 5/8" over stock and I liked that option better than loosing the bumperettes. Just in passing you can't tell the bed is higher than normal.

Because my hoist was an older non-low profile hoist I had to notch a couple of crossmembers also even after raising the bed height. I would have liked to went with a low profile hoist but I couldn't beat the price of the one I got (scrap price).
 

rosco

Active member
Steel Soldiers Supporter
2,102
27
38
Location
Delta Junction, Alaska
So what will you have in it? Did the hinges, lift, pump all come for one money - the $1200. That sounds pretty good. the electric pump sounds like the way to go. When you have a winch, you options are limited. The T-case PTO's are hard to find and expensive.

Lee in Alaska
 

ranchand

New member
140
0
0
Location
Spokane, WA
I used an heil sub frame lift which raised my bed 6". Looks great with the 15.5s and ill have plenty of clearance with a load. Only downside is my bed sits 9" taller than stock, a little hard to hand load:?
 

Gunner0311

Member
189
2
16
Location
Millington, Michigan
My M207 was converted to a Dump by the previous owner using a 10 yard dumpbox from a Mack Truck. Everyone thinks it is an original factory setup when they see it. I am going to take it off of the frame though and convert the M207 to a "Bobbed 4x4" with 395x20 tires....
 

jdr2710

Member
60
1
8
Location
Colorado Springs, CO
So what will you have in it? Did the hinges, lift, pump all come for one money - the $1200. That sounds pretty good. the electric pump sounds like the way to go. When you have a winch, you options are limited. The T-case PTO's are hard to find and expensive.

Lee in Alaska

Pretty much everything you need comes with for the $1200, hoist, pump, hoses, hinges, safety prop leg, cables for the battery (too short for my setup), even the bungee to strap the battery down. I did add some extra steel, most of which I had laying around the barn, I had to buy the 3/8"x5 1/2"x20' I'll use to box in the C channel on the box.

The installation instructions are a bit lacking tho, they basically say 'install the system', nothing on which orifice on the pump is the lift (one port is 2500psi, the other 1500), which the drop, nor which wires do what on the controller. I guess I'll experiment and find out!
 

jdr2710

Member
60
1
8
Location
Colorado Springs, CO
That sounds like a great deal. The high pressure side will be the up part, of course.
The challenge is in determining which port, helpfully labeled A & B, is the high pressure one! I'm going to guess A as high pressure & B as low, but I won't know until I test it. I have a high pressure gauge but I need to get the adapters to be able to connect it.
 

jdr2710

Member
60
1
8
Location
Colorado Springs, CO
I got my adapter to connect the high pressure gauge, and of course given a 50/50 chance I had it wrong. Good thing I checked! Turns out port B is the high pressure port.

I made good progress this weekend, and probably would have finished if the 'effing cylinder didn't leak! I'm going to call the seller on Monday and see how they want to go about fixing it. I'm guessing one of the O-rings got rolled when they installed the end cap as it leaks even with no pressure if the ram end is low enough. I'm hoping they'll just let me take it to a local shop and get it repaired and send them the bill. I'd rather not ship that 5" beast of a ram to Florida or Texas!

Other than the leak it is working like a champ. I should be ready to haul my gravel as soon as I get the ram fixed, and get the mud flaps re-installed.

Getting the bed back on over the hump of the hoist wasn't as bad as I was afraid it was going to be. I added a second counter weight to my jib crane, at a greater distance, so I felt safe lifting the rear of the bed and letting the crane lift around 1,000 pounds of the bed. I was able to back about 4' under the bed so I set that end on a piece of telephone pole as a roller (to clear the hoist). With the 2 axis of motion available with the crane I was able to roll the bed back onto the frame easier than I took it off without using the crane. once I got it close I set the entire bed on a set of 3/4" steel pipe pieces to be able to roll it into place. The guides I had installed helped with this process also keeping the bed aligned. I gave myself 3/4" of clearance to the crane mounted behind the cab.

I did get the proper safety prop leg installed instead of the piece of telephone pole in the pics. I also got the wiring to the batteries instead of the jumper cables. The remote works a treat, push a button and up she goes! In that 50/50 shot I actually picked the right wires for up and down. I had a couple custom cables made at the local welding shop for the ground & power out of 1-0 copper. I tested the power draw with a clamp-on amp-meter, only about 90 amps when lifting the empty bed, I'm guessing it will go a quite bit higher under full load.

I've updated the pics at: Index of /images/deuce/projects/dump The latest pics are the P502* ones.

I'll take some pics of it in action once I've got the ram fixed so it doesn't pee a puddle of oil on my floor!

Jeff
 

Attachments

Last edited:

m16ty

Moderator
Moderator
Steel Soldiers Supporter
9,576
210
63
Location
Dickson,TN
If it's leaking around the outer part of the cylinder end it's more than likely a o-ring (easy fix). If it's leaking around the rod then it's the cylinder packing (still not to bad of a job but will require more disassembly). Because of the low price of the whole setup they may be using cheap seals. You may be better off to rebuild it yourself or take it to a good shop and use quality seals.

They are really no big deal to rebuild yourself. Should be able to buy the parts to completely rebuild the cylinder for less than $30. Post a pic of the rod end of the cylinder and I'll tell you how it comes apart.
 

jdr2710

Member
60
1
8
Location
Colorado Springs, CO
I called the place in Texas and they were quite nice about it and said they would ship a new cylinder out right away with a return shipping label. I'll give the new one a shot, but if it has issues then I'll look into getting the parts and re-building it myself.
Thanks,
Jeff
 

jdr2710

Member
60
1
8
Location
Colorado Springs, CO
It takes just shy of 2 minutes to go all the way up, and a bit over a minute to come down. I'm guessing that speed will slow with a full load. Hopefully I'll be testing that this weekend! Still a lot faster than by shovel!!

I configured it such that my angle is right at 46 degrees (magic digital angle indicator). Which means slightly less load capacity than the 45 degree, but slightly more dump capability for sticky materials. Hopefully I never have something that 45 degrees won't shift! The very sparse installation instructions gave the hinge to pivot measurements for 45 and 50 degrees, so I thought I'd go for something in between.
 

jdr2710

Member
60
1
8
Location
Colorado Springs, CO
The new cylinder arrived yesterday and I got it installed last night. They provided the return shipping label, so all I had to do was drain the old one and put it in the box and set it out for the fedex guy to pick up. The replacement wasn't too bad of a job since I have the crane at the front which I used to raise the bed up a bit so I could get the cylinder out. The new one worked fine, no leaks. All I've got left is the mud flaps and the hauling can begin. I'll post some pics with the load of gravel.
 

jdr2710

Member
60
1
8
Location
Colorado Springs, CO
I put the new dump on the old girl to work this weekend. Close to 8 hours back & forth to the gravel place, a bit under 1 hour round trip for 17 miles including load & dump times. I've got the troop seats off for re-finishing, so the maximum volume it would handle equated to about 5 tons, the load in the picture is 5.2 tons. She drove perfectly, if a bit slow on the acceleration! There were some pretty good hills on the way home, but the lowest gear I needed was third which she pulled with plenty of power. The top speed I got on the couple of flat spots was 40mph in fourth, I didn't feel the need for much faster than that.

The dump worked perfectly, it only slowed a little with the 5 ton load. After a few loads I got the feel for the right angle (around 25-30 degrees) to be able to drive in low-first and lay down a nice even flow of gravel. At the end of the day I had hauled around 40 tons. The guys at the gravel yard were impressed with the deuce, asking where I got it, etc.

I only had one failure during the nearly 150 miles, and that was the throttle return spring. I was empty on the way to the gravel place and suddenly I'm at full throttle. I quickly hooked my boot toe under the pedal and pulled it up so I could get to the side of the road. Once stopped, holding the accelerator up the whole time with my right boot and applying brakes with my left, I shut her down and took a look. The return spring was dangling by the front end, the rear having broken from the linkage, a little quick work with the pliers and I had her back on the road again in just a few minutes. I continued for a few more trips afterward, checking the spring regularly. I'm going to replace it since it is apparently too old and weak to trust.

The next project, once the troop seats are re-done, is to clean up all the busted tree limbs from the last blizzard. I lost a few fair sized pine trees from the heavy wet snow, snapped them off 20' off the ground around 6" in diameter. We have a local place that takes the slash for free, so with the troop seats in place I should be able to get all of it in one load. I'm looking forward to the looks on their faces as I pull in and dump, should be worth a few comments!
 

Attachments

cattlerepairman

Well-known member
Steel Soldiers Supporter
3,174
3,099
113
Location
NORTH (Canada)
Nice job on that hoist!
Do you think you might be better off making your own side boards, rather than using the troop seats for regular or heavy hauling? The gaps in the troop seats won't reliably hold gravel back and I am sure they get trashed quite quickly.
 
Top
AdBlock Detected

We get it, advertisements are annoying!

Sure, ad-blocking software does a great job at blocking ads, but it also blocks useful features of our website like our supporting vendors. Their ads help keep Steel Soldiers going. Please consider disabling your ad blockers for the site. Thanks!

I've Disabled AdBlock
No Thanks