- 7,032
- 2,690
- 113
- Location
- Montevideo/Uruguay
DEUCE POWER STEERING CONVERSION
This was done not by adding the air assist system but replacing the original steering box and shaft for a true hydraulic power steering setup. This conversion was made so that every good welder with some mechanical skills and standard tools could do the same and achieve equal results. To make things more understandable for others many pictures were taken showing the completed installation.
I will convert my next deuce exactly the same way, only faster! Even with the much wider tires (14.5R20 singles on 11” rims) I can steer the truck like a modern pickup with the palm of one hand, very precisely on and off road, 3 1/2 turns between stops, returning fairly well to center position after each turn. The steering box and pump combination works well and resulted strong enough for normal operation but not to strong to break other components. You will still have to move the truck a little while steering on paved surface to park in a tight spot. The column was slightly tilted upwards to gain more room between steering wheel and my knees. The steering wheel and upper column were kept original and inside the cab it looks standard except for the lower bracket attached to the firewall.
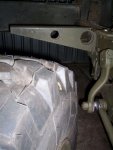
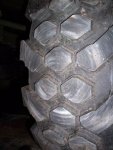
1. Why PS? Converting to power steering was mandatory for me not only because of the resulting unacceptable steering angles after just 2” suspension lift. Turning all the way to the right ended with the short pitman arm getting aligned with the drag link and increasing the right turning radius! PS also helps turning the new radials on paved ground, while standing, otherwise an impossible task! Turning several times from stop to stop left the rubber with concentric scars right in the middle of the thread. One picture clearly shows the rubbing pattern. Steering geometry makes the tires turn on the spot instead of “rolling” around the knuckle joints. That means better behaviour and optimal steering performance in rough terrain hitting potholes and rocks!
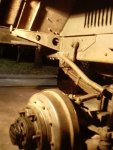
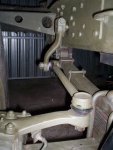
2. Steering arm: All that brute force from the power steering box has to be transmitted by the steering arm via the 4 studs to the knuckle, spindle, etc. That arm was reinforced and the eye enlarged to accept a std. ball joint, part of the new drag link. The weakest link remains in those 4 mounting bolts, certainly a point of concern. But I've never found those being loose on other trucks with original steering and until now they hold well in mine. Larger diameter studs could if necessary easily be installed.
3. Drag link: It’s a heavy duty part of a big truck, with ball joints at both ends, cut to proper length and carefully welded back together. Optional: 3 piece construction like the track bar with right/left treaded ball joints.
4. Steering box: The Ross Hydrapower HF54 is compact enough to fit in the same place as the original st. box, mounted inside the frame with sufficient clearance to the engine and winch drive shaft. The position where the pitman shaft sticks out trough the frame is the same but the hole was enlarged enough to allow for future oil seal maintenance without removing the box. Since the upper frame rail needs to be cut out a little more to make the box fit it also gets weaker. To compensate for this a segment of another truck’s frame was prepared and bolted in place, similar to the original reinforcement but longer and wider, for added strength. Pitman arms with different shapes and angles come with the HF54 depending on application. I was lucky to find one which didn't need any modification. The new arm is 2 ½” longer than the original arm. That was perfect to restore proper steering geometry.
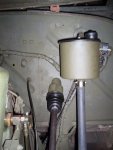
5. PS Pump: This gear-driven pump is made by Vickers (model # and specs. unknown) and is original equipment for the 5-ton trucks with the multifuel engine. No special brackets, belts or adapters are needed to run this pump on the 2 1/2 ton multifuel. Just remove the 5 nuts and plate in front of the injection pump gear and bolt the PS pump in place. I had no clearance problems at all but I have to say my radiator is not original, it came from a big International truck and was adapted. I don't know if there could be any interference when using the original heavy duty radiator with the 4 row core found in the multifuel deuces. Some trimming of my custom made fiberglass fan shroud was needed. A 1" diameter hose connects the pump inlet to the reservoir (International Truck) mounted to the firewall. A high pressure hose rated for up to 3000 psi with special fittings connects the pump to the PS box. Pump operation is silent, only against the stops or steering on paved ground while standing still it makes that normal hissing noise, something to avoid!
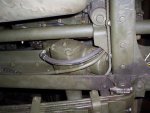
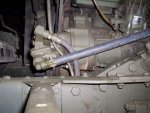
6. Lower steering shaft assembly: It connects the PS box with the steering column and was custom made from high grade 7/8" round steel, splined at both ends, one that fits into a std. U-joint and the upper end to accept a trunnion joint (CV join) found on the Maruti Suzuki as part of the front axle shafts (picture shows rubber boot beside the fluid reservoir). I found this part to be perfect not only to transmit with no play more than enough torque at a certain angle but also to allow for free axial movement of the shaft assembly. A minimum of approx. 1/4" of free up/down travel of the shaft is needed for normal operation of the PS box valve body. It also compensates for all relative movement between frame and cab. No more shocks and vibrations transmitted from the frame to the steering wheel and from there to your brain!
7. Steering column: The original tube was cut where it sticks trough the firewall and a nylon bushing serves now as a maintenance-free lower bearing. A second original dashboard mounting plate, bolted to the firewall, works well to firmly support the column at its lower end. It also allowed me to tilt the column a few degrees upwards for more leg(knee) room.
According to the tube length the inner shaft was also cut, splined and welded to the cup of the trunnion joint. The upper end with its spring loaded ball bearing didn't need any modifications.
One problem that still needs solution: The ground contact for the horn button in the center of the steering wheel. The old system had a wire running all the way from the button trough the steering shaft and box to the ground terminal of the horn relays. Since that is history now, one way to go would be an external combined horn/turn signal switch. Another solution: Building a custom brush/insulated race contact between tube and shaft, using parts from a 5-ton steering column or similar I could keep the central horn button working like original.
Gerhard
This was done not by adding the air assist system but replacing the original steering box and shaft for a true hydraulic power steering setup. This conversion was made so that every good welder with some mechanical skills and standard tools could do the same and achieve equal results. To make things more understandable for others many pictures were taken showing the completed installation.
I will convert my next deuce exactly the same way, only faster! Even with the much wider tires (14.5R20 singles on 11” rims) I can steer the truck like a modern pickup with the palm of one hand, very precisely on and off road, 3 1/2 turns between stops, returning fairly well to center position after each turn. The steering box and pump combination works well and resulted strong enough for normal operation but not to strong to break other components. You will still have to move the truck a little while steering on paved surface to park in a tight spot. The column was slightly tilted upwards to gain more room between steering wheel and my knees. The steering wheel and upper column were kept original and inside the cab it looks standard except for the lower bracket attached to the firewall.
1. Why PS? Converting to power steering was mandatory for me not only because of the resulting unacceptable steering angles after just 2” suspension lift. Turning all the way to the right ended with the short pitman arm getting aligned with the drag link and increasing the right turning radius! PS also helps turning the new radials on paved ground, while standing, otherwise an impossible task! Turning several times from stop to stop left the rubber with concentric scars right in the middle of the thread. One picture clearly shows the rubbing pattern. Steering geometry makes the tires turn on the spot instead of “rolling” around the knuckle joints. That means better behaviour and optimal steering performance in rough terrain hitting potholes and rocks!
2. Steering arm: All that brute force from the power steering box has to be transmitted by the steering arm via the 4 studs to the knuckle, spindle, etc. That arm was reinforced and the eye enlarged to accept a std. ball joint, part of the new drag link. The weakest link remains in those 4 mounting bolts, certainly a point of concern. But I've never found those being loose on other trucks with original steering and until now they hold well in mine. Larger diameter studs could if necessary easily be installed.
3. Drag link: It’s a heavy duty part of a big truck, with ball joints at both ends, cut to proper length and carefully welded back together. Optional: 3 piece construction like the track bar with right/left treaded ball joints.
4. Steering box: The Ross Hydrapower HF54 is compact enough to fit in the same place as the original st. box, mounted inside the frame with sufficient clearance to the engine and winch drive shaft. The position where the pitman shaft sticks out trough the frame is the same but the hole was enlarged enough to allow for future oil seal maintenance without removing the box. Since the upper frame rail needs to be cut out a little more to make the box fit it also gets weaker. To compensate for this a segment of another truck’s frame was prepared and bolted in place, similar to the original reinforcement but longer and wider, for added strength. Pitman arms with different shapes and angles come with the HF54 depending on application. I was lucky to find one which didn't need any modification. The new arm is 2 ½” longer than the original arm. That was perfect to restore proper steering geometry.
5. PS Pump: This gear-driven pump is made by Vickers (model # and specs. unknown) and is original equipment for the 5-ton trucks with the multifuel engine. No special brackets, belts or adapters are needed to run this pump on the 2 1/2 ton multifuel. Just remove the 5 nuts and plate in front of the injection pump gear and bolt the PS pump in place. I had no clearance problems at all but I have to say my radiator is not original, it came from a big International truck and was adapted. I don't know if there could be any interference when using the original heavy duty radiator with the 4 row core found in the multifuel deuces. Some trimming of my custom made fiberglass fan shroud was needed. A 1" diameter hose connects the pump inlet to the reservoir (International Truck) mounted to the firewall. A high pressure hose rated for up to 3000 psi with special fittings connects the pump to the PS box. Pump operation is silent, only against the stops or steering on paved ground while standing still it makes that normal hissing noise, something to avoid!
6. Lower steering shaft assembly: It connects the PS box with the steering column and was custom made from high grade 7/8" round steel, splined at both ends, one that fits into a std. U-joint and the upper end to accept a trunnion joint (CV join) found on the Maruti Suzuki as part of the front axle shafts (picture shows rubber boot beside the fluid reservoir). I found this part to be perfect not only to transmit with no play more than enough torque at a certain angle but also to allow for free axial movement of the shaft assembly. A minimum of approx. 1/4" of free up/down travel of the shaft is needed for normal operation of the PS box valve body. It also compensates for all relative movement between frame and cab. No more shocks and vibrations transmitted from the frame to the steering wheel and from there to your brain!
7. Steering column: The original tube was cut where it sticks trough the firewall and a nylon bushing serves now as a maintenance-free lower bearing. A second original dashboard mounting plate, bolted to the firewall, works well to firmly support the column at its lower end. It also allowed me to tilt the column a few degrees upwards for more leg(knee) room.
According to the tube length the inner shaft was also cut, splined and welded to the cup of the trunnion joint. The upper end with its spring loaded ball bearing didn't need any modifications.
One problem that still needs solution: The ground contact for the horn button in the center of the steering wheel. The old system had a wire running all the way from the button trough the steering shaft and box to the ground terminal of the horn relays. Since that is history now, one way to go would be an external combined horn/turn signal switch. Another solution: Building a custom brush/insulated race contact between tube and shaft, using parts from a 5-ton steering column or similar I could keep the central horn button working like original.
Gerhard
Attachments
-
 76.6 KB Views: 5,224
 -
 42.5 KB Views: 5,137
 -
 71.7 KB Views: 5,248
 -
 39.3 KB Views: 4,952
 -
 43 KB Views: 4,729