• Steel Soldiers now has a few new forums, read more about it at: New Munitions Forums!

  • Microsoft MSN, Live, Hotmail, Outlook email users may not be receiving emails. We are working to resolve this issue. Please add support@steelsoldiers.com to your trusted contacts.

DIY DD Starter Bracket

soule64

New member
66
0
0
Location
Huntsville, AL
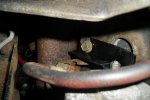
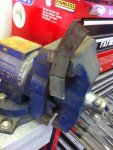
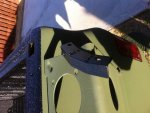
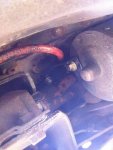
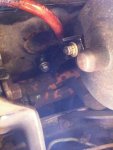
After reading a few posts about starter brackets, I figured I needed to check mine. Sure enough, it was missing. Checked the local dealer and gmpartsdirect.com - no joy. So I fabbed one up this weekend out of 1" angle, 7" long. Made 2 20 degree cuts 2" apart, heated the bend line and bent. Drilled the block hole first and installed to check the fit, removed and drilled the hole for the starter stud. One final install for fit, removed and welded the cuts. Quick shot of paint and final install with a M8 bolt on the block and a 1/4-20 nut on the stud. Anyway, I thought this might help someone else in the future.
 

Attachments

allenhillview

New member
272
3
0
Location
Jonesborough, TN.
My heat shield is missing, saw it in TM; but need one soon. Spent to much to not have it. How long do I have before heat gets me? Will someone show me a thread on it? I can maybe Fab one. Found thread but no for sure pictures just one off of another truck, not off of a 1008 or 6.2,
 
Last edited:

TXM1009

New member
33
0
0
Location
North Tx
Very cool. I guess I should get out and check mine. I just got it November so I still have a lot of getting acquainted to do with it. I need to get an antenna bracket or 2 also.

Did you do the bedliner or have it done? Looks purty all shiny and new:grin:
 

bjsmith

New member
272
1
0
Location
zachary,la
also some older small block chevys used the same bracket cant remeber what i got mine from on my old 6.5 but was perfet fit
 

soule64

New member
66
0
0
Location
Huntsville, AL
V
Did you do the bedliner or have it done? Looks purty all shiny and new:grin:
I did it myself. It was one of the ebay kits - two part base/hardener with rubber filler. I sprayed it over the bedrail and tailgate. Two gallons laid down good thick coat. I have three other trucks sprayed commercially and it is very comparable to linex
 
Great post! Used your picture to fab a bracket for a gear reduction. But only used a 5" peice with a cut 3" from and bend to 20 degrees. Thank for giving me the motivation.
Mr. Timmarr

Would you be willing to share the detailed specs of your bracket? I just replaced the starter with a gear reduction and obviously the stock bracket on mine doesn't work. The stealership here doesnt carry it ( i think the guy didnt know what he was doing when he was looking it up). I might as well just make one if you dont mind sharing? :beer: Also, I have a stock bracket if anyone needs it. PM me if you'd like it and ill send it your way.
 
Last edited:

Warthog

Moderator
Super Moderator
Steel Soldiers Supporter
13,775
227
63
Location
OKC, OK
Also, I have a stock bracket if anyone needs it. PM me if you'd like it and ill send it your way.

If no one else wants it I will take it and add it to my collection. You never know when you might need one.
 
The part number for the new style gear reduction starter bracket is 23502557

http://www.steelsoldiers.com/692875-post16.html

GMPartsGiant.com show them in stock as well as GMPartsDirect.com

23502557 - GM BRACKET
Site bully...errrr I mean warthog :lol:

Thanks for the info. The parts guy here at the stealership was insistent that there is only one bracket style even after I showed him the two brackets. I got tired of his ignorance and went home. I want to make my own because I just picked up my first welder and want to get some practice. I've been messing around with it in the garage and now I figured that small of a project would be something that I could learn on.

*edit* the bracket has been sent to another member this afternoon
 
Last edited:
Sorry about delay! blue2actual, I used 1x1 angle 1/8 thick about 5 " long. About 3 " down do a notch in one side 20 degrees and bent it. Welded the cut. Drilled a 3/8 hole 3/4 from end and another hole 1/4 " about 3/4 from end. I held it up after the 3/8 hole and marked the 1/4 with sharpie. put a 45 degree cut on starter end to clear solenoid. I put a 1/4 -20 nut on starter lug to space the bracket out before installing.
ENGINE BLOCK BOLT IS 8MM AND STARTER LUG IS 1/4-20. Took my son and I about 45 min from start to finish.
 

Attachments

Sorry about delay! blue2actual, I used 1x1 angle 1/8 thick about 5 " long. About 3 " down do a notch in one side 20 degrees and bent it. Welded the cut. Drilled a 3/8 hole 3/4 from end and another hole 1/4 " about 3/4 from end. I held it up after the 3/8 hole and marked the 1/4 with sharpie. put a 45 degree cut on starter end to clear solenoid. I put a 1/4 -20 nut on starter lug to space the bracket out before installing.
ENGINE BLOCK BOLT IS 8MM AND STARTER LUG IS 1/4-20. Took my son and I about 45 min from start to finish.
Thank you! I'm gonna give it a shot this weekend
 
Top
AdBlock Detected

We get it, advertisements are annoying!

Sure, ad-blocking software does a great job at blocking ads, but it also blocks useful features of our website like our supporting vendors. Their ads help keep Steel Soldiers going. Please consider disabling your ad blockers for the site. Thanks!

I've Disabled AdBlock
No Thanks