• Steel Soldiers now has a few new forums, read more about it at: New Munitions Forums!

  • Microsoft MSN, Live, Hotmail, Outlook email users may not be receiving emails. We are working to resolve this issue. Please add support@steelsoldiers.com to your trusted contacts.

Failsafe Warning Control Module Plug Repair Help

Artisan

Well-known member
2,762
227
63
Location
CDA Idaho
So my failsafe warning control module (FWCM) has been driving me insane
trying to repair. The initial complaint was the Low Air Warning light was
not coming on. I tested the 2 Low Air switches and all was well. So I threw
in a used but new to me FWCM and everything WORKED!

Days pass, truck sits.

I go out to the truck and SAME ISSUE, the low air light inop.
I replaced both low air warning switches and threw in ANOTHER
used but new to me FWCM, ALL WORKS!

Days pass, truck sits.

I go out to the truck and SAME ISSUE except now the parking
brake light is inop too! ( the buzzer always works thru all this) .

I reach down and wiggle the FWCM and dam if the low air warning light
and parking brake light didn't flash for a second! BINGO! I think I have
a connection problem at the screw on FWCM plug.

(All the while I am sure the ground is afixed to one of the two FWCM bolts)

So I pull the FWCM off the wall and get some slack in the wire harness that
feeds the FWCM and I look inside the plug and it looks like one of
the female connectors is pulled out a tad.

This plug has a ring that connects the plug to the FWCM, then above
that there is another ring that you can unscrew, what comes apart
next? I can not find a how to in the TM's.

STOP THE PRESS'S OH MAN.................

I was just outside dinking around w/ it and I pulled the ground and
THE LIGHTS CAME ON but the buzzer sound volumn went down 50%.
If I attach the ground the lights go OUT and the buzzer rings loud!

I am totally lost here...
 

Artisan

Well-known member
2,762
227
63
Location
CDA Idaho
Electrical Plug Help

Can anyone please point me towards a TM
that shows me how to service / take apart and
put back together the plug that plugs into the
Failsafe Warning Module?

Maybe a page number in a TM? I can not find...
 

Artisan

Well-known member
2,762
227
63
Location
CDA Idaho
What is wrong with the plug?
Well, when I look up inside it I "think" I see a female pin that is not
down as low as it should be and I am having problems w/ my failsafe
module.

If I pull the ground wire that goes to one of the two mounting bolts
and let the ground hang in mid air, my low air warning light and
parking light work but my audible buzzer is cut in half or better.

If I mount the Failsafe w/ ground I get a STRONG buzzer and no lights.

I looked at my grounds and found a missing L Frame to engine ground and
the left frame to compressor gorund was attached to the radiator!

I need a starter to block ground strap and I need to figure out how
to service that plug so I can take it apart and put it back together
and get all pins inside at a uniform height.
 

Suprman

Well-known member
Supporting Vendor
6,845
661
113
Location
Stratford/Connecticut
I don't know about the part you are haing trouble with but I am good at ekectrical stuff. You can make your own ground strap everything on these trucks work better when properly grounded. Clean up both places the ground straps connect with a wire brush. How far pushed in is the one plug? Most military connectors can be taken apart I have never seen a tm on it if we went by the book you would just order a new cable. Post pics.
Will
 

doghead

4 Star General /Moderator
Staff member
Super Moderator
Steel Soldiers Supporter
26,247
1,168
113
Location
NY
Do not post multiple threads/posts on one issue.
 

Artisan

Well-known member
2,762
227
63
Location
CDA Idaho
I just saw this ...

That PDF might help, have to run this AM ...

I will attempt photo it later and try to photo how far one pin is sunk in.
 

Suprman

Well-known member
Supporting Vendor
6,845
661
113
Location
Stratford/Connecticut
connect the connector to the module then open the back of the connector push the one pin back in put it back together and leave it alone it should be fine
 

nf6x

Feral Engineer
1,630
49
48
Location
Riverside, CA, USA
It sure annoys me that the danged failsafe warning modules are potted in epoxy. I just had to replace one in my M923, and I am sure I could have repaired the old one if it wasn't potted. I was tempted to make my own deluxe repairable module, but in the end I just spent the $150ish on a new one to be done with it. If I made my own then I would probably change some features. For example, I don't find it helpful to have the alarm sound when the parking brake is applied. I think a warning light is quite sufficient for that.

I don't know if I will be able to help out Artisan here, but I'm subscribing to the thread in case I can.
 

Tow4

Well-known member
Steel Soldiers Supporter
2,088
622
113
Location
Orlando, FL
Heat it up in an oven (not one you cook in) to 160 F. for about one hour. The potting will soften up and you should be able to carefully pry it out. If you have a heat gun, you can spot heat it and dig the potting out one area at a time.

I've done it many times, just go slow. Be careful with the heat gun, you can get it too hot and damage components.
 

nf6x

Feral Engineer
1,630
49
48
Location
Riverside, CA, USA
Interesting. I might give that a try. I have nothing to lose since I've already replaced the module, so I might as well learn how to de-pot stuff in the future.

How much does the stuff outgas in the oven? Is that something I really don't want to do in the kitchen oven?
 

Artisan

Well-known member
2,762
227
63
Location
CDA Idaho
Heat it up in an oven (not one you cook in) to 160 F. for about one hour. The potting will soften up and you should be able to carefully pry it out. If you have a heat gun, you can spot heat it and dig the potting out one area at a time.

I've done it many times, just go slow. Be careful with the heat gun, you can get it too hot and damage components.

Indeed "interesting". I to could do w/o the alarm sounding an audible w/ just the parking brake on!
The audible should be just for low air, that way it will really get your attention.
(Well, I drive by the guages, I would see it before it was too low but
good for the less savvie if you will ) .

Mark you gonna cook your old module and try to expose it's inner workings?
 

Artisan

Well-known member
2,762
227
63
Location
CDA Idaho
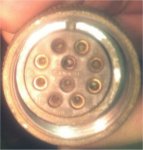
Yes, there may be a pin in the female connector that connects
to the FWCM that is too short, aside from that here are
more facts. Look at 11:00 O'Clock in this pic;

FWCW-PLUG.jpg

For the heck of it HERE is a pic inside the FWCM. I see the word
CANNON, does that designate the type or mfg of this plug?


I am sure the following might be hard to fathum. I wrote it
this AM so I do not forget anything. When I get all the items in
red fixed, if I still have a problem I guess I will be in serious need a professional.

XXXXXXXXXXXXXXXXXXXXXXXXXXXXXXXXXXXXXXXXXXXXXXXXXXXXX

Here is the issue(s);

If the FWCM is NOT screwed to the wall and its ground is NOT screwed
to the wall as well, both the parking brake light AND the low air warning
lights work. The audible buzzer buzzes at 50% volumn.

If the FWCM IS screwed to the wall and its ground IS screwed
to the wall as well, both the parking brake light AND the low air warning
lights DO NOT work and the audible buzzer buzzes at 100% volumn.


XXXXXXXXXXXXXXXXXXXXXXXXXXXXXXXXXXXXXXXXXXXXXXXXXXXXX


I replaced both low air switches on the tanks with new.
I obtained 2 more used Failsafe warning control modules to test with. ( FWCM )


TM ...23-5 Pg 611 is the electrical schematic for my M925A1

__________________

The posative main battery wire from batteries to starter was rubbing the block
and there was a bad wear spot in it's insulation. I ran a piece of 7/8" hose
over it, fixed.

There is a #68 wire that is wrapped with the posative main battery wire from batteries to starter
and it emerges at the firewall w/ a plug that feeds the Diagnostic Connector ("V" Posistion) only
that was severed and I have not fixed it yet, should be of no issue I thunk.

The neg main battery wire from batteries to starter is fine, it ALSO has a small
wire #GRD A that is the negative compliment to the #68 wire that I fixed, it
goes only to the Diagnostic connector as ("W" Posistion) well.

There is a #569 wire that is NOT connected at the battery compartment. It is
a 12V feed that goes to battery switch, then to heater switch. It is for LOW
speed fan on heater. So this second I have no low speed on my heater, I do
have high speed. The 569 wire was UNDER one of my batteries. I retrieved
it and I am working on extending it and fixing DONE but it should not be an issue
I thunk.
__________________

I have been looking at my grounds. I think there are 5 at the engine compartment.
A B C D in engine compartment driver side.
There is another ground by the alternator = 5.

All battery connections are clean and connected.

Ground A from hood to frame is present. (I need to pull it and check for cleanliness DONE )
Ground B from compressor to frame was wrong, it went to radiator,
I fixed it per schematics, frame to compressor bracket, plus pulled bracket and cleaned to metal,
all, re-afixed w/ dielectric grease.
Ground C from frame to starter is Missing*, I am working on finding one.
Ground D from block to cab is present. (I need to pull it and check for cleanliness DONE )

*The TM's contradict themselves. One place (TM ...24P-1 Pg 790) shows the ground from starter to block. The electrical schematic (TM...23-5 Pg 611 ) shows from frame to starter. I might do both.

Frazzled
 
Last edited:

Artisan

Well-known member
2,762
227
63
Location
CDA Idaho
I may be blind but I do not see the Block to Cab ground strap
in the Electrical Schematic TM...23-5 Pg 611 . It "is" pictured
in TM ...24P-1 Pg 790 "VIEW D".

Additionally that schematic is clear, the main battery ground wire
goes to Left Frame, and THEN to Starter ground. Not to starter
and then to frame. Maybe it makes no difference? The drawing is clear though.
TM...23-5 Pg 611

BUT in TM ...24P-1 Pg 790 "VIEW C" it shows a ground strap from starter to frame...

Frazzled.
 

Artisan

Well-known member
2,762
227
63
Location
CDA Idaho
Man........................This was tough. All my pleas for help didn't fall on deaf ears I am sure, but indeed my issue "was" a SOB to diagnosis and even a pro would have a hard time helping me from just a forum. I want to share w/ you what I did to finally get my Failsafe Warning Control Module in my M939 Series (M925A1) to work "As Advertised" . The low air warning light was not coming on, I bought 2 more boxes and all 3 boxes we acting DIFFERENTLY from each other when connected! I could tell that when I disconnected the ground wire and rubbed it that it made a difference but not a fix. I started at the engine compartment and pulled all 4 ground straps, glass bead blasted them and sanded the frame and engine block to bare metal and re-affixed all nice and tight using dielectric grease. NO HELP. I got opinions from guys and a couple guys said I had 3 bad Failsafe Warning Control Modules (FWCM) since all 3 acted differently. I then looked at the main power cables from the battery and DAM, I see the + cable has a worn spot on it really bad. I sleeve it w/ thick rubber hose and still, no fix. I find the other wires w/ issues as I have wrote and still no fix. Then it happened. I went to an AMVETS flea market kinda deal per the suggestion of "Sir Will Wagner". I arrived and two zipper heads were all over my truck wanting to know "HOW MUCH YOU SELL TRUCK!" to wit I replied $18,500.00 and they said GOOD DEAL and wasted a bunch of my time but then Sir Will W. came over to say hello and we chatted about my FWCM issue and he quickly suggested it was probably a grounding problem. I told him I fixed all grounds and he suggested I should add MORE Grounds! So I ran a #4 from the bed to the frame and no relief. Then I ran a #4 from the CAB to the FRAME and at the same time I pulled apart the #57 Wire Ground to Frame (this is the ground for the 2 low air warning devices, of which I replaced a month ago anew as well) and SCHZAMM, now my FWCM is working as advertised. I have left out a LOT of stuff, some of it covered in this thread and others but dam that was HARD. I will tell you this. READ THE DUCKING MANUALS PEOPLE. I am GLAD Doghead was so hard on me as a noob on this board, forcing me to dig into these manuals and LEARN, PLUS doing searches here on SS mining the gold that lies in these pages. In the end it was a combo of all of the above and a seasoned pro's opinion whom slayed this dragon, Thank U .
 
Top
AdBlock Detected

We get it, advertisements are annoying!

Sure, ad-blocking software does a great job at blocking ads, but it also blocks useful features of our website like our supporting vendors. Their ads help keep Steel Soldiers going. Please consider disabling your ad blockers for the site. Thanks!

I've Disabled AdBlock
No Thanks