• Steel Soldiers now has a few new forums, read more about it at: New Munitions Forums!

  • Microsoft MSN, Live, Hotmail, Outlook email users may not be receiving emails. We are working to resolve this issue. Please add support@steelsoldiers.com to your trusted contacts.


Ferret 38C5968

Ferretboy

Well-known member
384
471
63
Location
Ripley,ohio
Mine is stamped in two spots....on the flat plate just to the left of drivers hatch.....very light stamp....also the upper right corner of the front armour....above the shovel mount.....20200806_091800.jpg20200806_091744.jpg
 

Ferretboy

Well-known member
384
471
63
Location
Ripley,ohio
Oh the cleaning made a world of difference.....looks so much better.....hope you found some goodies......while cleaning mine i found a few cool things......maybe not all canadian ferrets got stamped with c.a.r. numbers...or where who knows.....but by your hull# if even if you find 521 any where....according to capt.Stevens list that would be correct...and the markings you found i think is really cool if that was used in that movie....take the best of care..David
 

teletech

Active member
426
209
43
Location
santa cruz,ca
Oh, Ferrets and their fuel systems!
Knowing they are known to be troublesome I decided to have a go at making sure it was serviced and cleaned out as well as I could without getting too crazy. First was the tank selector, then the fuel filter housing (which turned out to not have a filter in it)
I'd read about purging the air from the tank using compressed air applied to the vent, so I took a length of hose and connected to where the pipe entered the tank switch, inflated the tank until it swelled up a bit more than might have been prudent and... nothing. Not a gurgle, not a drop!
released the pressure and tried the same thing on the other pipe... this time I got a slow trickle but nothing that would feed a motor. Blowing back into the lines didn't help and in fact reduced my trickle.
OK, moving on. Remove the banjo bolts on the bottom of the tank, dumping what must have been about 3/4 of a tank of fuel into the hull. I redirected it to the holes nearby as best I could but it's still an awful mess and no smoking for about 50' please! I actually had to puncture a layer of crud on one side to get it to drain. Both banjo bolts are so plugged the look to be solid. Likewise the banjo fittings were packed solid with something the consistency of mostly-hardened asphalt roof-patch. Clearing all that out and still no flow to speak of, seems that same tar fills the fuel lines for some inches by the fitting. I'm hoping a good soak in a bucket of carb cleaner will do the trick.
 

Ferretboy

Well-known member
384
471
63
Location
Ripley,ohio
Been there....if the old gas has settled out it will be like tar....clogs the lines.....everything....very fun to clean that out.....ha ha....my fuel tank really needs a full restoration....maybe later....im in the proccess of running a fuel line to a jerrycan on the rear....i dont run 589 much anyway...easy to clean....until restoration of the main tank....there are places that bake and dip tanks....you get back bare metal ready for restoration.....if your parts are rusted badly ...you get back swiss cheese....lots of holes to fill....have you cleaned your carb yet?......more fun....
 

teletech

Active member
426
209
43
Location
santa cruz,ca
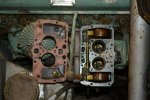
Well, I did finally get the fuel lines cleaned out and reinstalled, along with the selector and fuel filter assembly. The tank has a little crud in it, but not too bad really. So I figured I'd best look into the Solex. I pulled off the cover and everything looked fine, including the inlet screen being clean. The needle was stuck open but a tap and it moved freely so must have gotten glued in place by evaporating fuel. Of course I don't know what diaphragms might have perished but I think I'll wait on pulling the carb further down until I try to actually start the vehicle. Now the only real wildcard in the fuel system is the fuel pump, and that's hard enough to get to that I'll crank the motor for a while and see if it might just function before I go looking for trouble on that score.
DSC_0620.JPG

I guess it's time to look at the ignition circuit.
 

Ferretboy

Well-known member
384
471
63
Location
Ripley,ohio
Hello there...looks like you are coming along nicely....there are more screens at bottom of the carb...for the accellerater pumps......the diaphrams are hardy...but nice to do a major clean....getting the carb off is a chore....i have two bent 9/16th wrenches just for the task....fuel pump is a nice part to get to....ha ha....fuel tank out...is easy.....these engines were made to pull the entire power pack....engine and gear box....do all the sevice and replace...or pull and replace with one already serviced....thanks for the photos love it.
 

teletech

Active member
426
209
43
Location
santa cruz,ca
It cranks!
I pulled the spark plugs, cap&wires to do a compression test, dropped in a couple batteries and found enough of the controls work to crank the motor and also run some of the lights. Plenty of work to do on the electrical it looks like though.
Also, I left the banjo bolt loose on the carb and was very encouraged to see fuel spurting out of it while cranking. Knowing my fuel pump works retires almost all the remaining risk on the fuel side. Now I just have to go through the points, plugs, etc. and it will be time to start it up.

Gapped the plugs and checked to points. It started right up, so I added some fluid to the flywheel and went for a drive.
Looks happier after the trip somehow.
DSC_0630.JPG
 
Last edited:

Ferretboy

Well-known member
384
471
63
Location
Ripley,ohio
Now that you have #521 going why not drive her to ohio to visit her sister #589. ??? Haha...long trip i know...great work you are doing....love it....take care mate.A
 

teletech

Active member
426
209
43
Location
santa cruz,ca
I heard there were three Ferret owners all over in San Jose for a beer some time this year, sounds like you should make the trip here and we can see if we can do better than five.
Well, things didn't go so well today, running rough and smoking some. I pulled the Solex off (lucky one of the things the owner didn't loose was the bent wrench for the task) and found a torn diaphragm. So, unless I decide to do a carb swap I'm down until I get a batch of parts from the UK.
I guess on the plus side, I have no excuse for not pulling all the hubs down for lubrication while I go through the wheel cylinders.
 

Ferretboy

Well-known member
384
471
63
Location
Ripley,ohio
I only could wish for a trip to meet you all...sounds like a wild time for sure...i know some other ferret owners.....would be really cool to have the ferrets together for a photo shoot.....maybe someday....
 

Karl kostman

Well-known member
Steel Soldiers Supporter
2,283
836
113
Location
Fargo ND
Congrats on the Ferret it looks to be in pretty darned nice condition should take that much to get the engine running I would think, I means after flushing and cleaning the entire fuel system and going through all the electrical on the engine, very likely a carb rebuild. Without the turret your visibility issues are gone and that will also help to give all the noise a place to go other than your ears. I have seen the fuel tanks of these units out and I must say there are more bends, extremely odd angles than I have ever seen on a fuel tank before, just looking at the tank made me think it looked like a huge bugger to not only to get at but to get out, I hope you dont have to remove it to clean it out! Good luck it looks like an extremely interesting project!!
Karl
 

teletech

Active member
426
209
43
Location
santa cruz,ca
Congrats on the Ferret it looks to be in pretty darned nice condition should take that much to get the engine running I would think, I means after flushing and cleaning the entire fuel system and going through all the electrical on the engine, very likely a carb rebuild. Without the turret your visibility issues are gone and that will also help to give all the noise a place to go other than your ears. I have seen the fuel tanks of these units out and I must say there are more bends, extremely odd angles than I have ever seen on a fuel tank before, just looking at the tank made me think it looked like a huge bugger to not only to get at but to get out, I hope you dont have to remove it to clean it out! Good luck it looks like an extremely interesting project!!
Karl
Thanks and indeed, it's been amusing.
Visibility isn't really any different from the driver's perspective but I hadn't thought about the noise being better. It's still pretty darn loud, but less loud than the testing I did on my 6.9 IDI van with the engine cover off!
The fuel tank was definitely thought about late in the project and has a "let's see how much of this space we can use" sort of feel. Interestingly, there were ports in the hull nearly under the banjo fittings, just far enough off to make a huge mess. I had intended to add drain valves and fittings but got impatient.
Once I get the hubs inspected, new seals, and, relubed then wheel cylinders rebuilt, if I still don't have Solex parts in-hand I'm thinking I might put an old half-a-Holley on there temporarily. I wouldn't be the first as I know at least the fellow who turbocharged his Ferret had one. I'm all for originality... right up to when it makes the difference between a driver and a gate-guard!
 

Karl kostman

Well-known member
Steel Soldiers Supporter
2,283
836
113
Location
Fargo ND
Teletech it sounds like you approach challenges similar to me, I wasnt it done right and correctly but some times things just seem to get in the way to the point that we change course a bit! I am rebuilding a 50 Power Wagon it has only 18K original miles but it sat for an extended spell in Washington state and when I pulled the 3rd members on both Diffs I tried so hard to say the "minor corrosion" on the Ring and pinions would be OK, after looking and cleaning them 10 times I ordered new ones OH well its only going to be done once so it has to be perfect!
Your Ferret looks like a very interesting project since I have never owned one obviously a fair bit to learn for somebody that has never played with one. The learning new systems though is one of the biggest draws for me to something NEW. One of the guys in our club has an Alvis Stalwart and he has owned it for a bit of time and the only time its ever moved is being pulled with a tractor. I thought hard about buying that but the more I read about it, mainly drive train and the fact that I already have a warehouse full of Military "fixer uppers" I decided against it for now! I look very forward to seeing more pics as you progress on your project it looks extremely interesting! Good luck with it!
Karl
 

teletech

Active member
426
209
43
Location
santa cruz,ca
Teletech it sounds like you approach challenges similar to me, I wasnt it done right and correctly but some times things just seem to get in the way to the point that we change course a bit! I am rebuilding a 50 Power Wagon it has only 18K original miles but it sat for an extended spell in Washington state and when I pulled the 3rd members on both Diffs I tried so hard to say the "minor corrosion" on the Ring and pinions would be OK, after looking and cleaning them 10 times I ordered new ones OH well its only going to be done once so it has to be perfect!
Your Ferret looks like a very interesting project since I have never owned one obviously a fair bit to learn for somebody that has never played with one. The learning new systems though is one of the biggest draws for me to something NEW. One of the guys in our club has an Alvis Stalwart and he has owned it for a bit of time and the only time its ever moved is being pulled with a tractor. I thought hard about buying that but the more I read about it, mainly drive train and the fact that I already have a warehouse full of Military "fixer uppers" I decided against it for now! I look very forward to seeing more pics as you progress on your project it looks extremely interesting! Good luck with it!
Karl
Thanks, I'm not going for perfection by any stretch. It's going to stay ugly, but driving something that ancient and yet that heavy means it's slightly dangerous under the best circumstances but outright negligent to operate on a city road if one isn't absolutely confident in the brakes and steering at the very least. That is to say, I feel by taking on something like that I have a personal responsibility to those around me to exercise caution and make sure I'm not putting people at unwarranted risk by my actions.

I did pick up the wheel cylinder kits today as well as order an Autolite carburettor as a "temporary" solution to mixing air and fuel so I can keep playing while looking for a dealer who will ship to the USA.

The Stollies are legendary for the complexity of the drivetrain! I'm brave enough to import my own project CVR(T) and even I wouldn't try to make one of those run in the USA without at least one spare vehicle for parts.
 

teletech

Active member
426
209
43
Location
santa cruz,ca
Progress! It took a lot of reaching out but parts have begun arriving.
At first I was having no joy, I took the brake hoses in to a local hose shop only to have them say they didn't have the fittings but could turn and braze new back ends on my fittings but it was going to be several hundred bucks for a set of brake lines. Then I kept not getting responses from vendors in the UK about shipping spares to the US. It was getting a bit depressing really, but finally things turned around.
A set of decals for the switch panel from the UK and a set of new brake hoses from the folks at REME-Depot.
The best news is it looks like I've found someone to ship me a gearshift assembly (and the broken turn lamp lens). Pushing and pulling on the shift linkage was going to be a hindrance really quickly once I had brakes!
I think I've also found a source for the torn diaphragm in the Solex, but in the mean time I've bought an Autolite/Motorcraft 2100 and determined it will in fact fit where the Solex lived. It will need rebuilding as well but the carb AND rebuild kit cost less than a rebuild kit from the UK and a small fraction of what a locally sourced kit for the Solex would have cost me. I thought it might be entertaining to generate code for my CNC so I could make an adapter plate at a whim, so that's in process. As soon as I get my brakes all rebuilt then whichever carburetor has enough parts on-hand to be assembled will be the one installed. Speaking of brakes, I saw a post about how the wheel cylinders could be rebuilt with a particular Napa kit so I ordered four of those... well not so fast. The Napa kit was 1-1/4". Now It might be that later Ferrets use that size but my cups are all 1-1/8" dia, so I had to order up yet more brake cups. The wheel cylinders are made of aluminum with a steel piston, unfortunately the pistons point upward so any fluid that gets in there stays in there. Mine were thoroughly stuck. Marinading them in a carb cleaning bath for a few days softened most of the crud, then I drilled and tapped the back section of one of the old hoses and drilled/tapped it for a standard pipe thread. Then it was a simple matter to connect it to a hydraulic hand pump that allowed me to force the protesting pistons out of the bores.

Seeing the state of the old brake hoses really reinforced my belief that if you don't know how old a set of brake hoses are, it's time to change them. Even the ones that looked OK at a glance and might have moved some fluid crumbled to bits as soon as I flexed them to any degree.
 

Ferretboy

Well-known member
384
471
63
Location
Ripley,ohio
Hi teltech....hows things go with your ferret ? Its a most interesting machine....i know you will have a great time with it.....they all need a lot of care..David
 

teletech

Active member
426
209
43
Location
santa cruz,ca
The project proceeds apace. I'd meant to take some more pics but usually too busy working.
Brake hoses arrived, I found a source for carb parts in the UK that was willing to ship. Hopefully those will be here in the next couple days. I also found someone in the UK who sold me the gearshit I needed so I'm eagerly awaiting it's arrival.
Front brakes are back together, a lot of suffering one one side where the adjuster was stripped out and needed some pounding on and some soldering. On that same side I had endless trouble getting one of the brake banjos to seal to the wheel cylinder.
Deciding I'd better lube the front end, I had a go at the 32 grease fittings on the front suspension along with the four oil ports.
The good news is pretty much all the grease locations still had viable grease in them and the outer hubs weren't particularly low on oil.
The bad news is the inner tracta joints were almost totally empty. It had over a decade to leak out, so I'm not sure how bad it is in use but I'm preparing for the worst. I also decided I need to brake down at least one wheel as the tube loses over 75% of it's air overnight.
So, hopefully later this week I'll have it moved around so I can do the back wheels.
DSC_0631.JPG
Master cylinder, imperfect bore but not the worst I've seen. Honed it a bit then blasted and powder-coated in the hopes of keeping the rust down. The brackets are done in PPG Concept fine aluminum which is too glossy compared to the original aluminum paint but has a decent color.
IMG_20200829_223311.jpg
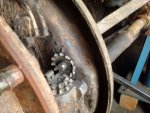
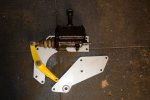
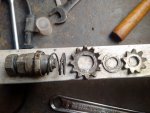
What a brake adjuster looks like if you grind away the rivet end holding the inner star on. The outer star had it's flats pushed out to make the hole round so I just peened them bad into shape. The inner wheel was simply slipping on the shaft as the mushroomed end had slipped. Since the unit has two springs and a rubber seal and my MIG was too far away to use without significant electrical work, I just got out some pretty hard solder and went with a quick medium-tamp repair.
IMG_20200829_223758.jpg
back in the plate and junk stacked to push it into the backing plate so I could do the reassembly. In retrospect I should have bored and tapped a threaded hole in the middle thus avoiding any heat as well as making it more easily stripped should there be other issues. Not going to take it back apart unless it strips again though.
IMG_20200902_172727.jpg
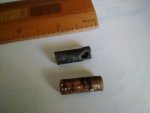
Interesting the improvised parts one finds. I suspect the brass rod might be original but the hack-sawn end of the pin clearly was not.
Both have been replaced by hard steel pins.
Nice to know what parts are there in critical parts of your braking system. I'm still not feeling bad I had to rebuild all the brakes. :-\
 
Last edited:
Top
AdBlock Detected

We get it, advertisements are annoying!

Sure, ad-blocking software does a great job at blocking ads, but it also blocks useful features of our website like our supporting vendors. Their ads help keep Steel Soldiers going. Please consider disabling your ad blockers for the site. Thanks!

I've Disabled AdBlock
No Thanks