


After reading about ToddJK's engine fire due to some remaining flame heater components, this project was at the top of my list. Note that as I work through all of the issues (there are so many, lol), I'm trying to document what I did in hopes a post or two of mine will help others that may come behind me. My ultimate goal is near complete restoration without doing a frame-off. It will take time, of course, and I may give up when I get to "good enough". Time will tell.
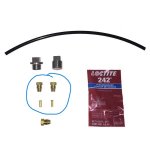
The flame heater was only 1/2 removed by either a motor pool (likely) or previous owner (very unlikely). I purchased a flame heater delete kit from rattlin truck as I didn't want to hunt down fittings and I like the clean look of the cnc fittings. The kit and instructions are top-notch and I highly recommend it. I took a couple of pictures near the end after realizing pictures help tremendously! I'll add those here for reference but going forward, I'll take more pictures through the process. The pictures are the plug in the IP already, the removed T-sectioned line, the replaced fuel line, the kit, and the fittings in the intake, with the brass washer and retainer nut.
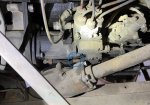
Where the truck stood when I started:
A plug was already in the IP outlet that would feed the flame heater system
Flame heater fuel pump previously removed
Ignition coil for flame heater still installed, plugged in, and attached to the spark plug in the intake
Return fuel line T-fitting still installed and connected
Small fuel line from the flame heater fuel pump disconnected/hanging
Flame heater Injector fitting still in the intake with both fuel lines attached
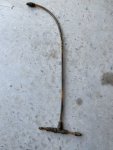
First I removed the t-fitting from the fuel line between the two injectors and followed the directions to cut in a new line. The anti-crush fittings are a little different than the ones that were there so I'm not sure yet if I have it tight enough. It uses a brass insert in the tubing and a compression fitting. No ferrule. I've attached a pic of those below. I guess I'll find out if they work and if I have it tight enough once I start it and run it.
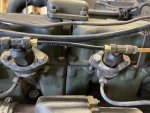
Once I had that fitting disconnected, I removed the fittings from the injector sticking into the intake. I couldn't rotate the fitting out of the intake because of the metal slobber tube so I removed the 4 nuts/washers at the top of the intake and loosened the clamp on the rubber tube at the bottom and pulled it away from the slobber tube about an inch to give me clearance. For whatever reason, the larger of the two brass fittings on the injector fuel line fitting was between a 7/16 and a 3/8. I've never heard of a 13/32 wrench but I suspect that's the size that would have fit. After removing the smaller fitting to the left, I was able to get a *quality* crescent on the larger and break it loose. Once those were off, I removed the fitting and set the retainer nut aside. After removing the spark plug, I discovered a brass washer so I cleaned that up and set it aside as well.
I then inserted the spark plug hole fitting with the square head and used the included blue loc-tite. I decided to re-use the copper gasket that was there though I suspect this wasn't necessary. Following that, I inserted the larger fitting where the injector fuel lines were. This hole doesn't appear to be tapered and the fitting, while very snug, will not bottom out. I chose to put the fitting in about 3/4 of the way (plenty of thread) and leave just enough to put the retainer nut on the outside and snug it down (both of these with blue loc-tite). The instructions that came with the kit don't ask you to do that but I have read in other threads where people had trouble keeping this fitting tight so I decided that overkill is underrated here.
The flame heater was only 1/2 removed by either a motor pool (likely) or previous owner (very unlikely). I purchased a flame heater delete kit from rattlin truck as I didn't want to hunt down fittings and I like the clean look of the cnc fittings. The kit and instructions are top-notch and I highly recommend it. I took a couple of pictures near the end after realizing pictures help tremendously! I'll add those here for reference but going forward, I'll take more pictures through the process. The pictures are the plug in the IP already, the removed T-sectioned line, the replaced fuel line, the kit, and the fittings in the intake, with the brass washer and retainer nut.
Where the truck stood when I started:
A plug was already in the IP outlet that would feed the flame heater system
Flame heater fuel pump previously removed
Ignition coil for flame heater still installed, plugged in, and attached to the spark plug in the intake
Return fuel line T-fitting still installed and connected
Small fuel line from the flame heater fuel pump disconnected/hanging
Flame heater Injector fitting still in the intake with both fuel lines attached
First I removed the t-fitting from the fuel line between the two injectors and followed the directions to cut in a new line. The anti-crush fittings are a little different than the ones that were there so I'm not sure yet if I have it tight enough. It uses a brass insert in the tubing and a compression fitting. No ferrule. I've attached a pic of those below. I guess I'll find out if they work and if I have it tight enough once I start it and run it.
Once I had that fitting disconnected, I removed the fittings from the injector sticking into the intake. I couldn't rotate the fitting out of the intake because of the metal slobber tube so I removed the 4 nuts/washers at the top of the intake and loosened the clamp on the rubber tube at the bottom and pulled it away from the slobber tube about an inch to give me clearance. For whatever reason, the larger of the two brass fittings on the injector fuel line fitting was between a 7/16 and a 3/8. I've never heard of a 13/32 wrench but I suspect that's the size that would have fit. After removing the smaller fitting to the left, I was able to get a *quality* crescent on the larger and break it loose. Once those were off, I removed the fitting and set the retainer nut aside. After removing the spark plug, I discovered a brass washer so I cleaned that up and set it aside as well.
I then inserted the spark plug hole fitting with the square head and used the included blue loc-tite. I decided to re-use the copper gasket that was there though I suspect this wasn't necessary. Following that, I inserted the larger fitting where the injector fuel lines were. This hole doesn't appear to be tapered and the fitting, while very snug, will not bottom out. I chose to put the fitting in about 3/4 of the way (plenty of thread) and leave just enough to put the retainer nut on the outside and snug it down (both of these with blue loc-tite). The instructions that came with the kit don't ask you to do that but I have read in other threads where people had trouble keeping this fitting tight so I decided that overkill is underrated here.
Attachments
-
 167.1 KB Views: 22
 -
 84.6 KB Views: 22
 -
 90.5 KB Views: 23
 -
 135.1 KB Views: 24
 -
 30.5 KB Views: 25
Last edited:


.JPG")
 ). Might be worth it to those in really cold climates and the flame heater along with the lines are of better quality or well maintained, but not worth it to keep it on if you don't need it.