How to Tighten the Flex Plate Bolts in a CUCV for Dummies
I was planning to shoot a video of this... but it didn't work out. I
was successful in tightening those bolts! I was able to get a few of them slightly tighter, but none of them was really loose. Such a load off my mind, knowing that, at least for a while, they won't back out on me and cause a bunch of problems.
Since this is a pretty easy fix, and can be tackled by someone with hardly any mechanical skills, I want to write a fairly in-depth description of the procedure to encourage those members who aren't familiar with the CUCV yet or are new to mechanic work to give this a shot on their own. This was a pretty easy and very important preventative maintenance task, but I'll admit that I was confused about what was going on down there until I read a lot and went to give it a shot... Working on these vehicles isn't always the most complicated thing, so my intention here is to encourage other members to give this a try on their own before wasting money on a mechanic. So hopefully some of you newbie CUCV owners can get your hands dirty and save yourselves some money and trouble (if they back out and crack the flex plate) by tightening your flex plate bolts yourselves! Anyway, so here goes!
Tools needed:
-Pliars
-15mm and 16mm socket
-Socket wrench (ratchet) with extensions (I had a 5 inch and a 3 inch extension)
-15mm and 16mm crescent / box end wrenches
NOTE: If you don't have these tools, just go buy one of those "mechanic sets" for $150-200 (I've got a set from Craftsman, made in USA, lifetime warranty!

). You'll save that much money real fast, in like one repair done yourself vs a mechanic (or worse, a tow, lost time at work, AND a mechanic!), and save yourself a lot of frustration having the right tools for the job. There will be plenty to work on, owning a CUCV...
Useful but not needed:
-beer (maybe save this til after you finish?)
-supportive friend?
-impact wrench (makes things faster but not necessary)
-white-out marker or some other kind of opaque, light-colored marking device (I did not have this... just used a wrench end to make a visible scrape on the torque converter)
-yogurt container, tupperware, dish of some kind to keep bolts from getting dirty (I also did not have this)
TM's to read:
9-2320-289-34 Section 5-12, specifically page "6-62" (has some diagrams, but lots more info about torque converter maintenance not necessary to check flex plate bolts)
9-2320-289-20 Section 4-5, page "4-14", another version of the same diagram, but talking about starter-to-flywheel clearance.
Definitions:
Flex Plate (also known as "Flywheel"): A round metal plate attached to the engine's crankshaft. It has gear teeth on the outer rim that the starter engages with to turn the engine during starting. It is bolted to the crankshaft in the center and to the torque converter near the edges.
Flex Plate Bolts: In this post at least, this refers to the bolts at the edge of the flex plate holding it to the torque converter. I could not find the appropriate size in a search. Maybe one of the other members can post this info and I'll edit this part?
Torque Converter: Big fat thing, kind of looks like a huge donut or a bundt cake or something, part of the transmission. The Flex Plate bolts to it.
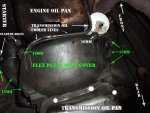
Dust Cover: The panel you need to remove to access the flex plate and torque converter.
Procedure:
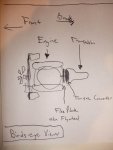
First thing you should do is read this all the way through. You may even want to print it out. A note about the picture... I colored everything that you DON'T want to touch white. Everything you need to remove is GREEN. I also included some poorly drawn sketches. Don't make fun of my terrible drawing skills!
Step One
First thing I did was park my truck with two wheels up on the curb. Not necessary, but since I don't have a lift or jack stands strong enough to hold the truck up in the air, it was helpful to get a couple extra inches of ground clearance.
First thing to do when under the truck, especially if you don't spend much time under there... is to look around. Chances are you'll find some liquids dripping from various places. Sample each drip with your finger, smell the liquid... diesel? oil? is it red (transmission fluid)? is it yellow (brake fluid)? is it green (engine coolant)? You may find you have a more pressing issue than making sure your flex plate bolts are tight... Anyway, let's assume you've got a few minor drips, but that all is generally well and you want to get those flex plate bolts tight.
Get underneath the truck and locate the dust cover. It's right in-between the transmission oil pan and the engine oil pan. There are 6 bolts holding it on, all of which are 15mm. The smart thing to do here is to work on the hardest ones first. This way if you get stuck, you don't have to put everything back. Once you've got all 6 of those off, take off the 16mm bolt holding the transmission oil cooler lines in place. I found that I needed pliars to bend the little holder-thingy out of the way, as it was getting in the way of my socket fitting over the bolt correctly. Keep that 16mm bolt separate from the others to avoid confusion.
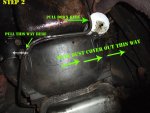
Step 2
Greasy yet? OK, now comes the tricky part. Refer to the picture marked "
Step 2". You have to pull the transmission oil cooler lines over so they aren't holding the flex plate dust cover in place anymore. I found that by pulling them down, near where my spin-on oil filter is in the picture, and then pulling them over to the left (the area where you removed that bolt), they eventually let the dust cover free. Once free, you have to kind of mess with it until it gets free of the starter and finally slides out (in the direction of the driver's side of the vehicle. I can't really explain this in any more detail, it will make sense once you're at that part.
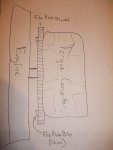
Step 3!
Now you should be able to see the flex plate / flywheel itself, along with the torque converter. I apologize... I was hurrying to finish up when doing this procedure and did not have my camera with me, so this hand-drawn diagram will have to suffice. It's pretty easy to figure out. Grab your 15mm box end wrench and align your body such that you can hold the torque converter still with one hand while cranking on the bolts with another. You have to hold the torque converter still so you won't be turning the engine over with your wrench. I was only able to access 2-3 bolts at a time, so after tightening as many as I could reach, I put a mark on the torque converter near each of those bolts. This way I would know which ones I had already done. You'll also want to inspect the teeth on your flywheel at this time. Are any of them broken or worn down a lot? That could spell trouble for you down the road. Also check that the flex plate doesn't have any cracks in it. This is a bit more difficult... but do the best you can. If there's anything obvious, you'll want to get a pro to replace that ASAP. Once you're done inspecting, crank the engine over in your preferred fashion. One way is to really crank on one of those bolts until it turns the engine. I chose to employ the starter motor as an assistant... a second of engine cranking over would reveal some more bolts to tighten (or some I'd already done). I repeated this process... tighten, mark, inspect, crank engine... until I was pretty sure I'd gotten them all (all the bolts I saw for 4 engine crank cycles were marked (already tightened). At the time I performed this procedure, I had not verified in the TM that there are a total of 6 flex plate bolts. There are 6 flex plate bolts total... so if you're good at counting, this is another way to make sure you got them all.
 Final step, reassembly!
For me, reassembly was much easier than disassembly. While I had the hardest time getting those transmission oil cooler lines out of the way to get the dust cover out, putting it back in they didn't give me much trouble at all. Possibly because I'd already bent them a little bit to where they needed to be. In any case, put one of the easy bolts (15mm) in first, but don't tighten it completely... just mostly tight. this will hold the cover in place while you put the rest of them in. Once they're all in, tighten them all up! Lastly, reattach the transmission oil cooler lines using that 16mm bolt.
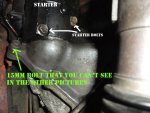
This is a good time to also check that your starter bolts are tight and that the support bracket on the rear of the starter is in place. The starter bolts are 16mm (on my truck at least). They should be real nice and tight, as should that support bracket.
And that's all!
If anyone has something to add, or if I left something out, or especially if I did it wrong... please add to this thread!