• Steel Soldiers now has a few new forums, read more about it at: New Munitions Forums!

  • Microsoft MSN, Live, Hotmail, Outlook email users may not be receiving emails. We are working to resolve this issue. Please add support@steelsoldiers.com to your trusted contacts.

FLU419 electrical issues

terridax

New member
12
7
3
Location
Colorado
Alright, back for another attempt...

I made it through the entire electrical diagnostic section of TM 5-2420-244-20-1 and was not able to find any issues. I then at some point realized that "ignition switch", "engine start switch", and "starter switch" all refer to different things and was second guessing whether I had mistakenly swapped any of those three terms and did a test wrong, so I started over from scratch and went through everything again... still nothing.

I can only assume that I am doing one of these tests improperly because of the extreme vagueness that many steps seem to have (whoever said this process is easy to read/follow is out of your mind... as a retired 2W2, there's no chance we'd have made it through a single operation without shutting it down and submitting changes for a major TM revision).

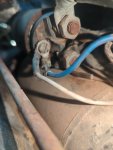
Anyway, that brings me to step 4 on page 3-71
"Step 4. Disconnect connector D (3) and check for +24 VDC between wire 11 (4) and ground. If +24 VDC is not present, repair wiring 11 between starter and connector D. If +24 VDC is present, reconnect connector D and go to step 5."
So, if I disconnect connector D there are obviously two pieces to the connector... one that's attached to the underside of the fuse boxes, and one that isn't. If I test the side that isn't connected, I do indeed get 24 volts. If I test the part of the connector that is attached to the bottom of the fuse boxes, I get nothing. Which side am I supposed to be testing?
 

sethtok

New member
9
5
3
Location
Tok, Alaska
Have you actually tested the solenoid on the starter itself? I have read that you tested the starter motor, but not necessarily the solenoid, or the contactor inside the starter solenoid. In this picture there is a wire connected to a small terminal on the back of the starter solenoid, that is the terminal that needs to see system voltage (24V in your case) when the "start" switch turned or pushed, this is what activates the starter solenoid itself For testing purposes, you can jump from batt + (big terminal) to the small terminal on the starter solenoid, just make sure it's not going to surprise you if it starts. There will be one of three outcomes from this test: (1) nothing happens = bad gound or bad solenoid windings. (2) there is a single click but the starter motor does not turn = bad contactor plate/contacts in the starter solenoid. (3) works like it should = the problem is before the starter. There are hand held starter switches with clip on ends at most auto parts stores if you dont want to jumper wires.
 

Attachments

terridax

New member
12
7
3
Location
Colorado
Chief, The connector is the canon plug. It hooks to the ignition switch. If you have 24VDC on wire 11, then the wire to the starter, from the connector, is good.
I understand the routing, but am not sure what you're getting at here. Wire 11 goes from the ignition switch to the starter, with connector D in the middle of it. For the test in step 4, it specifically says to disconnect connector D. With it disconnected, I do not get any power when testing wire 11 on the side of the plug that is attached to the bottom of the fuse boxes. Since the manual does not specify which side of the connector to test, and because the illustration shows the side that is attached to the bottom of the fuse-boxes, I am assuming that I should be testing the side of the plug that is attached, which is failing the test.

The first time around, I made the assumption that since wire 11 is getting power on the side of the plug that's not attached, that the TM was simply showing an illustration of the wrong side of the connector. Now, since I've gone through the entire troubleshooting process twice and not found the issue, I need to go through and eliminate any assumptions/doubts.

With connector D disconnected, should I be seeing 24 volts on wire 11 on the side of the plug that's attached to the bottom of the fuse boxes?
 

terridax

New member
12
7
3
Location
Colorado
Have you actually tested the solenoid on the starter itself? I have read that you tested the starter motor, but not necessarily the solenoid, or the contactor inside the starter solenoid. In this picture there is a wire connected to a small terminal on the back of the starter solenoid, that is the terminal that needs to see system voltage (24V in your case) when the "start" switch turned or pushed, this is what activates the starter solenoid itself For testing purposes, you can jump from batt + (big terminal) to the small terminal on the starter solenoid, just make sure it's not going to surprise you if it starts. There will be one of three outcomes from this test: (1) nothing happens = bad gound or bad solenoid windings. (2) there is a single click but the starter motor does not turn = bad contactor plate/contacts in the starter solenoid. (3) works like it should = the problem is before the starter. There are hand held starter switches with clip on ends at most auto parts stores if you dont want to jumper wires.
So, I actually asked about doing this and was told that for some reason this wasn't possible on this machine. Wish I could remember what the reason was that they gave, but I don't. Anyhow, I'm willing to disregard that entirely and give it a try, if you will tell me which one of these I should be hooking it up (I do have a jumper button... if I can find it)
Seems like mine has 3 posts, and yours only 2? I've got some extra wires, too o_O
 

Attachments

sethtok

New member
9
5
3
Location
Tok, Alaska
Put one lead to the top large terminal (battery positive cable) and the other lead to the flathead screw terminal, that will give your hand-held switch direct control of the starter solenoid. You can even disconnect the two small wires from the screw terminal if you want, but I don't think its necessary since they would see the same system voltage under normal operation. Page 3-76 shows wire 22 connected to the screw terminal on starter solenoid and references it being energised when the normal starting switch(s) are turned or pushed. it also shoes that wire 22 goes up to connector D (3) up under the hood somewhere.
 

Mogman

Moderator
Staff member
Moderator
Steel Soldiers Supporter
7,371
10,345
113
Location
Papalote, TX
I almost always test circuits with everything connected, you can get "good" voltage on a circuit when disconnected from the load for it to simply go away when the load is connected.
If all you are trying to trouble shoot is a single circuit from the IGN. switch to the starter with only one connection in between it should be an easy task.
As several have already suggested you should try jumping the + from the battery to the start terminal on the solenoid to make sure that part is working.
 

terridax

New member
12
7
3
Location
Colorado
Put one lead to the top large terminal (battery positive cable) and the other lead to the flathead screw terminal, that will give your hand-held switch direct control of the starter solenoid. You can even disconnect the two small wires from the screw terminal if you want, but I don't think its necessary since they would see the same system voltage under normal operation. Page 3-76 shows wire 22 connected to the screw terminal on starter solenoid and references it being energised when the normal starting switch(s) are turned or pushed. it also shoes that wire 22 goes up to connector D (3) up under the hood somewhere.
Got nothing... no clicks or anything. So either a bad solenoid, or a grounding issue?
I'm guessing the next step is rip the starter out, tear it apart, and clean everything up?
 

glcaines

Well-known member
Steel Soldiers Supporter
3,964
2,756
113
Location
Hiawassee, Georgia
If you are positive that the starter and/or solenoid are faulty, it doesn't cost that much to have a starter rebuilt by someone that knows what they are doing. Make sure you pick a place that can handle a 24 VDC starter. Removing the starter isn't very hard. If you do choose to remove the starter make sure you disconnect the battery cables from the batteries first. However, I'm not convinced that you have proven that either the solenoid or starter are faulty.
 

sethtok

New member
9
5
3
Location
Tok, Alaska
Ok, two verifications: (1) that is there is 24V at the top large terminal that the battery cable hooks to on the starter solenoid. (2) That the continuity of your hand held switch is good. If thoes check out, disconnect the two wires from the screw terminal and test continuity from the screw terminal to a ground on the engine block, look for about 1 ohm through the solenoid windings. If no continuity, hitch up your hand held switch again and hold it on while tapping on the starter solenoid with a hammer handle. The final test I would do just for piece of mind is, do the normal starting actions and check for system voltage on at least one of the two wires removed from the screw terminal, which should be the wire #22 (314). I dont actually know what the second wire goes too, but it would only be energized while cranking the engine, energized from wire 22 (314). .....Edit - Oh, I just realized I wrote the wrong number in the parentheses. Should be 213.
 
Last edited:

terridax

New member
12
7
3
Location
Colorado
Ok, two verifications: (1) that is there is 24V at the top large terminal that the battery cable hooks to on the starter solenoid. (2) That the continuity of your hand held switch is good. If thoes check out, disconnect the two wires from the screw terminal and test continuity from the screw terminal to a ground on the engine block, look for about 1 ohm through the solenoid windings. If no continuity, hitch up your hand held switch again and hold it on while tapping on the starter solenoid with a hammer handle. The final test I would do just for piece of mind is, do the normal starting actions and check for system voltage on at least one of the two wires removed from the screw terminal, which should be the wire #22 (314). I dont actually know what the second wire goes too, but it would only be energized while cranking the engine, energized from wire 22 (314). .....Edit - Oh, I just realized I wrote the wrong number in the parentheses. Should be 213.
I do have 24V at the top post on the starter. Continuity on my jumper switch checks out good. After disconnecting the wires from the screw terminal, I get a reading right around 90ohms on that terminal when grounding to the block... definitely not the 1ohm I was looking for, but not an open loop either. Now here's where things get weird... I tested both of the wires that came off of that screw terminal... the blue one is getting a constant 24V without the starter button being pushed, and the white one is getting nothing regardless of pushing the button or not...

Edit: I tried encouraging the starter to work with a hammer also, still nothing.

Also I think it's worth noting that this truck was working perfectly at one point, and I haven't swapped any wires around or anything.
 

sethtok

New member
9
5
3
Location
Tok, Alaska
Yeah that blue wire, If it is indeed the wire 22 (213), being constantly energized is not right, and that's according to the wiring diagram, not just my opinion. So on page 3-78 it shows the location of relay K1 (2), if you pull that relay and the voltage on the blue wire goes away, that is indicating that the relay is stuck on or the starter button is stuck on keeping relay K1 turned on electrically. If the voltage on the blue wire at the starter does not go away when relay K1 is pulled out, there may be a cross connection short in the harness somewhere. We can talk about isolating that if it becomes the case.

The white wire, if that is the correct terminal it goes on, should only get energized by the blue wire during normal cranking operation. But I cant think of what the purpose would be. Like, what would need to be energized only during cranking operations??

The starter solenoid not responding to direct control warrants pulling it out and bench testing. The high ohms reading could indicate bad ground from the starter to the engine block, but that time you made the started go whrrrr without engaging says that it is grounded.

Now I see that in you pic there is another wire that goes under the lower large terminal of the solenoid thats not in the starter wiring diagram. I cant tell just what it hooks to, but it is also strange.
 

terridax

New member
12
7
3
Location
Colorado
Yeah that blue wire, If it is indeed the wire 22 (213), being constantly energized is not right, and that's according to the wiring diagram, not just my opinion. So on page 3-78 it shows the location of relay K1 (2), if you pull that relay and the voltage on the blue wire goes away, that is indicating that the relay is stuck on or the starter button is stuck on keeping relay K1 turned on electrically. If the voltage on the blue wire at the starter does not go away when relay K1 is pulled out, there may be a cross connection short in the harness somewhere. We can talk about isolating that if it becomes the case.

The white wire, if that is the correct terminal it goes on, should only get energized by the blue wire during normal cranking operation. But I cant think of what the purpose would be. Like, what would need to be energized only during cranking operations??

The starter solenoid not responding to direct control warrants pulling it out and bench testing. The high ohms reading could indicate bad ground from the starter to the engine block, but that time you made the started go whrrrr without engaging says that it is grounded.

Now I see that in you pic there is another wire that goes under the lower large terminal of the solenoid thats not in the starter wiring diagram. I cant tell just what it hooks to, but it is also strange.
Mmk, did some testing, pulled each one of the relays while measuring V on the blue wire at the starter. I did get the voltage to cut to 0 when pulling one of them, but it was in the K2 position... that could very well be that the relays just aren't in the correct position on the relay rack, which I would assume is the case since there is a blue wire on the back of my "K2" that's identical to the one at the starter. Now here's the thing... these are 5 brand new Bosch relays, and I've swapped them all around, so I'm pretty skeptical of it being an issue with the relay itself.


Edit: Looks like it's gonna be storming pretty hard for the rest of the day. I think tomorrow I'll go ahead and pull the starter so I can clean it up and bench test it.
 

sethtok

New member
9
5
3
Location
Tok, Alaska
Alright, lets see. If the new relays are the same PN as the old ones thats good, if not there is a slim possibility that the normally open and normally closed terminals are opposite of the old relays. Continuity checks from terminal 30 to 87 and 87A on the new and old relay to be certain. Then, with the system energized un-plug and plug in that new relay to hear or feel if it is clicking, likewise with a couple of the old relays. None should be clicking, if they do, disconnect the main wire to the alternator, just in case it has a bad diode back feeding things its not supposed to.


This is kind of a arbitrary question, but do you know if the blue wire actually runs through the connector "D" as shown in the wiring diagram on page 3-77. It would be wire 213 on the diagram. Just trying to determine if the blue wire was a repair or factory installed. Another thing to note is which terminal the blue wire interfaces with on the relay.

Have close look and test all the old relays to be sure that someone didn't modify that circuit to use a opposite operation relay.


Note edit: Main alternator wire is hot +
 
Last edited:
Top