• Steel Soldiers now has a few new forums, read more about it at: New Munitions Forums!

  • Microsoft MSN, Live, Hotmail, Outlook email users may not be receiving emails. We are working to resolve this issue. Please add support@steelsoldiers.com to your trusted contacts.


FLU419 SEE HMMH HME Owners group

Speedwoble

Well-known member
606
296
63
Location
New Holland, PA
So I am in the process of rebuilding the hydraulic rams on my SEE, and what a pain in the ass that is!
But I have learned a couple of things that I thought maybe I could contribute. First off, my understanding is that the Freightliner was built with a Case 580B/C backhoe attached, and that is even what the info plate on my backhoe assembly says it is, but my seal kits for a Case 580C backhoe do not work.
Our backhoe is newer than the afore mentioned 580B/C/D. The 580D was made from 1980-1984, but our mogs were made in 1986-88. THis overlaps better with the 580E. A lot of that erronious info comes from the CASE MB4/94 mogs which were available with the Model 26 and Model 35 backhoes that were made in the 580D days.
The tag on our backhoe is 35C, which is a "backhoe attachment". It is not the same as the Tractor Loader Backhoe version. It is in the Case parts books as a Case "35C"35C.JPG

Now, there are some differences between the civilian 35C and ours. Namely ours has the pintle hitch and the extra mounts on the dipper boom. Compare the image of the FLU parts book to the Civilian M35C vs 35C.jpg
Though the Dipper is different, the Boom crosses over. Backhoe Boom.JPG

The FLU also uses an aftermarket heavy duty bucket by a different company than CASE.

Choosing one particular cylinder, the Boom cylinder, we can see that it crosses over to the 580E and 580SE(in addition to the 580D&G). Backhoe Boom Cylinder.JPG

So, go to your local CASE Dealer and order parts there.*

*I work for CASE, so please support my employer.
 
Last edited:

Danziger68

New member
1
0
1
Location
Omaha
FLU 419 Case 508 boom hydraulic cylinder is bleeding like crazy. Anyone have specifics on what what version of the Case 508 was used and how/where I might be able to pick up and rebuild kit? Everything works great, it is just leaking at the moment. :)
 
Last edited:

Brents347

New member
27
14
3
Location
Truckee, CA.
FLU 419 Case 508 boom hydraulic cylinder is bleeding like crazy. Anyone have specifics on what what version of the Case 508 was used and how/where I might be able to pick up and rebuild kit? Everything works great, it is just leaking at the moment. :)
I think you will find your answers in the last 2 or 3 posts right before yours.
 

Speedwoble

Well-known member
606
296
63
Location
New Holland, PA
After being smug about the condition of my 3rd Unimog, I finally decided to figure out why the brake lights weren’t working in advance of today’s snow. I found previously undiscovered mouse damage in front of the dash. They nibbles on many wires, but only severed 4 coming from the light controls. There was about a 1/2” min left on each end, so I was barely able to get in there and crimp a bare splice with heat shrink. Now I have warning lights, dash illumination, hazards, and brake lights again.
 

Attachments

rtrask

Active member
332
220
43
Location
San Luis Valley, Colorado
I finally got around to mounting the tires I bought back in October. I will post some pictures later, probably tomorrow. I ran into a issue with one of the valves leaking. I did a search on the part number, but did not get a direct match. I was wondering if anybody has replaced the valve stem, and what valve stem you used? This one from Amazon. https://www.amazon.com/TR-416-Outer...=1520824510&sr=8-5&keywords=tire+valves+stems

It looks similar to the parts manual picture.

TM 5-2420-224-24P-1.pdf.jpg

To replace the whole valve stem I will need to break the bead, but looking at the picture I wonder if it might not be possible to just replace the rubber grommet on the outside and leave the bead intact. I suspect that for that to work the replacement stem will have to be identical.
 

peakbagger

Well-known member
727
345
63
Location
northern nh
I just went to local autoparts store and they had a generic mag wheel replacement stem. It fit perfectly except its chrome. Once you see the stem, you will figure out that you need to pop the bead. The pressure is on the inside of the tire so the majority of the sealing is done from the inside assisted by the pressure in the tire. The outer rubber is most likely there for the initial inflation.

I bought a mechanical bead breaker, but others have gotten creative and use the loader bucker to pop the bead. I did the ether trick to reseat mine but strongly suggest picking up one of air tanks set up to reseat bead.

A general observation is that the rubber gaskets in the stems appear to dry rot and it may be related to sun exposure as the valve stems leaked on one side of my SEE but not on the other.
 

The FLU farm

Well-known member
Steel Soldiers Supporter
3,289
1,221
113
Location
The actual midwest, NM.
Those valve stems should work, Ron. Just be sure to use the correct size grommet.
For breaking the bead, I've been using a Hi-Lift jack, in my case under the drop leg of the HMMH, but anything heavy enough will work.

If using a Hi-Lift, be sure to get the base as close to the rim as possible, and be prepared to give it a few tries. And as usual, a little lube (not oil or grease!) helps a lot.
 

rtrask

Active member
332
220
43
Location
San Luis Valley, Colorado
Here is a look at the tires I bought compared to the Michelins. If you are looking for tires take a look a simpletire.com I was very happy with price and service.

f8f770c63ca5e68d62c56d6540c9366a.jpg
6a4d80d250af02db94bccea54f0d06c8.jpg

2abbb396a4abdabcba3124bc80b1d0b9.jpg

Sent from my SAMSUNG-SM-G935A using Tapatalk
 
Last edited:

rtrask

Active member
332
220
43
Location
San Luis Valley, Colorado
They are definitely not wider, if anything they are slightly narrower in the fattest part of the tire. because of the larger lugs they may look a little wider. They may be slightly taller, but I suspect that is because they have new tread. All in all they are pretty similar, just a very different tread design.
 

peakbagger

Well-known member
727
345
63
Location
northern nh
Here is a look at the tires I bought compared to the Michelins. If you are looking for tires take a look a simpletire.com I was very happy with price and service.

View attachment 721678
View attachment 721679

View attachment 721680

Sent from my SAMSUNG-SM-G935A using Tapatalk
What brand are those tires? Do they have speed rating?.

Every time I go on the simpletire.com site and try to do search for the SEE tire size, it comes up with no choices.

They do look like a heck of off road tread
 

mberetta

Member
39
1
8
Location
Utah
677441_6002_160_0001.jpg
I've gone and done it. I'm sure I'll regret it here and there. I picked this up from govplanet. I'm sure I will have loads of questions. I'm about to spend the next few days working on it. I hope that I can get it started up without too much trouble. There seems to be an abundance of information on these here. I'm making up a checklist of things to do/check before I start it up. I would appreciate any feedback.

I need to check all fluids.
Add good batteries.
Check fuel and air filters.
Check belts and hoses.

Did you guys drain the old fuel? I've had diesels before that had to be primed after sitting a long time. I need to look through the manual and find how to prime it. I'm guessing I am missing plenty of things from this basic list. Anything that you wish to shout out would be appreciated. I've searched the site and I just haven't found a real list of things to check. Things here and there but I haven't found that newby flu419 checklist that I was hoping to find.

So, I am concerned about the condition of all the hydraulic lines. This rig came from Texarkana, TX. The hydraulic lines look pretty bad to my untrained eye. I know mine isn't the only one coming out of there looking like this. So the question is, do these lines need to be replaced before use?


677441_6083_0_0007.jpg

Sorry, I don't know how to make the pictures larger on here.

Mine came without a hood. This is going to be used for work on my farm, not to be a looker. Does anyone have a damaged or unwanted hood they want to part with cheap?
 

peakbagger

Well-known member
727
345
63
Location
northern nh
Many come without a hood. They are a real PITA to put on an off and the method of securing them is difficult at best with the loader on. If you really need one Vons Mogs sells Fiberglass ones http://www.vonsmog.com/newunimoghoods.html. There is someone on the Unimog Exchange http://www.unimog.net/exchange/ parting one out, but I expect unless you can go pick it up the cost to ship would be outrageous. The biggest issue with no hood is the fuse boxes are exposed to the weather. There is supposed to be clear plastic covers over the fuses to keep them dry but these seem to disappear. It just means you need to keep an eye on the fuse clips and clean the inevitable corrosion off them on occasion.

Yes drain the fuel tank and take a flashlight and look inside the tank for growth and contamination. Some folks have had a heck of time fighting this as if its in there its going to come out and plug up the fuel system. Some of that crap is biological so even if you clean out the tank the fuel system will reintroduce it. The primer pumps on most SEEs are crap. if you need to unscrew a serrated plastic cap, that's the old style and it questionable that it will work. Its not worth rebuilding. Get the new style Bosch plunger pump. Expedition Imports has them along with the biggest inventory of NOS spares for SEEs.

Yes your hoses are most likely "cooked", its a choice of pay me now or pay me later. There is still some life left in the hoses as is but I would suggest getting some oil absorbent pads to throw in the tool boxes for when a hose fails. I wouldn't set it as priority until you figure out if everything is working. Don't buy NOS hoses, just go over to hydraulic hose store and have them make up a set.

If you go through this thread you will discover you are missing a key system to go through. Its a PITA but my strong suggestion is go through the air system as its critical to the operation of the SEE and there are a lot of expensive difficult to get to parts that can get damaged by the inevitable crap in the air lines. Start at where the air line that comes from the engine screws into the alcohol injector ( Just ahead of the right rear wheel), to the air pressure regulator and then follow it through to the air tanks. Take a magnet to the line that runs from the inside of the left frame rail just off the air pressure regulator that runs to the air tanks, it its steel, plan on replacing it as its low spot in the system and rots from the inside out and will contribute rust flakes to the air system. You can only go so far easily until you need to lift the cab (difficult) but my guess is the crap introduced from the cross body air line tends to drop out and get caught in the air tanks and some of the check valves before it heads up to the inaccessible locations. By the way, the alcohol injector selector is hopefully set at summer meaning its turned off, don't turn it on until you have verified that the alcohol bottle isn't smashed in and full of dirt. If you plan to use the SEE in freezing conditions then you will need to deal with it or do the smart thing and switch it over to an air dryer.

I would also suggest opening the drains on the differential locks and lubricating them. I did a post on separate thread on how to do this. Its not mentioned anywhere in the military service manuals and it sounds like on many SEEs it hasn't been done and the drain plugs are painted over (they were on mine).

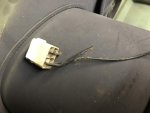
Check the hydraulic cooling fans out back. Take a thin object and see if the fans will turn free. Then look carefully at where the wires go into the fan motor. The grommets rot due to UV and water can leak into the motors ruining them. The military fix is goop them up with RTV and hope. I think there is way of rotating them so the wire is facing down but both of mine were cooked so I replaced them with truck cooling fans off of Ebay. These fans only run when the hydraulics are hot, if they are full of water, they will short an important fuse that controls a lot of the equipment on the back of the SEE like the remote throttle, the remote loader lift, the hydraulic accessories and the rear spotlight.

Last thing go through the lubrication instructions and find every grease fitting and give them a squirt (make sure you read the warnings on overlubing some of them. They are all there but some are a PITA to find. There is one on the transmission that has to be accessed from up top behind the cab after you have deployed the backhoe. Also drain the portal hubs and refill with synthetic gear lube making sure you get the level right. Most equipment don't have portals so people ignore them. Don't do it, the repairs are major PITA if you let them run low and since they don't hold much lube the lube you do put in them needs to be the best you can get in there.

BTW, Nothing I have said is new, its all buried in this thread. I know its painful, but start at post #1 of this thread and go through every post, you will learn a lot about the things that can be a problem with a SEE. Its also worth going in the Misc tech manual forum and look for the thread with the student manuals and the thread that I set up that has a indexed set of the military tech advisories.

Good luck
 
Last edited:

Migginsbros

Well-known member
2,035
5,957
113
Location
Berlin-Germany
Welcome to the group.
First failure we had was a broken waterpump belt.
We have changed them all.
Good luck with your tractor.

Greetings from overSEEs
 
Top
AdBlock Detected

We get it, advertisements are annoying!

Sure, ad-blocking software does a great job at blocking ads, but it also blocks useful features of our website like our supporting vendors. Their ads help keep Steel Soldiers going. Please consider disabling your ad blockers for the site. Thanks!

I've Disabled AdBlock
No Thanks