• Steel Soldiers now has a few new forums, read more about it at: New Munitions Forums!

  • Microsoft MSN, Live, Hotmail, Outlook email users may not be receiving emails. We are working to resolve this issue. Please add support@steelsoldiers.com to your trusted contacts.

Found pieces of metal in tansfercase, it's a shame because i was going to sell it

rickf

Well-known member
3,020
1,313
113
Location
Pemberton, N.J.
There are not many people that can successfully take a picture of the inside of a unit through a small hole! Well done, by the way, get a pipe tap and clean the rust out of those threads or you may have a weeping plug.

Rick
 
226
2
18
Location
Felton, DE
Haha thanks i did that with my waterproof verizon phone, i use it for taking pictures of everything. I was wondering about that. I have acccess to just about every available chemical where ill be swapping this so i may just thread a rag dipped in 50% caustic into the hold to clean the rust out. i wont have to worry about metal getting in it, or vapor rusting from acid. i dont think i have have any taps that size anyway .
 

trukhead

New member
725
5
0
Location
dane/wi
Now is the time to list the truck for sale and hold out for the high price. If you wait until you have to sell then it is likely you would take the lower "cash" price. Take each day one at a time and enjoy the truck each day.:D
 

rickf

Well-known member
3,020
1,313
113
Location
Pemberton, N.J.
Haha thanks i did that with my waterproof verizon phone, i use it for taking pictures of everything. I was wondering about that. I have acccess to just about every available chemical where ill be swapping this so i may just thread a rag dipped in 50% caustic into the hold to clean the rust out. i wont have to worry about metal getting in it, or vapor rusting from acid. i dont think i have have any taps that size anyway .
Any plumber and most mechanics would have the tap. The mechanics would use it to do just that, clean up heater fitting holes and such. Put some grease on the tap and that will grab any rust. You are not looking to take off any metal, just run it in till it gets good and snug and you are done.

Rick
 
226
2
18
Location
Felton, DE
Oh are they a standard pipe thread? I didnt look at them too well, i have pipe taps, though id rather run a thread chaser which i can just make our of a black iron pipe nipple if they are pipe thread. I will check them out tomorrow.
 
226
2
18
Location
Felton, DE
I did clean the threads out yesterday, they werent actually rusted, just some rust water marks from moisture, the threads are all painted the same color as the inside of the transfercase. I also filled the case up with 80/90 and a qt of lucas stabilize. I rotated it 100 times or so in each direction with it laying flat to make sure all bearings have oil on them, and make sure there are no leaking seals. I also got a couple longer bolts, a chain faill, and im just going to use an aluminum load bar across the cab to lower it.<br><br>My questions is does it make a difference which way the short shaft and output shafts are bolted? Are they somehow balanced to the transfercase? I cant imagine they would be.
 

gringeltaube

Staff Member
Super Moderator
Moderator
Steel Soldiers Supporter
6,888
2,275
113
Location
Montevideo/Uruguay
......My questions is does it make a difference which way the short shaft and output shafts are bolted? Are they somehow balanced to the transfercase? I cant imagine they would be.
Its only every 180º and no difference. All propeller shafts are factory-balanced, before installation.

G.
 
226
2
18
Location
Felton, DE
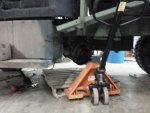
Well i got it all done tonight, it was actually really easy. If i had been able to use my impact gun i would have been able to do it in half of the time, but right as i was starting my tow behind compressor/generator it decided to blow a fuse on one leg of the generator, then did it two more times so i just left it behind. I have a 60 gallon at home but i dont have one at the warehouse i was using.

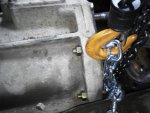
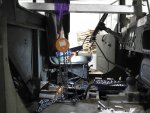
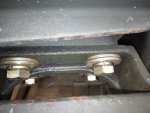
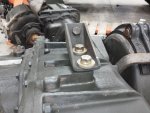
Anyway it took me about 5 hours entirely by myself including the time to run out to buy a 15/16th wrench and bolts. When i got the old transfercase off i realized there were studs in it. I'm not sure how you guys remove them but i removed the 3 body mount bushings, and just maneuvered it around very easily from underneath with my legs. The chainfall hoist i had had a long enough chain to reach the floor so i was able to raise and lower by myself and move it effortlessly to both remove it and install it. I used a chain through bolts at about 10 and 11 and it balanced pretty much perfectly. I ended up just using some 5/8" brad 8 bolts, washers, and lock washers in place of the studs. A couple of the studs came out removing the brackets and i noticed they are only threaded in about .5". I have 2" bolts in there now which is why i had to use 2 washers. I also made a thread chaser to clean out the threads since they had sat.

If i had an impact to use i could have done it in under 3 hours im sure. The part that took me the longest was unbolting all of the driveshafts being they were all split nut jam nuts, and impacts and extension would have done it in seconds over a ratchet and wrench. Removing the brackets and changing over everything took a little while too. In all it wasnt too bad. I drove it around the parking lot, tested everything out it works great. The old one didnt have any shaft play or binding or anything, it probably would have lasted another 20k plus. But atleast now there is a brand new transfercase in it

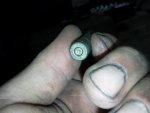
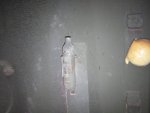
I did find a couple cool things when i took the seat out, a CO2 looking canister marked Nitrogen which clips into a place in the cab above when im assuming a fire extinguisher should be and i also found what looks like a blank inside of a hole in the frame. I am not exactly sure what it is though
 

Attachments

rickf

Well-known member
3,020
1,313
113
Location
Pemberton, N.J.
That is a blank .223 round and the nitrogen cylinder looks like it was for a decon canister. To take out studs you just thread one nut down on the stud about a full nut past the beginning of the threads and then thread another nut on right down to the first. Take two wrenches and tighten the two together and then use the bottom nut to turn the stud out. Installation is the same except you use the top nut to tighten it in.
 
226
2
18
Location
Felton, DE
I thought about it but they looked like fine thread, i wasnt sure where exactly i could get 5/8" fine thread nuts. Im glad i went with the bolts though, there is much more threaded in the transfer case now.

Ive driven in about 20 miles at 55mph so far, i did notice a small leak on the output shaft and the input shaft, but i am not too concerned with that, i think it may go away since the seals were probably a little dry from sitting, with some heat and oil i think they should seal up hopefully
 

rickf

Well-known member
3,020
1,313
113
Location
Pemberton, N.J.
Well I am not a deuce owner so I can't help with the specifics but weren't the nuts you took off of the case you took out fine thread? Actually, wouldn't you have been transferring the studs from the old to the new? Then in that case you would use the same nuts that held it together. You can still do it as long as you have the clearance to get to them.
Again, I am not an expert on deuces so I am just giving advice on changing out the studs. Most studs are coarse thread on the installed side and fine on the application side. There are special tools for removing and installing studs but I have been a master mechanic for 40 years and the two nuts have always worked for me. (Leave it alone guys. :D)
Rick

I should mention that if you decide to put in the studs with the case installed there is another trick for installing them since you will not have room for two nuts on the stud. Let me know if you need that one.
 
Last edited:
226
2
18
Location
Felton, DE
They were coarse thread in the case, fine thread on the stud. I didnt waste too much time with it, some studs came out whole, some the nuts came off with, i was using a 2ft 3/4" ratchet on the 4 i could get to with it and it took substantial force on them so im not sure i would have been able to even use wrench to break those free. I got lucky and was able to hit the wrench with a 4lb hammer to break the others free. I honestly didnt put a whole lot of effort into putting the studs back in haha, i made the decision just to run and grab bolts, it was easier to install and for any future removal.
 

rickf

Well-known member
3,020
1,313
113
Location
Pemberton, N.J.
I am sure the bolts will be fine. Look at your old case and see if the bolt holes go through to the inside of the case. If they do you may experience some oil weeping at the bolts. The studs were so hard to get out because they were locktited in. Most likely if you look at the ones that came out there will be a reddish tint on the coarse threads, that would be permanent locktite. The trick to that is heat, on a unit that big we are talking oxy-acetylene torch. You would have to heat up just the spot where the stud is threaded in to around 700 degrees and it would then come out like butter. The trick is to be able to use a hot torch to get JUST that spot without damaging other areas. If the bolts do start to weep it is not really a big deal but you will have to drain the case if the hole is below the oil level. Take the bolt out and clean the threads with brake cleaner and dry with air, coat the threads with Permatex aviation sealant and put it back in and you are good to go.

Rick

Also check the old case and make sure the longer bolts are not going to hit anything inside.
 
226
2
18
Location
Felton, DE
The bolt holes do have a bottom. i measured everything, and cut perpendicular slots on a pare bolt to make a thread chaser to make sure the threads were clean. I used an extra washer to make sure the bolts wouldnt bottom out, there should be about 1/4" in the bottom of the bolt hole extra space with how i measured and shimmed them. It's all in and working now with no leaks or anything and nothing loosened up so i think its all fine.
 

gringeltaube

Staff Member
Super Moderator
Moderator
Steel Soldiers Supporter
6,888
2,275
113
Location
Montevideo/Uruguay
..................i did notice a small leak on the output shaft and the input shaft, but i am not too concerned with that, i think it may go away since the seals were probably a little dry from sitting, with some heat and oil i think they should seal up hopefully
Sorry to disappoint you but that won't happen... If you decided to keep the truck then better plan on replacing those seals and polish the sealing area of the companion flanges; it is not that difficult to do with the T-Case in place.

I have all housing dimensions and replacement seal numbers, in case you need them.

G.
 
Top