• Steel Soldiers now has a few new forums, read more about it at: New Munitions Forums!

  • Microsoft MSN, Live, Hotmail, Outlook email users may not be receiving emails. We are working to resolve this issue. Please add support@steelsoldiers.com to your trusted contacts.


Front axle seals and boots stepXstep

Banshee365

New member
269
14
0
Location
Ocala, FL
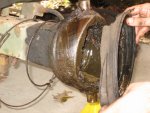
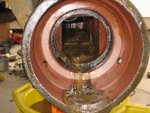
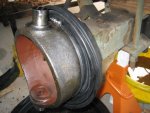
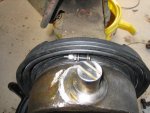
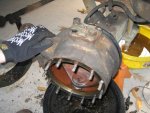
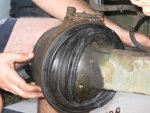
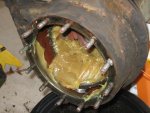
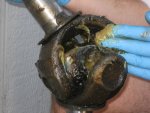
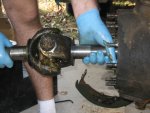
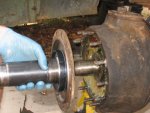
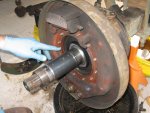
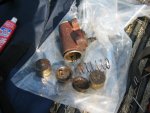
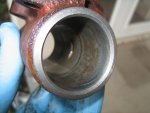
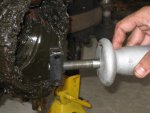
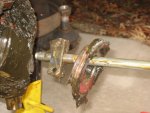
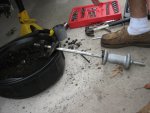
Pull out your slide hammer now, or drive the inner seal retainers out with a 6' pipe or rod from the other side. My slide hammer came with a couple of attachments including the 2 jaw puller. The puller jaws sucked majorly but the mount was wide enough to get behind the retained but now too big to where it wouldn't fit in the axle tube so I just used that! Had to put the mount inside the axle first, then screw the slide hammer into it. After watching the harbor freight slide hammer almost come apart from cheap metal and acting like a gorilla banging at these things they finally came out. Sweet!
 

Attachments

Banshee365

New member
269
14
0
Location
Ocala, FL
Here is where the brake cleaner comes in handy. Clean everything up. Brake cleaner eats the red primer off is you scrub it hard to be easy on it.

Now I slipped the new zipperless boots over the kingpins and installed the inner clamp. All of these boot clamps must be pretty tight, but don't break them, The inner clamp is easy to install, the outer clamp? Get a friend to help! There is no top orientation on these boots. But it's easy to tell how they are designed to unfold as the wheel is turned so install them as your common sense tells you.

I used new stainless 8-32 bolts with nylon lock nuts. I jammed the old nut against that too. I don't want that clamp to loosen again!

NOTE: The nut/bolt must be installed at the top so there is no interference with the boot as the wheel is turned. I stalled all of the clamps at the top but had to offset the drivers side outer clamp becaues of the steering arm.
 

Attachments

Banshee365

New member
269
14
0
Location
Ocala, FL
With the inner seal retainers out you need to replace the seals now. I set the retainer in with seal-down in a vise so the seal could fall out. Used a small punch and hammer and worked my way in circles unil the seal fell out. They are in there good. New seals said "outside" on one side which means that side must go inside the retainer, which will make that side of the seal face outside to the wheels. Then just bang the new seal with a hammer. Be careful not to bend it up too much. It's designed to where the rubber part is attached to the "outside" of the seal which is inside the retainer so some small distortion to the seal won't warp it.

Now install the retainer back into the axle housing. I used a large/long socker with the attachment end on the retainer to maximise surface area and not cause any big dents. Make sure you bang this retainer all the way in or because your axle will rides against this retainer and if it's not all the way in everything won't fit like it should and you could end up with a worn groove in your retainer from the axle.
 

Banshee365

New member
269
14
0
Location
Ocala, FL
Get your friend to help you install the outer clamp. It's a pain to keep on the groove without the clamp tight and in place. Keep checking around the knuckle as you tighten.
 

Attachments

Banshee365

New member
269
14
0
Location
Ocala, FL
Now start packing the axle with grease. I bought the blue surgical looking gloves for $2 for 10. These are also great for washing parts with brake cleaner in your hand and avoiding organ failure. You can feel parts alot better with these over the mechanix gloves. Each side takes about 2# of grease. get it up to the plugs and pack some down in the boot too.

I left the old grease in the u-joints on my axles. I then packed some more grease into the u-joint's on each axle.
 

Attachments

Banshee365

New member
269
14
0
Location
Ocala, FL
Clean the axle shafts up and especially where the seal makes it's home upon axle installation near the thrust surface. Install the axle and you'll feel the nice tight seal it makes on the last inch or so of movement.
 

Attachments

Banshee365

New member
269
14
0
Location
Ocala, FL
If you want to replace the hub seals, as I did regardless of condition, pry them off with a screwdriver or the back of a hammer or something. Then I pressed the new ones on by tapping the seal around in circles with a long 3/8" extension. I put a folded rag between the seal and extension each hit to keep from denting the seal up too back. Make sure the seal is free of sand and clean and install the spindle over the axle shaft and onto the steering knuckle studs.
 

Attachments

Banshee365

New member
269
14
0
Location
Ocala, FL
Now install the brake assembly and don't forget that ring that also goes on the studs. There are 2 cuts made on the ring and those straight parts of the ring make sort of a point at the top pointing at the wheel cylinder.
 

Attachments

Banshee365

New member
269
14
0
Location
Ocala, FL
That is how it sit's right now because i'm waiting on brake rebuilt kits. All that is left to do is reinstall the wheel cylinders that I removed, install brakes shoes, adjust them, install drum/wheel hub, adjust bearing load, and put that cap and the wheel back on and it's done. I'll post the pics and procedures when I do it. But here are some pics of my wheel cylinders.
 

Banshee365

New member
269
14
0
Location
Ocala, FL
If you pry the boots on the wheel cylinders back and fluid comes out you have problems and should rebuild/replace your cylinders. To disassemble them pry the boots off and remove them along with the linkages. Then you'll see the inside of the pistons. behind those pistons are rubber seals and a spring. To remove the pistons stick a air gun attactment on your air hose, stick it on the brake fitting hole and squeeze a little air in there and the pistons pop right out. Don't go crazy with it or you'll be searching for parts across your yard.

Here you see the insides of the pistons. And the reason why I have to rebuilt these things! I don't think they were working.
 

Attachments

Banshee365

New member
269
14
0
Location
Ocala, FL
Here is the inside of what the both of my wheel cylinders looked like. Does the TM call for that? Prolly not. All of that gunk is definetly not supposed to be there and should be thouroughly cleaned prior to the rebuilt. I used brake cleaner and a garden hose.
 

Attachments

Banshee365

New member
269
14
0
Location
Ocala, FL
I honed the cylinders with DOT3 as a lube and a 3 stone honer from autozone. I set it on the lowest tension on the end of my cordless drill and ran it up and down for a few seconds. By looking at the picture I may need to do it more but the inside is smooth now and I don't want to take too much material out. Now I'm waiting on rebuild kits and I'll post more.
 

Attachments

jasonjc

Well-known member
5,325
283
83
Location
Gravette Ar.
Nice job great work!!!
I would have done this to if:
A) I could write as good as you. ( a 4th grader would beat me in this area)
B) could rember to take pic as I go.

If you like those blue gloves try there 2ply there are alot better. I get them by the box. And those one pice boots rule!
keep up the good work and post the prade pics.
 

clinto

Moderator, wonderful human being & practicing Deuc
Staff member
Administrator
Super Moderator
Steel Soldiers Supporter
Supporting Vendor
12,596
1,120
113
Location
Athens, Ga.
Banhsee, this is outstanding. My hat's off to you! :beer:
 

Floridianson

Well-known member
Steel Soldiers Supporter
7,390
2,437
113
Location
Interlachen Fl.
Doing that right now. The only thing I did different was to pack the spindle housing with grease for the spindle bushing. Great pics thanks.
 
Top
AdBlock Detected

We get it, advertisements are annoying!

Sure, ad-blocking software does a great job at blocking ads, but it also blocks useful features of our website like our supporting vendors. Their ads help keep Steel Soldiers going. Please consider disabling your ad blockers for the site. Thanks!

I've Disabled AdBlock
No Thanks