• Steel Soldiers now has a few new forums, read more about it at: New Munitions Forums!

  • Microsoft MSN, Live, Hotmail, Outlook email users may not be receiving emails. We are working to resolve this issue. Please add support@steelsoldiers.com to your trusted contacts.

Getting closer to Bob

Bcurtman

New member
119
1
0
Location
Rosebud, Mo
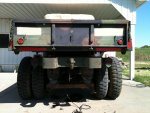
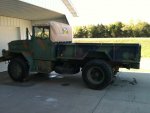
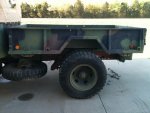
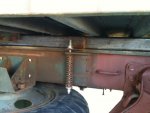
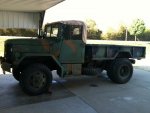
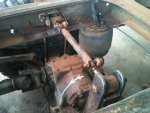
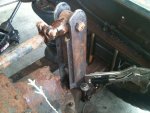
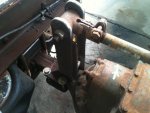
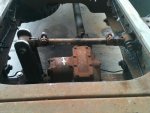
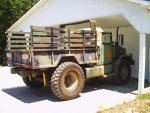
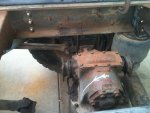
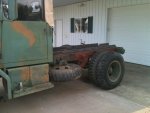
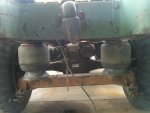
Well, the machined trailing arm mounts / spring blocks are re-installed with the 3 x 3 x 1/4 wall spacers on top of them. Pinion angle is now correct. I'm going to weld a couple of keepers on the blocks so they can't sneak out from under the u-bolts. I went ahead and picked up some 3 x 3 x 3/16 tube for under the bed as well. Now I see that the driveshaft has to be lengthened 6" so that is next. Got new DOT approved nylon air line, fittings, and a pressure regulator coming in from McMaster Carr. I'm going to replace all the copper line and then also put the regulator in the cab to control the ride and ride height in the rear.
 

Attachments

Bcurtman

New member
119
1
0
Location
Rosebud, Mo
Got the bed rails fitted with angle iron mounts tonight, pretty much like original. Used the springs and allthread up front and bolts in the back. Driveshaft gets lengthened next week at a shop that will retube and balance for around $200. Rear brake hose will be in tomorrow at O'reilly and I got the hard line today. Got dark on me tonight, maybe pics tomorrow.
 

Bcurtman

New member
119
1
0
Location
Rosebud, Mo
Mounted a small air pressure regulator in the cab last night to control the air ride ride and height. I'm pulling the air off the end of the valve under the glove box. I put a QD for an air hose on the other port. Driveshaft is finished. Lengthened and balanced for $173.49. Not bad at all. I ran a new steel brake line from the block under the cab back to the axle to avoid a coupling. A 5' stick was perfect in length. When my new brake hose arrives from TNJ I should be ready to bleed the brakes and go for a ride. I'll follow the bleeding procedure on here that I've been reading. If anyone has any tips, please chime in.
 

Bcurtman

New member
119
1
0
Location
Rosebud, Mo
We set the bed on her today. I drove it down the driveway and turned it around and drove it back. No brakes yet cause no brake hose, but it was great to have it move again on its own. Measuring all paid off. Cab to bed is right, wheel wells are centered over rear tires, and tailgate opens all the way to rubber bumpers on bumperettes. I have to weld the bed to the 3" tubing, but that's only a 20 minute deal. Once the hose is on and the brakes are bled, we should be on the road. Well, I still have to coil up the taillight wires and plug them in....the devil is certainly in the details, and there are lots of little things that have to be done to make them right. Put new wiper arms and blades on yesterday thanks to another post here. The Anco parts worked great! Pics in the morning!
 

HanksDeuce

Well-known member
1,080
238
63
Location
Prairieville, LA
You did a really good job on this bobber. I wonder how much better the ride is with air? Have you felt a difference only driving it down your driveway? :drool:
 

Bcurtman

New member
119
1
0
Location
Rosebud, Mo
It seems like it will ride great, but I will say that without the shocks, I noticed a lot of "axle wrap". I don't think for a second this is axle wrap, but more the loading / unloading of the bags when taking off and stopping. Shocks will help this a bunch. I am only running 10 psi to set it at level ride height with the bed empty! I'll know more in about one more week. Lots of little details and nut torquing to finish up.
 

Wozdirt

Member
Awesome build. I like the use of the three inch tubing to mount the bed at desired height. And I am very interested to hear how the air suspension affects the ride and drive.
Thanks for posting up all of the progress pics
 

Bcurtman

New member
119
1
0
Location
Rosebud, Mo
Yes, I'm pulling the air off the end of the line under the glovebox, going through a regulator mounted on the firewall inside the cab, and then back to the bags. Are you concerned about an air bag failure and then loss of braking? Explain your suggestion, please. I'm always looking for a way to improve!
 

Bcurtman

New member
119
1
0
Location
Rosebud, Mo
Everyone has an opinion, and I have mine regarding the actual need for a track bar on the rear of my truck with the Reyco air ride. However, since the engineers at Reyco said it was needed on the semi's, and I will be operating this on the road with other people's lives at stake, I went ahead and installed it Saturday. It causes no interference for me at all. I'm waiting on a rear brake hose from TNJ Murray, and it is taking a while to get here. Then the bed will go back on and we will be thinking paint and tires. I also plan to install a receiver hitch in the rear as well.
 

Attachments

Bcurtman

New member
119
1
0
Location
Rosebud, Mo
Got my 14.00-20's today from Feltz Tire. Man these things are huge and they are in GREAT shape. Thanks Rodney! I have flaps and tubes on order at the local tire shop. Once my airpak is rebuilt and the rear hubs are flipped, the tires go on. Then it will be time for paint. I cant decide between freshening up the camo or going custom colors on it....
 

Bcurtman

New member
119
1
0
Location
Rosebud, Mo
I got my 14.00-20's mounted up and on the truck! Wow! What a change in stance and attitude! I now have Eleven 9.00-20's, some almost new, and 8 wheels along with M35 top bows available. I can see that I will have to make the caster modification to make it handle better, or play with the air pressure in the tires. It does wander a bit now.
 

rrrr

Member
752
0
16
Location
Missouri
With the bigger tires you might want to adjust the tow out on the front tires. I did this when I put 395's on mine. Made it much more controlled. Do a search on the forum its well covered. I went an additional 3/8 inch tow out started at 1/4 inch and tested first.
 

Bcurtman

New member
119
1
0
Location
Rosebud, Mo
So should I toe it out AND adjust the caster both? Modifying the caster angle looks simple enough judging by the pictures on here. Of course, changing the toe in / out is easier yet!!
Here are a couple of pics. Rebuilt the airpak completely yesterday, but friends stopped by so I did not get it re-installed. To be perfectly honest, I didn't see a specific issue where I could say "there, that's the reason it was blowing air out of the vent", but I'd have to speculate that either the pushrod bushing seal or pushrod seal were the culprit.
 

Attachments

DeucesWild11

Active member
1,265
12
38
Location
Putnam County, NY
I rebuilt my Airpack too and had the fluid blowing out the air vent as well. Saw a few small things I thought may have contributed but couldn't tell for sure. So long as it works for you now that's the main thing!
:beer:
 

rrrr

Member
752
0
16
Location
Missouri
Turn so the wheels are straight. Put a staple in each tire, on the front side, so you can get an exact distance between the staples. Jack the front axle off the ground so that the tires are just touching. Loosen the tie rod behind the axle. Then turn the tie rod a full turn one direction and check your measurement between the staples. You want the distance to increase. Try a 1/4 inch first. If the distance decreases turn the tie rod the opposite direction.
 

Bcurtman

New member
119
1
0
Location
Rosebud, Mo
I measured my toe last night. Doing a pretty quick, but reasonably accurate measurement at the fat part of the tire at axle height both in front of and behind the axle, I am currently toed out 3/8". Do I need more, or is more towards zero toe or neutral better? I'm guessing from the above post that I might already have too much....
 
Top
AdBlock Detected

We get it, advertisements are annoying!

Sure, ad-blocking software does a great job at blocking ads, but it also blocks useful features of our website like our supporting vendors. Their ads help keep Steel Soldiers going. Please consider disabling your ad blockers for the site. Thanks!

I've Disabled AdBlock
No Thanks