• Steel Soldiers now has a few new forums, read more about it at: New Munitions Forums!

  • Microsoft MSN, Live, Hotmail, Outlook email users may not be receiving emails. We are working to resolve this issue. Please add support@steelsoldiers.com to your trusted contacts.

goldneagle's M923 recovery and modification thread

goldneagle

Well-known member
4,436
870
113
Location
Slidell, LA
There was a antenna base behind the muffler support. I made a adapter to mount the CB antenna in place of the military antenna.
 

goldneagle

Well-known member
4,436
870
113
Location
Slidell, LA
I spent the afternoon cutting and terminating 3/0 battery cables for the 4 batteries I will use with the winch. I ended up wasting a lot of time looking for the 350 AMP battery quick-connect I had purchased for connecting the battery bank to the winch. Still cannot locate it! Ordered a replacement so I can finish the job. I will take pictures once the cables are properly secured in place.
 

goldneagle

Well-known member
4,436
870
113
Location
Slidell, LA
Well I found the 350 AMP quick connector today after searching for over 2 hours. I soldered the 3/0 cables to the connector. Picked up some 3/8" stainless nut and washers for the battery terminals. When I got back I hooked up the cables to the batteries and was able to test the winch. Works flawlessly!

I was going to strap the batteries in place and secure the wires in place, but the UPS driver did not show up with the parts until 7:30 PM. So I have to wait until tomorrow to get the work done. I took some pictures of the cable ends to show the termination.
 

Attachments

goldneagle

Well-known member
4,436
870
113
Location
Slidell, LA
Went out this morning in the heat (97degrees out) and worked on securing the batteries with the strap kits I purchased this week. Once I marked the location of the strap brackets I used special self-tapping screws that can drill through 3/8" plate to attach the brackets to the weight trays. Once they were secured I broke the excess length off the screws with my hammer. These screws have long drill tips on the end so they came go through the entire thickness of the metal before the threads engage. Once I got all 16 screws done I reinstalled the batteries into place and secured them with the straps. I then attached the battery cable back to the terminals. I still have to secure the cable out of the way below the frame. Right now they a just hanging there loose. I ordered some straps and waiting for deliver early in the week.

Here are some more progress pictures.
 

Attachments

goldneagle

Well-known member
4,436
870
113
Location
Slidell, LA
Got side-tracked on another project the last few days. I was trying to decide how I was going to secure the cables in place under the frame. Finally it dawned on me about using beam clamps. I had used beam clamps years ago when I was doing electrical work for a living. I was trying to keep from having to drill holes in thick beams and frame pieces just for wire straps.

The beam clamps made the job a breeze. I just tightened the clamps in the location I chose. Then I attached the insulated wire straps with 1/4"-20 stainless steel screws using the pre-tapped holes in the beam clamps.
 

Attachments

goldneagle

Well-known member
4,436
870
113
Location
Slidell, LA
Came up with a mounting location for the battery isolator. I cut a piece off a damaged bumper as a mounting bracket. (see picture) I pre-drilled it for the isolator and the mounting bolts. Using the existing hole for the round bumpers under the hood support, I used longer 5/16" bolts to mount the bracket in place. I then mounted the battery isolator to the bracket with (4) 1/4" bolts. (see pictures)

I will run the cables for it later.
 

Attachments

goldneagle

Well-known member
4,436
870
113
Location
Slidell, LA
After a delay of almost a week I got a chance to make some progress on the winch project. I had been doing a lot of thinking of how to cover up the batteries. After a few ideas i came up with the best idea, in my opinion. I am using 3/4" thick horse stall mats. They are solid rubber (probably recycled tires). I cut the mat to fit on top of the 2 batteries between the posts and cables. when fitted in the mat height is almost exactly to the top of the battery posts. Then I cut another piece to fit the outside of the batteries. The third piece goes on top of the cut up one and goes all the way to the top of the frame. I will drill holes in the 3rd (top mat) where the bolt heads stick up above the frame. (so the rubber mat will sit on the frame and on top of the batteries.

Later I will cut heavy gauge sheetmetal to go over the rubber mats.

I only cut the 3 pieces for one side this afternoon. I will get the other 3 done tomorrow morning when it is cooler out. Check out the attached pictures.
 

Attachments

goldneagle

Well-known member
4,436
870
113
Location
Slidell, LA
Thank you Swamp Donkey for the feedback.

Had a crazy day today loading tires for shipping and shipping items sold on Ebay. Ended up tying up most of my day. I did manage to cut and fit the rubber mat pieces for the left side batteries after the rain stopped this evening. I still have to drill holes in the top rubber mat pieces for the large bolt heads on top of the frame. This will allow the rubber mat to sit flat on top of the frame extensions.

Once I get the mats completed I will start to fabricate the sheet-metal covers.

Do to the late hours I did not get any additional pictures yet.


I would love to hear some feedback and suggestions from my fellow members on this project. Seems like I am the only one writing any entries in this thread lately.
 

goldneagle

Well-known member
4,436
870
113
Location
Slidell, LA
Looks like no rain Sunday so i hope I can start on the metal cover. Just have to drill or notch the rubber top mat for the large bolt heads on top of the truck frame first.
 

Csm Davis

Well-known member
4,152
376
83
Location
Hattiesburg, Mississippi
Hey bud my guy said no thanks, and I have an idea about the winch and battery covers, what about covering the top and bottom of the winch area with tread plate to protect the winch from the elements and it would give you some storage also.
 

goldneagle

Well-known member
4,436
870
113
Location
Slidell, LA
I had a very productive day today! I measured and cut the upper rubber mats with my jigsaw to notch for the top bolt heads protruding from the top of the frame. Once I had both of them sitting flat it was time to work on the sheet-metal covers.


Mat_Cut_1.jpgMat_Cut_1a.jpgMat_Cut_1b.jpgMat_Cut_1c.jpgMat_Cut_1d.jpg

I started by using my newly modified Panasonic 12 volt metal cutting saw to cut a 25" x 48" piece of heavy gauge sheet-metal from the 4' x 10' sheet. (I gutted out a 12 volt battery and installed a power cord to make it into a corded saw) (I ran it to my 12 volt battery charger for power) It cut the sheet fairly quickly. I used a saw guide so I could get a nice clean straight line.
After carefully measuring the project I cut 2 pieces 25" x 14" and 2 pieces 25" x 10" from that sheet-metal. Had to notch the end of the top piece to fit up to the hood as well as for the shackle mounts.

I fitted them into place and then started to measure for pieces of 1" angle that had to go on top of the side panels. Then i also fitted some angle around the top covers. Once I had them fitted i welded them to the sheet-metal panels.

Cover_Rough_1b.jpgCover_Rough_2b.jpgCover_Rough_2a.jpgCover_Rough_2.jpgCover_Rough_2c.jpgCover_Rough_1b.jpgCover_Rough_1.jpgCover_Rough_1a.jpg
 

goldneagle

Well-known member
4,436
870
113
Location
Slidell, LA
Continued...

After cleaning up the welds i primed the sheet-metal with etching primer on both sides.

I will still need to drill and tap the holes that will allow me to attach the cover to the truck frame and battery trays. But that is for another day....

Cover_Primed_2a.jpgTop_View_1.jpgTop_View_1a.jpgCover_Primed_1.jpgCover_Primed_1a.jpgCover_Primed_1b.jpgCover_Primed_2.jpgCover_Primed_1c.jpgCover_Primed_2b.jpg

Top_View_1b.jpg
 

goldneagle

Well-known member
4,436
870
113
Location
Slidell, LA
Looks good so far. Is there pace in the stall mats so the batterys can vent?
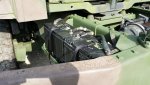
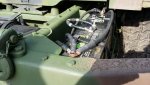
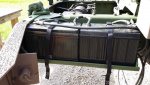
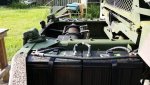
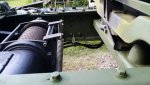
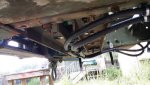
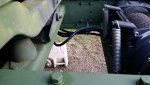
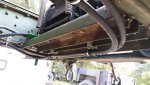
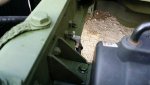
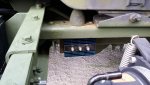
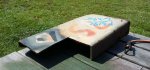
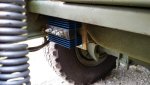
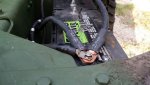
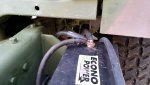
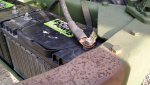
There is 3" gap between the back of the batteries and truck frame. There is also a gap between the side of the battery and the bumper. There is also a triangle shaped opening on the truck side of the battery tray.

The passenger side batteries have a vent tube pointing towards the large gap between the batteries and the frame.

On the driver's side I may have to rout a channel in the mat since the vent tubes point towards the rubber mat on the outside.

So basically it's not a closed box. FYI the bottom of the rubber mats have thin channels grooved into them. I will add a picture of the under side of the mats tomorrow.

Thank you for asking about it.
 

goldneagle

Well-known member
4,436
870
113
Location
Slidell, LA
For those who are worried about venting the batteries I took some pictures of the battery boxes to show large openings on the sides. Also I cut a deep channel in the side rubber mat to vent the 2 batteries on the driver's side. The picture of the mat also shows the grooves on the back of the mat.

Grooved_Mat_1.jpgOpen_Sides_1.jpgOpen_Sides_1a.jpgOpen_Sides_1b.jpgOpen_Sides_1c.jpg

I started by drilling holes through the side covers at the bottom. Then I aligned the side panel to the battery tray and marked the location to drill and tap the battery tray bottom lip. I used a 1/4"-20 tap to thread 5 holes on the side of each battery tray. Then I attached the side panel to the battery tray using short 1/4" bolts and lock washers.

I marked and drill holes in the top cover that lined up with the angle welded to the side panel. I then used short self-tapping screws to attach the top piece to the side piece on both battery trays.

Now I took a C-clamp and clamped the top piece to the truck frame. I drilled holes in the covers. Then I drilled through the top piece into the frame with a drill bit the same diameter as the tip on the long self-tapping screws I am using. The drill tip on the screws is not long enough to drill through 3 layers of frame material. Once I got the holes drilled I used the long self-tapping screws to attach the battery cover to the frame.

I then blew out the debris with air. Then I prepped the surfaces with liquid surface prep. Managed to paint the battery covers. Here are the rest of the pictures:

Side_View_1b.jpgSide_View_1c.jpgSide_View_1.jpgSide_View_1a.jpgTop_View_1.jpg

Front_View_1a.jpgFront_View_1.jpgFront_View_1b.jpg
 
Top