• Steel Soldiers now has a few new forums, read more about it at: New Munitions Forums!

  • Microsoft MSN, Live, Hotmail, Outlook email users may not be receiving emails. We are working to resolve this issue. Please add support@steelsoldiers.com to your trusted contacts.


Got my coveted M-37

papabear

GA Mafia Imperial 1SG
13,508
2,383
113
Location
Columbus, Georgia
And yep! It is a M-37 on the dataplate, belonging to the Marine Corp.
I guess the refurbishment will just have to go along with the truck ID tags.
It might not be the ideal candidate for a Infantry Museum being a MC vehicle, but, I'm thrilled to have it and it will do for my personal preferences. I'll just keep it in the family.
If ya think that's confusing try this one:

My wife's Strata Blue Airforce jeep is actually a Marine M38A1 owned by a retired Army Infantry feller (Me) until she took it away from me.:roll:

She has never driven it and only ridden in two parades in it!:cookoo:

Oh well...If MamaBear ain't happy...nobody is happy!:wink:
 

3dAngus

Well-known member
4,719
101
63
Location
Perry, Ga.
So, today, I flushed out the radiator three times and pulled the temperature gauge sensor. The previous owner converted it to 12vdc, so it isn't going to be a true and very expensive type of restoration, and not in the traditional museum quality sense.

I replaced the temperature sensor, and temperature gauge. I filled up the brake master cylinder because the pedal was all the way to the floor. It was empty. Turns out there is a leaky master cylinder and it looks like it might be coming from the plunger so I am going to try to clean it up with a rebuild kit first, and if that doesn't work, a new master cylinger.

All the gauges need replacing and I'll be working them one at a time, doing fluid checks and changeouts as I go. The oil will be next, then the generator or voltage gauge. Monday is my day off, but I'll be ordering parts and paint tomorrow. Scares the heck outta me spraying paint with a sprayer, which I've had for years, and never dared to hook it up to the compressor, but this whole thing is all about learning new stuff for me, getting educated, and getting frustrated and getting some fun out of it all at the same time, so if I mess it up, I'll make it right, one way or the other. I can always write another check, but I'm going to try it myself first. Only I would go out and pay $85 a gallon for something called catalazed urethane mixed with $68.50 a gallon ODC-31 catalysts and try to spray it when I can't even pronounce it nor know what the heck it is.

Uhhhhhhh.... maybe I better hire a painter. :doh:
 

Storm 51

Just a Grunt
Steel Soldiers Supporter
888
9
0
Location
Seattle, WA
You asked for suggestions on the paint, and I suggested one I've had a positive experience with. There are lots of other choices. There's also Rapco and Gillespie (sp?) and there are even some trucks with great paint jobs done with common house paints and "rattle" cans.

The website explains what the Catalyzed Urethane is and also explains all the owners research regarding the paint and its formulation.

I had a professional car painter paint mine (the EPA in my area is absolute death on "non-permitted" auto painting - you MUST have a certified booth). I'm glad I did. I have no clue about paint sprayers and prep work. I'm sure my painting ignorance would have been obvious in the quality of my paint job.

You may want want to try different options. You asked for suggestions and got mine. It is worth what you paid for it.

Storm 51
 

3dAngus

Well-known member
4,719
101
63
Location
Perry, Ga.
Thanks Storm. I gave you thanks on your post before I wrote the post above as well.

I called my painter right after I wrote that. Sometimes when I yak like that, it makes me think. I think I better go with a pro. Thanks. I love your M-37! I plan on looking into the paint you mentioned and value your opinion.
 

Storm 51

Just a Grunt
Steel Soldiers Supporter
888
9
0
Location
Seattle, WA
Thanks, 3dAngus! Good luck with your truck. Thanks for the compliment on mine. The paint's not cheap, but to me it's worth the cost.

I originally was going to do a 3 or 4 color woodland camo paint scheme, but got talked out of it.

I never imagined when I began restoring this truck for the second time that paint would be such a huge issue.

Please post lots of pics of your progress.

Storm 51
 

3dAngus

Well-known member
4,719
101
63
Location
Perry, Ga.
After talking to the rep on site on caterized urethane, I have elected to go with anothe paint even though I do believe the caterized urethane is a higher quality paint. Reason: they cannot put it in aerosol spray paint cans where I can use a can for a quick touch up under the engine compartement or chassis. I'm back to Rapco but in lieu of the normal 383 Carc replacement, I elected to purchase 4 gallons of the forest green and give it a shot. If I don't like it, I'll dump it and start over.

I tried putting in my new brake master cylinder today. Reading the tech manual, the removal looks like a simple 20 minuted job. It's never that easy. Anyway, after 7 hours of labor, I've decided to just replace all the brake lines. Bending a new line from the master cylinger to the through the frame "Tee" turned out to be all but impossible. In the end, I also managed to strip out the tee by inserting one of my cut and formed solid brake line in at a tilt. The lines running forward and aft from the tee are all corroded so I'm just going to order all new ones.

Problem is, most of the kits I see in the $150 area don't appear to have the most important line I need, which is that 6" run from the master cylinder to the in the frame tee. It has a right angle bend on it just 1" off the end and three auto parts shops have been unable to get a right angle bend that close.

Any of you M-37 people know where I can get that custom made part?

Breaking that line will put me a week to ten days behind. None of these old brake lines and parts seem to be very forgiving when a wrench is put to them after all this time.
 

T. Highway

Well-known member
Steel Soldiers Supporter
1,231
49
48
Location
S.E. WI & S.E. TN, USA - Earth
Make your own. I made mine and I started away from the end of a staight line by 3-4 inches, then trimmed it and flared it. You will waste $5 worth of line but save yourself $.

Bert
 

3dAngus

Well-known member
4,719
101
63
Location
Perry, Ga.
Now I know...
After trying to bend about 7 different, and different length lines, I gave up and went on line to order (after a much needed shower). Heck, I ate after 5PM and did not eat since anything at all since last night (but coffee), and just went out to work on the M-37 this morning and never stopped. It was fun.

So now I get online and I see they sell them differently. They sell much longer ones, start the bend after where the turn normall would be, and bend a 270 degree. That way you have a lot more to play with.

I tried the normal mil-spec line where it has a bend at the last one inch. That is the hardest part to do because the connector is in the way. I even tried to make my own by cutting the screw down off and bending and flaring, but neither would the flaring tool work well with only 1 inch and a screw on covering that one inch.

Doing it the way the resellers are doing it, with a 270 degree bend in it will be a piece of cake. Unfortunately, on that last go around, I cross threaded the through the frame "tee" and I just know I'm gonna mess up the two lines hooked up to it when I try to replace it.

Two steps backward, one step forward.
 

3dAngus

Well-known member
4,719
101
63
Location
Perry, Ga.
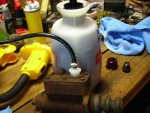
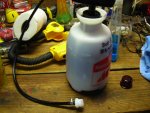
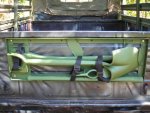
Well today I put together my one man power brake flush system for under $20 from Ace hardware. It is the 1/2 gallon version and uses a 1/4X1/2"MIP adapter which is a perfect fit and there is no drilling required. It only took about 5 minutes to put it together.

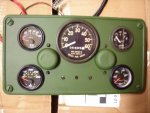
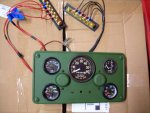
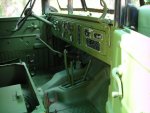
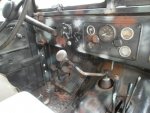
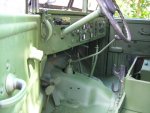
I also got my instrument panel wired up and refinished to about 90%. I have it all wired to the 12 v ignition for starters, due to the availability of only two terminal boards. Another is on the way, and I'll move a few wires over to the light switch, but for now, all lights and instruments come on with the key. No problem there. The previous owner coverted it to a 12v system but never did the instrument panel and it still had the original 24v gauges.

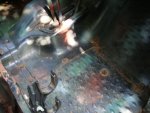
I found another leak on the other side of the chassis tee, just off the master cylinder. Looks like the hard line going from the tee forward to the front brakes has a crack in it, so I've got more work to do. Still considering changing out all the lines, but for now, I would be content to just fix all the leaks and see where I stand. I'll make up a new front line after getting this one off, which is not going to be any easy task in itself. I'll have to dismantle all I've put together to get it off and out of there. ONce changed, I'll pump up my brake power bleeder system, and test the rest of the lines and brake wheel cylinders for more leaks. If none, I'll bleed and see where I'm at. I really want to get off all these leaks and start some sanding and painting and get this thing cleaned up, but I do want good brakes first.

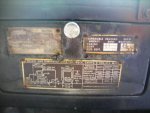
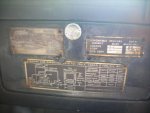
I ordered some additional brake parts and all new data plates for the interior.
 

Attachments

M-37Bruce

Active member
705
59
28
Location
Midlothian, VA
What gauges did you end up with, are they DATCON, can't seem to read them from here? BTW, Your dash turned out great!
Save your old Data Plates, I have mine in a safe place. (glove box in a baggie for now)
 

3dAngus

Well-known member
4,719
101
63
Location
Perry, Ga.
OK. I'll save the dataplates.

The gauges are made by Equus and purchased from O'Reilleys auto parts.
The fuel guage does not work as the sender is still original and set up for 24v, so I didn't change it out. Not sure how it would read with 12vdc in lieu of 24vdc. I might be able to put a resistor across it as a shunt later.
That line through the fuel gauge is not visible unless looking through the camera.
 

3dAngus

Well-known member
4,719
101
63
Location
Perry, Ga.
Well, today I finished the wire brushing and painting of the inside of the cab. Like I said before, it is Carc 383 replacement by Rapco and a rattle can job and it will not match the outside, but I got impatient and did need to use up those rattle cans. The battery looks new and the seats are pulled as I and my wife are pulling the old covers and recovering with some canvas from a pup tent. It should look a heck of a lot nicer than that white vinyl which looks like boat cushion seats. Also, I completed my pioneer tool rack for the back of the tailgate and put it up just to see what it will look like. I wire brushed the old rusty wheels and got the majority of the grease and rust off and painted in camo black. I hope to start the engine compartment next week, then, on to the big job of getting paint sprayer and compressor out and sanding and painting the external. Getting close to the Ga. Rally!

Here's some before and after pictures, minus the seats.
 

Attachments

Last edited:
Top
AdBlock Detected

We get it, advertisements are annoying!

Sure, ad-blocking software does a great job at blocking ads, but it also blocks useful features of our website like our supporting vendors. Their ads help keep Steel Soldiers going. Please consider disabling your ad blockers for the site. Thanks!

I've Disabled AdBlock
No Thanks