• Steel Soldiers now has a few new forums, read more about it at: New Munitions Forums!

  • Microsoft MSN, Live, Hotmail, Outlook email users may not be receiving emails. We are working to resolve this issue. Please add support@steelsoldiers.com to your trusted contacts.


HanksDeuce: 8" Lift, Bobbed, External Cage, A/C and more Project!

hankstrucks

Member
47
0
6
Location
riverhead, new york
Hank , check out Long Island brush trucks. The pipe work we have on our local fire trucks are best any where period. The trucks were first done by the late Art fectman from Speonk n.y. Then by westhampton Brush truck and now by a company up west. These brush trucks can push over very large trees and hold 500 to 1000 gal of water doing it . Your truck looks great and if you did some pipe work wow! Hanks trucks
 

HanksDeuce

Well-known member
1,080
238
63
Location
Prairieville, LA
Cool! Anymore updates? When is paint-day?
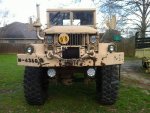
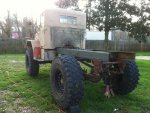
As soon as the weather cooperates I will pressure wash the deuce, do some sanding, and spot prime. Once the primer cures the paint will go on. Maybe by mid February?

Hank , check out Long Island brush trucks... Hanks trucks
Hank, thanks for the heads up on the brush trucks.

I found a great link with a photo gallery of brush trucks.
http://www.flickr.com/photos/seebeew/sets/72157624990507208/with/6939573946/

Here are a few examples:
 

Attachments

Last edited:

HanksDeuce

Well-known member
1,080
238
63
Location
Prairieville, LA
The bars for the brush trucks look awesome. Is this still on your wish list?
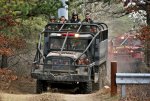
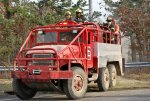
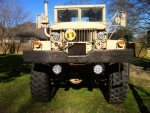
Yes, I still plan on the external roll cage. It will somehow tie into the interior to provide harness attachment points and new seat anchor points in the event of a rollover. It will be 2" DOM tube 0.188 wall for the main hoops and 0.120 wall for the rest of the cage.
 

HanksDeuce

Well-known member
1,080
238
63
Location
Prairieville, LA
Well, I jumpered wires #491 & #21 on the harness that plugs into the back of the 3 position switch on the dash. My front turn signals now illuminate with the head lights on while in service mode, but they don't blink when I use the turn signal switch. The rear LED lights do blink, however.

Suggestions can be found in the thread below:
http://www.steelsoldiers.com/showthread.php?69174-LED-turn-lights-won-t-blink

So, I purchased the product below to see if it will work. It's a Grote 44010 Solid Three-Wire State Electronic Flasher that is specifically made for 12V/24V LED lights used as turn signals. We shall see when it arrives in a week...
 

Attachments

Last edited:

Adrian A

New member
261
7
0
Location
Fresno Ca.
There is an adapter plug that goes behind the multi switch that allows the markers to work correctly. Maybe someone will have more info about it. It was about $90 if I remember correctly.
 

Dipstick

Well-known member
1,101
1,266
113
Location
Effort PA
There is an adapter plug that goes behind the multi switch that allows the markers to work correctly. Maybe someone will have more info about it. It was about $90 if I remember correctly.
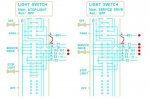
Adrian...I bought the adapter plug from Erick's Military Surplus. It's easy to install and it works great. I think it costs about $83 dollars. I also discovered that my flasher had water inside it's mil connector. That resulted in front and rears turn signals that wouldn't blink even after the adapter was installed. So, between the adapter and a dry flasher connection my turn signals now work great.
 

m-35tom

Well-known member
Supporting Vendor
3,020
220
63
Location
eldersburg maryland
hank, you jumped the correct wires and they have nothing at all to do with the turn signals, that is only the side markers. the front turns are i believe a separet bulb. if your rears flash your flasher is good.
 

HanksDeuce

Well-known member
1,080
238
63
Location
Prairieville, LA
hank, you jumped the correct wires and they have nothing at all to do with the turn signals, that is only the side markers. the front turns are i believe a separet bulb. if your rears flash your flasher is good.
Tom, my deuce lights worked fine stock. I was concerned when I upgraded to front and rear LED lights, but they still flashed correctly. Since the deuce doesn't have parking lights for driving I jumpered the wires to provide parking lights while driving. The jumper mod does illuminate the LED front lights, but when I switch either side with the turn signal switch the LED brightens, but does not flash. I would think it could be flasher related. I've always wondered why the factory flasher worked with the new LED lights.
 

m-35tom

Well-known member
Supporting Vendor
3,020
220
63
Location
eldersburg maryland
the factory flasher is solid state and does not care how much wattage is attached (within reason) it will flash the same rate. sounds like you have a grounding issue and the front turn bulbs may have been grounded thru the marker circuit until you turned them on removing that path. do they flash if the markers are off?
 

welldigger

Active member
2,602
15
38
Location
Benton LA
When my truck had truck lite omnivolts all the way around the stock flasher worked just fine. That is until 3 out of 4 took a dump on me....back to old-fashioned bulbs I went....a real shame since I have LED headlights also. If you still have an old light fixture put it back on the truck and try your blinker then.....pray it doesn't blink.
 

welldigger

Active member
2,602
15
38
Location
Benton LA
O and tom you are correct on bulb type fixtures. Park lights are one bulb and blinkers are another. LEDs on the other hand share the same LEDs for both functions.
 

HanksDeuce

Well-known member
1,080
238
63
Location
Prairieville, LA
I haven't had a chance to fix the blinking problem. But, my Grote flasher unit that is compatible with LEDs came in last week.

I've been having fun sanding and painting.

A redneck's guide to painting your deuce outdoors in Louisiana during winter:
1. Removed M105A2 bed. Stored oak boards in garage. Strapped boards to metal bar to keep them straight.
2. Gave the deuce a shower with a 4000 psi pressure washer. Stayed away from the windows and tires.
3. Put on a respirator rated for sanding use.
4. Attempted to sand the front bumper with a 6" DA + 80 grit pad and the deuce laughed at me.
5. Spent 2+ hours with a wire wheel in my die grinder to sand off 6 layers of paint on the front bumper.
6. Wiped the bumper down with lacquer thinner + blow dried with shop air.
7. Put on multiple coats of Rustoleum self etching primer. Waited a few days.
8. Put on multiple coats of Rustoleum rusty metal primer.
9. Took pictures as I went along.

Next up is to wait for the oil based rusty metal primer to cure. Maybe shoot top coat next weekend if the weather holds out?
 

Attachments

Last edited:

HanksDeuce

Well-known member
1,080
238
63
Location
Prairieville, LA
Here is another set of progress pictures from a different angle.

Same steps as above, but the 6" DA + 80 grit pads actually took off a good bit of CARC. Final sanding on the frame rails (outside) to bare metal was accomplished with the wire wheel on my die grinder.

Next on the list is to sand the entire cab, hood, and fenders. The bed bottom will be sanded and painted off the deuce.
 

Attachments

Last edited:

Riktord

Member
78
1
6
Location
Dallas, TX
I won't lie... I read "lift kit" and cringed... but it came out good. I'd like to see if your design can take heavy stresses of some aggressive trails though.
 
Top
AdBlock Detected

We get it, advertisements are annoying!

Sure, ad-blocking software does a great job at blocking ads, but it also blocks useful features of our website like our supporting vendors. Their ads help keep Steel Soldiers going. Please consider disabling your ad blockers for the site. Thanks!

I've Disabled AdBlock
No Thanks