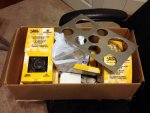
I decided to replace the two leaky rear hardtop rubber seals on my deuce today. 3M Ultrapro Autobody Sealant #8300 is what I used.
A single tube from O'Reilly Auto Parts was $30. I can't believe it, but a single tube was more than enough to complete the job.
http://www.oreillyauto.com/site/c/d....oap?ck=Search_N2356_-1_-1&pt=N2356&ppt=C0171
There are upper and lower gaskets on the rear of the hardtop. I talked to m-35tom today and he recommended 2 passes on each level of the hard top mating surfaces.
To start I removed all of the bolts on the top rear gasket of the hardtop. I left the 2 bolts in the front windshield frame alone. A few 4x4 blocks were stacked on top of the transmission tunnel, and I capped it off with a scissor jack and a 2x2x24" block that pressed against the insulated hardtop roof. For reference it was ~50 inches from the top of the transmission tunnel to the underside of the insulated roof. I cut the sealant tube at the 5/16" mark and made a nice fat bead on the back edge and then a second pass on the inner side of the bolt holes. Work as fast as you can because this stuff sets up pretty quickly. I slowly lowered the roof back to the top mating surface and I installed/tightened all of the bolts. 1/4" drive ratchet with a short 7/16" socket on top and 7/16" box end on the bottom.
After I removed all of the lower mating surface bolts I raised the roof (slowly) again as I loosened the factory gasket with a flat blade screwdriver. The scissor jack and 4x4 blocks pushed the hardtop towards the bed as I raised the roof from the lower section. I removed the lower gasket and cleaned the mating surfaces. After I made 2 more beads of the sealant I slowly lowered the scissor jack. Just before the hardtop touched the sealant beads I pulled it into place at each bolt location (from inside) and dropped in a bolt/washer. Some tugging is required at all spots to align the hardtop lower section. Not much tugging required when you are doing the upper section first. Finish the job by lowering the hardtop and tightening the lower bolts.
No pictures this time because I was trying to beat the rain. After I came back from dinner it started raining pretty hard. No leaks to speak of. Wooo who!


 83.5 KB Views: 163
 86.2 KB Views: 160
 79.5 KB Views: 174
 77.7 KB Views: 161
 69.7 KB Views: 161
 98.4 KB Views: 149
 101 KB Views: 144
 103.3 KB Views: 137
 66.8 KB Views: 138
 96.1 KB Views: 152