• Steel Soldiers now has a few new forums, read more about it at: New Munitions Forums!

  • Microsoft MSN, Live, Hotmail, Outlook email users may not be receiving emails. We are working to resolve this issue. Please add support@steelsoldiers.com to your trusted contacts.

Headlight Help

Milcommoguy

Well-known member
Supporting Vendor
1,659
2,117
113
Location
Rosamond, CA
All good points for any owner, operator and maintainer. If one has the $$$ to sent it out for service ...skip the next part.

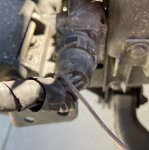
General maintenance of the electrical as stated can be done on the cheap. A simple 24 volt test lamp or go all fancy with a multi-meter. (and very handy around the house) I was poking around the Lowes and saw this yesterday. >
thumbnail.jpg

Will do all the general testing one could ask for. What was neat is the DC clamp on Amp probe. (AC too for home) When the "truck won't start" no more guessing about glow plugs. Clamp this puppy on the glow plug common lead or run around to each and measure the current flow... easy peasy.

Sure there's other ways to test, but for $89 bucks you still have all the other features of a good meter. Chump change for what HumV's are going for.

Easier that a Rubik's cube, once you get the hang of it, CAMO
 
Last edited:

dmuldrew

Member
33
5
8
Location
Memphis, MO
Allright getting started, but not much progress. The boots on the connectors on the back of the headlights are toast. Splitting, crumbling. Some of the connectors pulled off of the wires they were crimped to removing them. Ive got new connectors and boots.

I have continuity on the ground connector of the headlight harness to the frame so is it ok to assume the ground is good? I was going to remove the wire harness
for the headlights at the connector and check for power there. But I cant get it off. Is it ok to spray some penetrating oil on this or is that a no go? How hard should I crank on this. Looks like it would easily twist off.
 

Attachments

98G

Former SSG
Steel Soldiers Supporter
5,921
4,069
113
Location
AZ/KS/MO/OK/NM/NE, varies by the day...
Allright getting started, but not much progress. The boots on the connectors on the back of the headlights are toast. Splitting, crumbling. Some of the connectors pulled off of the wires they were crimped to removing them. Ive got new connectors and boots.

I have continuity on the ground connector of the headlight harness to the frame so is it ok to assume the ground is good? I was going to remove the wire harness
for the headlights at the connector and check for power there. But I cant get it off. Is it ok to spray some penetrating oil on this or is that a no go? How hard should I crank on this. Looks like it would easily twist off.
Like you, I'm extremely reluctant to go yanking on 20 year old electrical cables. It would be terrible to damage a wiring harness because a headlight failed.

Here's how I'd do it- I'd take a known good headlight and plug it in and see if it works. Surely someone around you has one . This will tell you if it's a truck issue or a headlight issue.

Shameless plug - I have a pair of NOS LED headlights I'd like to sell you if yours are bad.
 

Action

Well-known member
3,581
1,552
113
Location
East Tennessee
Did you pull a power wire from the back of headlights and see if it has power? You already took the ground wire off. Obviously, you need the lights turned on. If no power, hit the dimmer switch and check again.
 

dmuldrew

Member
33
5
8
Location
Memphis, MO
Allright getting started, but not much progress. The boots on the connectors on the back of the headlights are toast. Splitting, crumbling. Some of the connectors pulled off of the wires they were crimped to removing them. Ive got new connectors and boots.

I have continuity on the ground connector of the headlight harness to the frame so is it ok to assume the ground is good? I was going to remove the wire harness
for the headlights at the connector and check for power there. But I cant get it off. Is it ok to spray some penetrating oil on this or is that a no go? How hard should I crank on this. Looks like it would easily twist off.
Allright, got that off with just a bit more effort...but no idea what post to
 

dmuldrew

Member
33
5
8
Location
Memphis, MO
I cannot get power on the posts, high or low beam on either side. BUT I may be doing something wrong. Cause I disconnected the harness at the frame connector. I assume with the lights on that since my marker lights and signal lights work that some pf the posts here should be hot. Does a diagram exist that tells me what post powers what light?IMG_1791.jpg
 

papakb

Well-known member
2,288
1,186
113
Location
San Jose, Ca
Using your multimeter you can check for power on the female sockets in the body connector. Put the black lead in pin "E" and measure to the other pins for voltage. This schematic is in the back of TM9 2320 280-20-3.


HMMWV Headlight wiring.jpg
 

Milcommoguy

Well-known member
Supporting Vendor
1,659
2,117
113
Location
Rosamond, CA
Start with something you know. Bulbs/s good? Voltage to the switch connector pin F? Voltage out of switch when in proper position pin M? or then down to dimmer wire 16 ? Out dimmer hi wire 17 or low position wire 18? (could be reversed, no biggie) Could check at hood receptacle? or at lamp bucket posts same 17 hi 18 lo. Place of no juice... is where the work begins or part to replace.

This is where the simple short test leads come into play to check bulb/s, bypass a switch, etc. Test lamps right at the batteries. Ohm meter works too on old school bulbs.

Post 14 Logic works both ways...look for something "voltage" or look for where its missing and move towards the source.

Got to ask... did it ever work? Lighting switch is a bit complex in its switching... even though markers, park, black-out, etc. may work. Wire harness are pretty robust as are the connectors BUT but but always be on the look out.

Search other threads too... Headlight, lighting switch, etc.

BIG FREE guess. Other light circuits (markers, stop/turn ?) work? Busted light switch or dimmer. BIG TEST What do you have on wire 16 of dimmer. Most important half way point. Dived and conquer.

Got to have the juice, CAMO
 

dmuldrew

Member
33
5
8
Location
Memphis, MO
There aren't female sockets on the body connector. The body connector has male pins that insert into the female sockets on the headlight side of the wire harness. Maybe I dont understand the terminology. But, with the ignition on, the light switch in the far right position. Black attached to bare metal on the chassis, I get a continuity tone on the middle pin and on pin E. With the same ground on the chassis measuring DC voltage I get no power off of ANY pin. This is a head scratcher, because the front marker lights and turn signals were working before I started checking and unhooked this. Shouldn't something be hot here?
 

dmuldrew

Member
33
5
8
Location
Memphis, MO
Start with something you know. Bulbs/s good? Voltage to the switch connector pin F? Voltage out of switch when in proper position pin M? or then down to dimmer wire 16 ? Out dimmer hi wire 17 or low position wire 18? (could be reversed, no biggie) Could check at hood receptacle? or at lamp bucket posts same 17 hi 18 lo. Place of no juice... is where the work begins or part to replace.

This is where the simple short test leads come into play to check bulb/s, bypass a switch, etc. Test lamps right at the batteries. Ohm meter works too on old school bulbs.

Post 14 Logic works both ways...look for something "voltage" or look for where its missing and move towards the source.

Got to ask... did it ever work? Lighting switch is a bit complex in its switching... even though markers, park, black-out, etc. may work. Wire harness are pretty robust as are the connectors BUT but but always be on the look out.

Search other threads too... Headlight, lighting switch, etc.

BIG FREE guess. Other light circuits (markers, stop/turn ?) work? Busted light switch or dimmer. BIG TEST What do you have on wire 16 of dimmer. Most important half way point. Dived and conquer.

Got to have the juice, CAMO
Yes at one time the headlights did work. Again see my post below. Pretty confused. Im expecting to see voltage at the body side of the connector BECAUSE I see the other lights on this harness working.
 

Action

Well-known member
3,581
1,552
113
Location
East Tennessee
Put the multimeter ground lead in the place stated in post #28. The HMMWV uses the harnesses for grounding. You may get a ground signal on the frame, but I would use the ground wire at the plug.
 

dmuldrew

Member
33
5
8
Location
Memphis, MO
Allright getting started, but not much progress. The boots on the connectors on the back of the headlights are toast. Splitting, crumbling. Some of the connectors pulled off of the wires they were crimped to removing them. Ive got new connectors and boots.

I have continuity on the ground connector of the headlight harness to the frame so is it ok to assume the ground is good? I was going to remove the wire harness
for the headlights at the connector and check for power there. But I cant get it off. Is it ok to spray some penetrating oil on this or is that a no go? How hard should I crank on this. Looks like it would easily twist off.
Allright, got that off with just a bit more effort...but no idea what post to
Did you pull a power wire from the back of headlights and see if it has power? You already took the ground wire off. Obviously, you need the lights turned on. If no power, hit the dimmer switch and check again.
Put the multimeter ground lead in the place stated in post #28. The HMMWV uses the harnesses for grounding. You may get a ground signal on the frame, but I would use the ground wire at the plug.
Did that, still no power on any of those posts. There is no power to bot hot posts on the headlights. I haven’t taken apart markers of turn signals…cause they work.
 

Milcommoguy

Well-known member
Supporting Vendor
1,659
2,117
113
Location
Rosamond, CA
Starting OVER. You have markers working. GOOD. This means you have voltage to the switch. Has stated switch has mulit-contacts that switch the voltage to function/s selected. IF you have the switch in the SER DRIVE position and park light is NOT OFF... check for voltage at wire #16 on the dimmer switch. Look for the little tag #16 on wire.

(can't find it) then find the one that does have 24 volts. That would be #16 IF one can believe the lighting switch is good.?

You MUST have 24 Volts there with a KNOWN good ground. (scratch / dig down to the bare metal to make contact) AND a KNOWN good lighting switch. Now there is the wire between the two and chances are ??? it is OK... BUT never assume ANYTHING until traced out. Could be pinched, cut, burnt, who knows what to expect. Gremlins. around every corner.

If not finding 24 Volts, on #16 remove the big connectors on back of lighting switch and inspect for issues, bent, burnt, corrosion, etc. especially PIN "'M"

Looks good OK. This is a my CRAP shoot..... lighting switch is toast... and it wouldn't be the first time.

I get electricity is mysterious. Easiest way is to follow the Volts. Someone said doctor? Easy... finger bone connected to the hand bone,. Hand bone connected to the wrist bone. Wrist bone connected to the arm bone...... "Am I getting this right" TOBASH. Just follow through making good connections.

Battery to switch, switch to wire, wire to dimmer switch, out switch (gets tricky here can go one of two ways 17 hi or 18 lo) out to and thru hood connector, to bulbs and back to 91 ground.

Time to find, fix and repair... 1 hour, including looking for the beer bottle opener LOL, CAMO
 
Last edited:

osteo16

Well-known member
Steel Soldiers Supporter
572
570
93
Location
Evansville, IN
Just in case some of our wires got crossed here...... You are sure your dimmer switch/HIGH-LOW beam foot activated switch is connected and connected properly??? My lights didn't work either....Turned out one of the plugs came loose on the FOOT DIMMER switch on the floorboard.. Not the dimmer switch on the dash .... Just clarifying here....

Ocho Out
 

Milcommoguy

Well-known member
Supporting Vendor
1,659
2,117
113
Location
Rosamond, CA
Starting OVER. You have markers working. GOOD. This means you have voltage to the switch. Has stated switch has mulit-contacts that switch the voltage to function/s selected. IF you have the switch in the SER DRIVE position and park light is NOT OFF... check for voltage at wire #16 on the dimmer switch. Look for the little tag #16 on wire.

(can't find it) then find the one that does have 24 volts. That would be #16 IF one can believe the lighting switch is good.?

You MUST have 24 Volts there with a KNOWN good ground. (scratch / dig down to the bare metal to make contact) AND a KNOWN good lighting switch. Now there is the wire between the two and chances are ??? it is OK... BUT never assume ANYTHING until traced out. Could be pinched, cut, burnt, who knows what to expect. Gremlins. around every corner.

If not finding 24 Volts, on #16 remove the big connectors on back of lighting switch and inspect for issues, bent, burnt, corrosion, etc. especially PIN "'M"

Looks good OK. This is a my CRAP shoot..... lighting switch is toast... and it wouldn't be the first time.

I get electricity is mysterious. Easiest way is to follow the Volts. Someone said doctor? Easy... finger bone connected to the hand bone,. Hand bone connected to the wrist bone. Wrist bone connected to the arm bone...... "Am I getting this right" TOBASH. Just follow through making good connections.

Battery to switch, switch to wire, wire to dimmer switch, out switch (gets tricky here can go one of two ways 17 hi or 18 lo) out to and thru hood connector, to bulbs and back to 91 ground.

Time to find, fix and repair... 1 hour, including looking for the beer bottle opener LOL, CAMO

Another tid-bit "Dimmer switch".... wire #16 should be connected at the location with the "ribs or bars or lines" molded along the side of the three connections. This is the common to the switch. The #16 wire has ribs on its rubber part too. (If I remember correctly ??) The other two (should be) labeled on the switch "H" for HI to wire #17 and "L" for LO to wire # 18. Look closely on the black insulator.

Now I see, CAMO


71STnmYKwqL._AC_SL1500_.jpg
 
Last edited:
Top
AdBlock Detected

We get it, advertisements are annoying!

Sure, ad-blocking software does a great job at blocking ads, but it also blocks useful features of our website like our supporting vendors. Their ads help keep Steel Soldiers going. Please consider disabling your ad blockers for the site. Thanks!

I've Disabled AdBlock
No Thanks