Tanabi
Member
- 44
- 3
- 8
- Location
- Raleigh, NC
Hi guys!
I wanted to share a project that I did, that I think is pretty cool. I'm not particularly skilled or talented at this kind of thing, so, be forewarned -- I did the best job I, personally, could do with the tools on hand (mostly an off-brand "Dremmel" rotary tool). Most of you could do better. Please don't laugh too much at my crooked cutting work.
Anyway, first a little background for people not familiar -- HMMWVs can be two-person two-door or four-person four-door. Both use the same basic body; a four door has a longer roof, a 'C' pillar, back seats, and of course two extra doors.
The two door typically comes as a soft top (there are hard top variants, but they are special-purpose and not as common), and it still has got the "wells" for the back seats, but instead of doors, it has fairly flimsy blank panels and some covers that go in the bed that just sort of lay in place and never fit right (at least not on my truck). If you don't know what I'm talking about, check this truck out : http://www.militaryjeep.com/image/m998-2man-3/index.html Not mine, but the best shot I could find readily of the back of the truck.
Under the covers, there's still the basic box frames for the seats. I believe you're supposed to be able to use the covers as back-rests and actually sit back there if you were so inclined, but my truck lacked the part of the seat where you put your bum, so on my truck this was not possible.
You can convert a two door to a four door, or vice versa, if you have the right parts.
In my case, I was only interested in the 2 door variant -- I use my HMMWV as a farm truck and I've never had more than one person willing to ride in the thing with me at a time so being a 2-seater wasn't a problem. My truck originally came with a soft top, but the top got destroyed over winter -- so I 'upgraded' to a hard top.
Specifically, a civilian hard top by Midwest Military Equipment and their metal front doors with X-pattern. I discovered that, with their kit installed, I could no longer use the panels that covered the rear seat wells. Those covers are designed to tuck into spaces behind the front seats, and the hard top made so the covers no longer fit because the back piece of the hard top kit covered those spaces.
I was looking at this situation, and I had an idea. I could use MME's "half doors" in the rear, cut down the rear panels, and with a few modifications ... I could turn those rear seat compartments into a pair of "trunks" that I can use for storage!
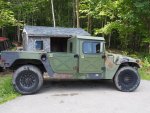
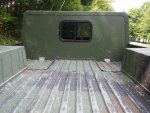
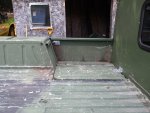
So that's what I did. Took the pandemic to get me the time to sit down and finish it since I bought this kit a couple years ago, but, it is finally done.
Here's roughly what I did, if you want to replicate this yourself, hopefully with more skill than I used.
1. Remove the bases of the back seats.
This is optional, but, I was never going to use those rear seat bases so I tore mine out to have more storage space. It is both riveted and glued to the floor. The fore/aft rivets are easy enough to drill out because they poke through the bottom of the body tub. It's also riveted to the 'center hump' (be careful not to drill out rivets you don't need to as there are many rivets there), to itself (the seat base is 2 pieces riveted together), and -- unfortunately -- to the awkward space between the seat and the base of the door opening.
In my case, I removed all the rivets I could, and I actually cut the seat base along the door side because I couldn't get my drill in position to drill out those rivets, and the rivets aren't accessible from the underside. Not the best solution, but as I've mentioned a couple times, I'm not the best at any of this!
2. Cut down the covers
The covers have a 'rounded' end and a squared off end. The squared off end tapers, so, I cut off (most) of the tapered end. I thought that would be more structurally sound since these covers will be load bearing. The end result has no problem holding my weight of about 200 lbs so I think I chose correctly.
The length of the cover should be cut down to about 30 and 1/2 inches to leave enough of a gap for it swing up and down without getting stuck.
3. Cut the retention bracket.
There's a bracket on the wheel-hump edge of the seat well in which the cover is normally tucked into. From the side it would almost look like a capital 'C'. Cut the top part of that bracket so that it doesn't interfere with the cover swinging up and down. You're basically turning that 'C' into an 'L' so the bracket remains there as a shelf but doesn't have the top lip.
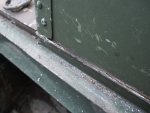
4. Add a support bracket
At the time of this writing, I only added one bracket, but it really needs a second bracket near the 'transmission hump' as well and I will be adding that later on my own setup. I purchased a bracket from a True Value, just one that seemed about the right size and sturdiness. I drilled for 1/4 inch bolts and I used 1 1/2 inch length bolts I think -- you'll want bolts that aren't threaded all the way to the head and have a smooth portion to be more load bearing.
I chose class 5 bolts, but consider class 8 -- you want something solid. I also put RTV gasket material between the bracket (powder coated steel) and the aluminum of the back cover because I figure this is a place that will gather salt and evil, and also it will help make sure nothing leaks along the bolts into the cab. Don't forget the washers.
You may have to remove the passenger seat's backing which is just held on by four easy-ish to reach bolts to secure the passenger side, but I was able to do the driver's side just by moving the seat up. The way things line up, you will actually drill into a cross-beam support that's behind the chair, but you can reach into the support from the underside to bolt it together.
On my truck, the placement of the brackets was actually slightly different on each side so my measurements won't help you much -- put the covers on, hold the bracket and position it so it's stable and the cover doesn't wobble, mark the holes with a marker, and drill. Don't forget the drilling oil / cutting fluid, it'll save your bits!
I would highly recommend you drill one hole put one bolt in loosely first, position the bracket, and then put some rocks or something heavy on the cover to hold the bracket in place such that you get good positive contact all along the bracket and not just at one point. Only drill the second hole when you've got a good place.
Also, when tightening the bolts, the bracket is going to move all over the place, so keeping those rocks putting pressure on the bracket while you're bolting it down will make sure it stays in place.
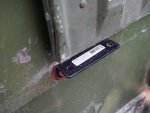
5. Add Hinges
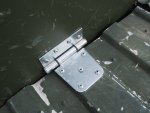
My original intention was to use 2 hinges on each cover. I bought four of the hinges you see in the picture, but it turns out, there was only one place on the cover that I could mount the hinge because the hinge I chose was too wide. It would only fit on the center of the cover.
I could have returned the hinges and gotten narrower ones, but I decided, at my inept level of skill, I was better off using 1 very sturdy hinge rather than trying to get 2 hinges to align in tandem. So that's what I did, and I don't regret it. Works well enough for my purposes.
I used 3/16" aluminum pop rivets with a 1/2" grip (usually obtainable at Home Depot, etc.) for the hinges. On one side, I applied RTV gasket between the steel hinge and the aluminum parts, but it was a huge mess so I didn't do it on the other side -- I am going to use this as an experiment to see if it matters or not I might be pulling up the other side and RTV-ing it next year if it looks corroded or in worse shape than the other side after winter.
I got the hinge itself at True Value, same place I got the brackets. They'll also have the rivets -- they'll also have the "extra long" rivets you will need for a later step in this guide with a 5/8" grip that you won't likely find at Home Depot. At least, mine didn't carry it.
Putting the hinges on is pretty easy. Shift the cover around until it's really solidly secure on the fore/aft ends and on the transmission hump -- take the time to really work it over and put pressure on the cover in different ways, make sure it's seated really well. Then use the hinge itself as a template to drill the holes. Pop rivet it on. The hinge has enough wiggle room that even if you're as inept as me, should work out okay.
6. Cut down the door blanks.
So, at this step, you'll have the covers on hinges and that's great -- they now flip up and down, and congratz, you've got your truck bed largely back. But, there's still a huge gap between the bed and the door.
What I did, was I took the original "blanks" that fill the door holes, I cut them down, and I actually mounted them to the inside of my doors such that the 'shelf' that is part of the door blanks would swing in and out with the doors.
To do this requires a lot of cutting, because those blanks weren't meant to swing in and out.
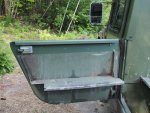
First cut: The door blank has a 'flat' side that points fore and normally is up against the cab and a "curved" side that points aft and is curved to conform with the wheel well.
You're going to cut the flat side first; on my truck, the flat side had a slight curve to it about an inch-ish from the edge. Basically, this curve is the connection between the main part of the panel and the part of the panel that screws into the B-pillar of the truck. This curve is right near the fore support pillar that is part of the door blank and helps support the 'shelf'.
Just cut straight along that curve. With that metal removed, you should be able to take the door blank, put it into the door opening, and it should fit neatly without any of it trying to stick out onto the B pillar.
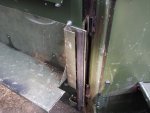
Next, cut off the top. Cut the blank fore/aft so there's about 9 inches of metal above the 'shelf' of the door. You can leave more than 9 inches of metal on there if you want, I cut mine lower than I technically needed to get the job done, but I wanted to have a lot of wiggle room while still keeping enough metal there to help brace the shelf. Cutting it this low also means you won't interfere with the top hinge bolts of the outer door.
You'll also cut the supports down to match wherever you cut the top off.
At this point, the door blank should fit neatly 'inside' the outer door. However, if you try to close the outer door, the bolts from the lower hinge will interfere. You have a few options.
What I did, is I positioned the inner door where I wanted it, leaned on the outer door to make the bolts scratch holes on the inner door, and then I cut a big rectangle around the bolts for two purposes:
a. When I tried to be more 'surgical' and drill holes for the bolts to tuck into instead, I found that I had a lot of trouble aligning the doors and the holes, and I wound up making a huge mess.
b. this gives you really easy access to the outer door's hinge bolts which is very useful.
You may be more clever than me, and perhaps you can drill your holes with more precision or even use the hinge bolts to help hold on the inner door. My way is not great, but it works.
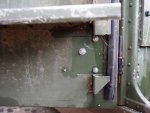
Third cut: the door will not be able to swing open/closed because the shelf won't clear the door opening. So I cut a rectangle out of the aft end of the door shelf so that it would be able to swing. I cut out a rectangle about 4 and 1/2 inch fore/aft by 4 inch wide. Keep the piece you cut out, you'll need it later.
You may be able to cut a smaller piece -- I did this by eyeballing it.
7. Mount the inner door
At this point, you should be able to close the outer door with the inner door in place, and everything should fit without it being a fight. The outer door's "X" pattern is held on by rivets that may push into the inner door, but we'll fix that in a minute.
If anything isn't fitting right, now's the time to trim it.
On the outer door, drill out the rivets on the X that is mounted on the door. You can leave the top row of rivets in -- those will be above the inner door and thus will not interfere with it, and leaving those in will keep the X in place.
On my door, I also drilled some extra rivet holes on the fore end of the door -- I positioned them so they would attach inside the support that is on the fore end of the inner door and did my best to line them up neatly.
Put the inner door where you want it on the truck, close the outer door, and then drill through the holes on the outer door, through to the inner door. You'll need the extra long 5/8" grip rivets now -- use them to secure the inner door to the outer door. For the first couple of rivets, you'll probably have to push the rivet through the outer door, inspect the inner door, and use a hammer to make the inner door secure up against the outer door well enough for the rivet to go all the way through.
These 5/8" grip rivets are just long enough to do the job -- if they don't seem long enough, then either something isn't cut / fitting right, or some hammer work will probably fix it.
Once the inner and outer doors are together, you can try to open the door. Chances are, you'll have to lift the door a little, or force it open a bit. The aft end of the shelf will still snag a little on the wheel hump.
Use a combination of cutting and/or hammering the shelf piece to bend it a bit to make it fit. It's going to be off by a tiny bit, but the amount it is off will vary. On my driver's side, two quick whacks of the hammer and it fit like it came from the factory that way -- on the passenger's side, I had to do a bunch of cutting, and grind down the head of one of the body rivets a bit, to make it work.
8. Mind the Gap
Now your door should open/close freely. But you've got that awkward 4 1/2 inch by 4 empty gap.
So ... there's a lot of ways to fix this. I'll share with you what I did, and then I'll offer a couple of alternative ideas.
The retention (now support) bracket that's part of the wheel well, that you cut so the cover can swing open and shut, is where you want to mount this piece. I did it by first bending the piece so it would fit flush with everything, then I drilled holes so the piece would fit on the bracket.
Easier to show than to tell, so here's what I did.
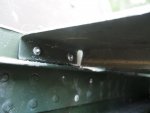
The problem with this, is there's a lot of "stuff" on the underside of that bracket that you're drilling into -- supportive stuff. I don't feel like I undermined anything by drilling into it, but, it did make me cringe a little.
I had to do a couple more minor cuts to the door to allow this extension piece to not interfere with the rest of the door -- the cuts I made were different for each door, so another thing you'll have to suss out on your own.
You could do one of these alternatively: you could drill from the top of the piece down into the bracket (drill down towards the ground instead of into the wheel well). I thought about this, but I didn't think the rivets would reliably hold the piece.
Or, you could add hinges to your door piece, so that the gap-minding piece flips onto the door piece when you open and then flips out to mind the gap when you close. I was really tempted to do this, but, it makes being able to lock your new 'trunk' compartments a lot harder, so I opted not to do that.
Or be more clever than me and think of a different/better solution!
.... And that's it for the basics! Stuff you can do afterwards if you're feeling ambitious:
* Add a mounted loop to the cover so you can padlock it to the cargo tiedown on the truck bed, thus making it secure (the outer doors have locks on them)
* Fill in the gaps made by the cuts with some kind of trim.
* Paint everything you messed up
* Fill in holes to at least pretend to make this thing water tight
* Add more brackets to reinforce places. Personally, I'm planning on mounting brackets on the transmission hump for the fore end of the covers because that's the weakest spot. I'd also like to add brackets to reinforce the 'shelf' on the doors but I haven't had a clever idea how to do that yet without making the X-doors look ugly.
* Try to waterproof it. I think this is an exercise in futility, but, a man can dream.
* Move the batteries to the rear compartment now that there's room and access to it.
* Many more ideas!
Let me know if you have any questions, and please don't mock my poor craftsmanship.
I wanted to share a project that I did, that I think is pretty cool. I'm not particularly skilled or talented at this kind of thing, so, be forewarned -- I did the best job I, personally, could do with the tools on hand (mostly an off-brand "Dremmel" rotary tool). Most of you could do better. Please don't laugh too much at my crooked cutting work.
Anyway, first a little background for people not familiar -- HMMWVs can be two-person two-door or four-person four-door. Both use the same basic body; a four door has a longer roof, a 'C' pillar, back seats, and of course two extra doors.
The two door typically comes as a soft top (there are hard top variants, but they are special-purpose and not as common), and it still has got the "wells" for the back seats, but instead of doors, it has fairly flimsy blank panels and some covers that go in the bed that just sort of lay in place and never fit right (at least not on my truck). If you don't know what I'm talking about, check this truck out : http://www.militaryjeep.com/image/m998-2man-3/index.html Not mine, but the best shot I could find readily of the back of the truck.
Under the covers, there's still the basic box frames for the seats. I believe you're supposed to be able to use the covers as back-rests and actually sit back there if you were so inclined, but my truck lacked the part of the seat where you put your bum, so on my truck this was not possible.
You can convert a two door to a four door, or vice versa, if you have the right parts.
In my case, I was only interested in the 2 door variant -- I use my HMMWV as a farm truck and I've never had more than one person willing to ride in the thing with me at a time so being a 2-seater wasn't a problem. My truck originally came with a soft top, but the top got destroyed over winter -- so I 'upgraded' to a hard top.
Specifically, a civilian hard top by Midwest Military Equipment and their metal front doors with X-pattern. I discovered that, with their kit installed, I could no longer use the panels that covered the rear seat wells. Those covers are designed to tuck into spaces behind the front seats, and the hard top made so the covers no longer fit because the back piece of the hard top kit covered those spaces.
I was looking at this situation, and I had an idea. I could use MME's "half doors" in the rear, cut down the rear panels, and with a few modifications ... I could turn those rear seat compartments into a pair of "trunks" that I can use for storage!


So that's what I did. Took the pandemic to get me the time to sit down and finish it since I bought this kit a couple years ago, but, it is finally done.
Here's roughly what I did, if you want to replicate this yourself, hopefully with more skill than I used.
1. Remove the bases of the back seats.
This is optional, but, I was never going to use those rear seat bases so I tore mine out to have more storage space. It is both riveted and glued to the floor. The fore/aft rivets are easy enough to drill out because they poke through the bottom of the body tub. It's also riveted to the 'center hump' (be careful not to drill out rivets you don't need to as there are many rivets there), to itself (the seat base is 2 pieces riveted together), and -- unfortunately -- to the awkward space between the seat and the base of the door opening.
In my case, I removed all the rivets I could, and I actually cut the seat base along the door side because I couldn't get my drill in position to drill out those rivets, and the rivets aren't accessible from the underside. Not the best solution, but as I've mentioned a couple times, I'm not the best at any of this!
2. Cut down the covers
The covers have a 'rounded' end and a squared off end. The squared off end tapers, so, I cut off (most) of the tapered end. I thought that would be more structurally sound since these covers will be load bearing. The end result has no problem holding my weight of about 200 lbs so I think I chose correctly.
The length of the cover should be cut down to about 30 and 1/2 inches to leave enough of a gap for it swing up and down without getting stuck.
3. Cut the retention bracket.
There's a bracket on the wheel-hump edge of the seat well in which the cover is normally tucked into. From the side it would almost look like a capital 'C'. Cut the top part of that bracket so that it doesn't interfere with the cover swinging up and down. You're basically turning that 'C' into an 'L' so the bracket remains there as a shelf but doesn't have the top lip.

4. Add a support bracket
At the time of this writing, I only added one bracket, but it really needs a second bracket near the 'transmission hump' as well and I will be adding that later on my own setup. I purchased a bracket from a True Value, just one that seemed about the right size and sturdiness. I drilled for 1/4 inch bolts and I used 1 1/2 inch length bolts I think -- you'll want bolts that aren't threaded all the way to the head and have a smooth portion to be more load bearing.
I chose class 5 bolts, but consider class 8 -- you want something solid. I also put RTV gasket material between the bracket (powder coated steel) and the aluminum of the back cover because I figure this is a place that will gather salt and evil, and also it will help make sure nothing leaks along the bolts into the cab. Don't forget the washers.
You may have to remove the passenger seat's backing which is just held on by four easy-ish to reach bolts to secure the passenger side, but I was able to do the driver's side just by moving the seat up. The way things line up, you will actually drill into a cross-beam support that's behind the chair, but you can reach into the support from the underside to bolt it together.
On my truck, the placement of the brackets was actually slightly different on each side so my measurements won't help you much -- put the covers on, hold the bracket and position it so it's stable and the cover doesn't wobble, mark the holes with a marker, and drill. Don't forget the drilling oil / cutting fluid, it'll save your bits!
I would highly recommend you drill one hole put one bolt in loosely first, position the bracket, and then put some rocks or something heavy on the cover to hold the bracket in place such that you get good positive contact all along the bracket and not just at one point. Only drill the second hole when you've got a good place.
Also, when tightening the bolts, the bracket is going to move all over the place, so keeping those rocks putting pressure on the bracket while you're bolting it down will make sure it stays in place.

5. Add Hinges
My original intention was to use 2 hinges on each cover. I bought four of the hinges you see in the picture, but it turns out, there was only one place on the cover that I could mount the hinge because the hinge I chose was too wide. It would only fit on the center of the cover.
I could have returned the hinges and gotten narrower ones, but I decided, at my inept level of skill, I was better off using 1 very sturdy hinge rather than trying to get 2 hinges to align in tandem. So that's what I did, and I don't regret it. Works well enough for my purposes.
I used 3/16" aluminum pop rivets with a 1/2" grip (usually obtainable at Home Depot, etc.) for the hinges. On one side, I applied RTV gasket between the steel hinge and the aluminum parts, but it was a huge mess so I didn't do it on the other side -- I am going to use this as an experiment to see if it matters or not
I got the hinge itself at True Value, same place I got the brackets. They'll also have the rivets -- they'll also have the "extra long" rivets you will need for a later step in this guide with a 5/8" grip that you won't likely find at Home Depot. At least, mine didn't carry it.
Putting the hinges on is pretty easy. Shift the cover around until it's really solidly secure on the fore/aft ends and on the transmission hump -- take the time to really work it over and put pressure on the cover in different ways, make sure it's seated really well. Then use the hinge itself as a template to drill the holes. Pop rivet it on. The hinge has enough wiggle room that even if you're as inept as me, should work out okay.

6. Cut down the door blanks.
So, at this step, you'll have the covers on hinges and that's great -- they now flip up and down, and congratz, you've got your truck bed largely back. But, there's still a huge gap between the bed and the door.
What I did, was I took the original "blanks" that fill the door holes, I cut them down, and I actually mounted them to the inside of my doors such that the 'shelf' that is part of the door blanks would swing in and out with the doors.
To do this requires a lot of cutting, because those blanks weren't meant to swing in and out.

First cut: The door blank has a 'flat' side that points fore and normally is up against the cab and a "curved" side that points aft and is curved to conform with the wheel well.
You're going to cut the flat side first; on my truck, the flat side had a slight curve to it about an inch-ish from the edge. Basically, this curve is the connection between the main part of the panel and the part of the panel that screws into the B-pillar of the truck. This curve is right near the fore support pillar that is part of the door blank and helps support the 'shelf'.
Just cut straight along that curve. With that metal removed, you should be able to take the door blank, put it into the door opening, and it should fit neatly without any of it trying to stick out onto the B pillar.

Next, cut off the top. Cut the blank fore/aft so there's about 9 inches of metal above the 'shelf' of the door. You can leave more than 9 inches of metal on there if you want, I cut mine lower than I technically needed to get the job done, but I wanted to have a lot of wiggle room while still keeping enough metal there to help brace the shelf. Cutting it this low also means you won't interfere with the top hinge bolts of the outer door.
You'll also cut the supports down to match wherever you cut the top off.
At this point, the door blank should fit neatly 'inside' the outer door. However, if you try to close the outer door, the bolts from the lower hinge will interfere. You have a few options.
What I did, is I positioned the inner door where I wanted it, leaned on the outer door to make the bolts scratch holes on the inner door, and then I cut a big rectangle around the bolts for two purposes:
a. When I tried to be more 'surgical' and drill holes for the bolts to tuck into instead, I found that I had a lot of trouble aligning the doors and the holes, and I wound up making a huge mess.
b. this gives you really easy access to the outer door's hinge bolts which is very useful.
You may be more clever than me, and perhaps you can drill your holes with more precision or even use the hinge bolts to help hold on the inner door. My way is not great, but it works.

Third cut: the door will not be able to swing open/closed because the shelf won't clear the door opening. So I cut a rectangle out of the aft end of the door shelf so that it would be able to swing. I cut out a rectangle about 4 and 1/2 inch fore/aft by 4 inch wide. Keep the piece you cut out, you'll need it later.
You may be able to cut a smaller piece -- I did this by eyeballing it.
7. Mount the inner door
At this point, you should be able to close the outer door with the inner door in place, and everything should fit without it being a fight. The outer door's "X" pattern is held on by rivets that may push into the inner door, but we'll fix that in a minute.
If anything isn't fitting right, now's the time to trim it.
On the outer door, drill out the rivets on the X that is mounted on the door. You can leave the top row of rivets in -- those will be above the inner door and thus will not interfere with it, and leaving those in will keep the X in place.
On my door, I also drilled some extra rivet holes on the fore end of the door -- I positioned them so they would attach inside the support that is on the fore end of the inner door and did my best to line them up neatly.
Put the inner door where you want it on the truck, close the outer door, and then drill through the holes on the outer door, through to the inner door. You'll need the extra long 5/8" grip rivets now -- use them to secure the inner door to the outer door. For the first couple of rivets, you'll probably have to push the rivet through the outer door, inspect the inner door, and use a hammer to make the inner door secure up against the outer door well enough for the rivet to go all the way through.
These 5/8" grip rivets are just long enough to do the job -- if they don't seem long enough, then either something isn't cut / fitting right, or some hammer work will probably fix it.
Once the inner and outer doors are together, you can try to open the door. Chances are, you'll have to lift the door a little, or force it open a bit. The aft end of the shelf will still snag a little on the wheel hump.
Use a combination of cutting and/or hammering the shelf piece to bend it a bit to make it fit. It's going to be off by a tiny bit, but the amount it is off will vary. On my driver's side, two quick whacks of the hammer and it fit like it came from the factory that way -- on the passenger's side, I had to do a bunch of cutting, and grind down the head of one of the body rivets a bit, to make it work.
8. Mind the Gap
Now your door should open/close freely. But you've got that awkward 4 1/2 inch by 4 empty gap.
So ... there's a lot of ways to fix this. I'll share with you what I did, and then I'll offer a couple of alternative ideas.
The retention (now support) bracket that's part of the wheel well, that you cut so the cover can swing open and shut, is where you want to mount this piece. I did it by first bending the piece so it would fit flush with everything, then I drilled holes so the piece would fit on the bracket.
Easier to show than to tell, so here's what I did.

The problem with this, is there's a lot of "stuff" on the underside of that bracket that you're drilling into -- supportive stuff. I don't feel like I undermined anything by drilling into it, but, it did make me cringe a little.
I had to do a couple more minor cuts to the door to allow this extension piece to not interfere with the rest of the door -- the cuts I made were different for each door, so another thing you'll have to suss out on your own.
You could do one of these alternatively: you could drill from the top of the piece down into the bracket (drill down towards the ground instead of into the wheel well). I thought about this, but I didn't think the rivets would reliably hold the piece.
Or, you could add hinges to your door piece, so that the gap-minding piece flips onto the door piece when you open and then flips out to mind the gap when you close. I was really tempted to do this, but, it makes being able to lock your new 'trunk' compartments a lot harder, so I opted not to do that.
Or be more clever than me and think of a different/better solution!
.... And that's it for the basics! Stuff you can do afterwards if you're feeling ambitious:
* Add a mounted loop to the cover so you can padlock it to the cargo tiedown on the truck bed, thus making it secure (the outer doors have locks on them)
* Fill in the gaps made by the cuts with some kind of trim.
* Paint everything you messed up
* Fill in holes to at least pretend to make this thing water tight
* Add more brackets to reinforce places. Personally, I'm planning on mounting brackets on the transmission hump for the fore end of the covers because that's the weakest spot. I'd also like to add brackets to reinforce the 'shelf' on the doors but I haven't had a clever idea how to do that yet without making the X-doors look ugly.
* Try to waterproof it. I think this is an exercise in futility, but, a man can dream.
* Move the batteries to the rear compartment now that there's room and access to it.
* Many more ideas!
Let me know if you have any questions, and please don't mock my poor craftsmanship.

