mead
Member
- 41
- 2
- 8
- Location
- Cold Spring, Ky
Hello all. I've been lurking around the website for a couple of weeks, and this is my first post.
First off, many thanks to all those involved with this site. My son bought a 1985 1028 last week, and he and I have already learned a huge amount from this site.
One of several problems we encountered was no horn. After reading many posts, and viewing excellent wiring diagrams, (http://www.steelsoldiers.com/showthread.php?60580-Horn) I concluded it must be the horn contact at fault. Since I couldn't find clearly detailed drawings, or better yet photos, to help me figure out the small details of the horn contact, I thought I'd post some photos from my own repair, in the hopes that it might be helpful to anyone else following the same road. My apologies if this information is redundant.
The first thing we learned is that the horn button is simply pried off. Perhaps that's so elementary that everyone else knows, but we weren't sure until after we'd done it.
I'll detail the reassembly procedure, so obviously the disassembly would be the reverse.
Here's a photo showing the cylinder into which the horn contact parts will go.
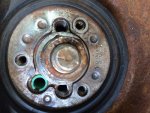
Insert the spring:
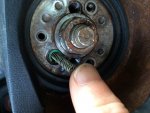
then the pin and plastic retainer:
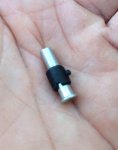
I got the replacement parts at NAPA:
http://www.napaonline.com/Catalog/Ca...822_0374189458
The pin in the kit might be too long, and if so can be cut to the right length. I would try it first before cutting it.
You can find illustrations in the Technical Manuals (TM's) here:
http://www.steelsoldiers.com/forumdi...hnical-Manuals
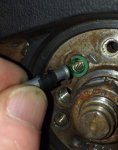
(When I took it apart, the spring was missing and the pin was installed backwards, so there was obviously no electrical continuity.)
I used the probe of an electrical tester to push in the retainer and rotate it clockwise to engage the small locking pin into its slot in the cylinder.
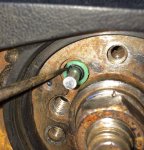
(The pin was then sticking out about 1/2".)
Next comes the spring, installed convexly, if that's a word. (bulging out, not in as it was when I discovered it).
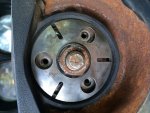
then the insulator bushing, cup, and retainer screws:
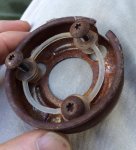
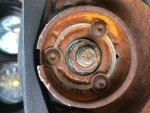
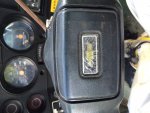
Lastly, push the horn button back in place, and you're done! (Ours was broken, so I siliconed it in place.)
I also sanded the rust off of the parts that make the electrical connections.
Thanks again to all the participants of this excellent website. I have been empowered.
p.s. Here's the truck:

First off, many thanks to all those involved with this site. My son bought a 1985 1028 last week, and he and I have already learned a huge amount from this site.
One of several problems we encountered was no horn. After reading many posts, and viewing excellent wiring diagrams, (http://www.steelsoldiers.com/showthread.php?60580-Horn) I concluded it must be the horn contact at fault. Since I couldn't find clearly detailed drawings, or better yet photos, to help me figure out the small details of the horn contact, I thought I'd post some photos from my own repair, in the hopes that it might be helpful to anyone else following the same road. My apologies if this information is redundant.
The first thing we learned is that the horn button is simply pried off. Perhaps that's so elementary that everyone else knows, but we weren't sure until after we'd done it.
I'll detail the reassembly procedure, so obviously the disassembly would be the reverse.
Here's a photo showing the cylinder into which the horn contact parts will go.

Insert the spring:

then the pin and plastic retainer:

I got the replacement parts at NAPA:
http://www.napaonline.com/Catalog/Ca...822_0374189458
The pin in the kit might be too long, and if so can be cut to the right length. I would try it first before cutting it.
You can find illustrations in the Technical Manuals (TM's) here:
http://www.steelsoldiers.com/forumdi...hnical-Manuals

(When I took it apart, the spring was missing and the pin was installed backwards, so there was obviously no electrical continuity.)
I used the probe of an electrical tester to push in the retainer and rotate it clockwise to engage the small locking pin into its slot in the cylinder.

(The pin was then sticking out about 1/2".)
Next comes the spring, installed convexly, if that's a word. (bulging out, not in as it was when I discovered it).

then the insulator bushing, cup, and retainer screws:


Lastly, push the horn button back in place, and you're done! (Ours was broken, so I siliconed it in place.)

I also sanded the rust off of the parts that make the electrical connections.
Thanks again to all the participants of this excellent website. I have been empowered.
p.s. Here's the truck:

Last edited:

