OverkillTASF
Member
- 92
- 6
- 8
- Location
- Central Virginia
Giving this its own post since I couldn't find any instructions that really prepped me for it. All parts listed can be found at Advance Auto. I know this is dumb, obvious, and even taken for granted by many... but when I was looking at the various pullers I had, the configuration of the rotor etc... I wasn't sure what I was going to need to do. I bought $25 worth of stuff at Advance Auto and nailed it though. So... just to share some photos for anyone who might search the interwebs...
Materials:
What the **** you're doing:
What does this **** look like:
Materials:
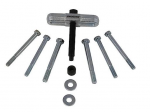
- A 2 hole steering wheel puller. I used part #AC581/W150.

- 2x 1/4-20 thread grade 8 bolts / screws. 1 inch long or better. I recommend getting slightly longer ones if you can. I used grade 8 bolts that were ALMOST too short at 1". Longer bolts would have been better, and I'm not sure grade 8 is really necessary as easily as it came off. These will be used with the steering wheel puller, but are too small for the slots in the puller, hence the washers below. I used part #960-010. You can do better.
- 2x 3/8" grade 8 washers. These will allow you to use your smaller bolts in the big slots on the puller. These washers are too large for the bolt, so you might do well to stack a right-sized washer on top. In my application these were fine on their own. I used part #965012.
What the **** you're doing:
- Follow the instructions in the service manual up to the point of actually pulling the rotor out of the stator.
- Get some penetrating oil in around the crankshaft and wait overnight of possible.
- Coat the bottom 2" of the push-bolt (the black one in the picture of the steering wheel puller above) in the puller with a little bit of anti-seize.
- Back the push-bolt in the steering wheel puller all the way out. Use the proper tip for the push-bolt if you can... my bolts were too short and there wasn't room.
- ...possibly wrong... I THINK I put the crankshaft end bolt back on without its washer, but didn't tighten it down, in order to give my pusher something to push on that wasn't threads. This shouldn't be necessary (and maybe isn't possible anyway...) if you buy longer bolts, as mentioned above in the materials sections. I didn't have room to use the proper tip on the puller because of the short bolts.
- Put one of your grade 8 bolts through a washer, then through the slot on the puller, and thread it into the rotor, just before finger tight.
- Put another grade 8 bolt through a washer, then through the other slot on the puller, and thread it into the rotor, finger tight.
- Snug both bolts down. Don't go crazy, you're not torquing anything or trying to stretch threads.
- Tighten the push-bolt until it starts resisting. Go an eighth of a turn more. Tightening the push bolt is pushing on the end of the crank shaft and pulling on the rotor.
- Tap the rotor with a mallet a few times from all 4 sides.
- This took really so little effort and my rotor came right off... I was prepared for something much worse, because I've never succeeded in getting ANYTHING off of a small engine crankshaft... always seized on. Maybe you'll have good luck with the MEPs too!
- Tighten the push-bolt an eighth of a turn more.
- Repeat tightening/tap until the rotor is loose. It will NOT come out yet, but it will no longer be on the shaft.
- Keep tightening the push-bolt until the rotor magnets are no longer pulling it into the stator. It's heavy. Be gentle but... it's heavy. Put it aside somewhere for safe keeping.
- Continue as described in the service manual.
What does this **** look like:
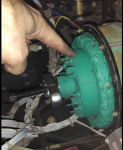
- Once you've removed the alternator cover, you'll see the rotor inside the stator. This is the rotor on its way out. I'm pointing at the rotor. You can see the steering wheel puller attached to the rotor.

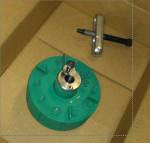
- This is a picture of the removed rotor, the steering wheel puller off to the side, and one of the bolts/washers threaded in to illustrate where they go. It's obvious when you're looking at it... I think. Note that normally the puller would be between the washer and the rotor. Again, maybe obviously.

- A picture of the stator and crankshaft with the rotor removed. I threaded the crank end bolt and washer back end to protect the threads while I did my other work, and so I wouldn't lose them. Obviously you can't do any of this if you leave the bolt and washer on.

Last edited:


