• Steel Soldiers now has a few new forums, read more about it at: New Munitions Forums!

  • Microsoft MSN, Live, Hotmail, Outlook email users may not be receiving emails. We are working to resolve this issue. Please add support@steelsoldiers.com to your trusted contacts.


Humvee Starter / Flexplate Teeth

Mogman

Moderator
Staff member
Moderator
Steel Soldiers Supporter
5,970
8,323
113
Location
Papalote, TX
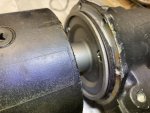
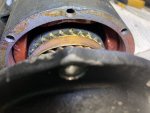
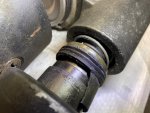
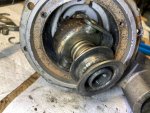
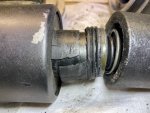
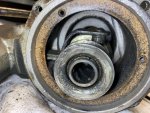
Let me play with one of my spares in the AM, I am thinking the collar should be pressed against the thrust washer, if I were building it I would stack more thrust washers on the brush end of the armature, but shaft movement is normal, most are fairly sloppy, but that would not be limiting the bendix travel anyway.
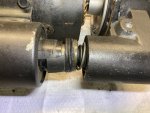
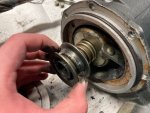
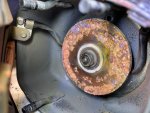
The solenoid, fork (and its pivot point) and bendix are what is involved there.
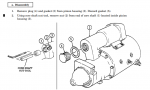
 
  • Like
Reactions: OBX

jake20

Well-known member
431
839
93
Location
Illinois
That’s awesome, thanks! I have a theory that this could in fact be a shim spacing issue like you mentioned earlier.

In the videos on my previous post, the bendix clearly has no issues fully kicking out to the collar on the shaft. If you look at the photo attached in this post, the wear marks on the flexplate are only about half way through the width of it.

When you transpose where the bendix gear should be when kicked out against the collar seen in the photo, it should really be using most of the width of the flexplate, but it doesn’t seem to be. So this makes me think that the tolerance / shim spacing could be too tight? Or I’m just overthinking this lol
 

Attachments

jake20

Well-known member
431
839
93
Location
Illinois
Definately needs all the terminals cleaned good...wire brush and sandpaper..
Yeap that’s definitely on the list, and I confirmed the cable that I did the not-so-great solder joint on. It’s labeled 81A. What I may do is try those larger style crimp connectors instead of attempting to heat up a super thick cable to solder to.

I’m still not quite sure what the purpose of that cable is. The main ground and positive lugs are obvious, and the really small cable closes the solenoid. It goes to the same lug as the main large positive, is it just another path for the current to flow?
 

Attachments

juanprado

Well-known member
Steel Soldiers Supporter
5,513
2,720
113
Location
Metairie/La (N'awlins)
Don't mean to threadjack, but does anyone have a pointer to the new style J bracket? NSN or other identifier so I can order one? Bendix on my starter is _slowly_ going, sometimes it won't engage. I've got a new starter in a box when the time comes, but I'm going to wait as long as I can. :) But I'd like to throw the bracket in the box with the starter and swap them both at the same time.
Send me a pm as I have a spare nos
 

jake20

Well-known member
431
839
93
Location
Illinois
Another thought.. my start switch has been bizarre since I got the truck.

It doesn’t go very far into the start position, and sometimes I have to release it slightly for the truck to start. The fuel shutoff solenoid circuit seemed to be finicky with it. The starter always sounded strong with it but maybe it’s acting weird with the initial engagement.

I’m waiting on a new switch from kascar, but it’ll be a week or two due to stock.

From my point of view, my next steps with the current information would be:

1: Clean all contacts thoroughly and fix the soldered cable in a better manner

2: New start switch

3: Add something to the shim to add a few thousandths of clearance maybe?

Off to bed now, too much thinking 🤪
 

Mogman

Moderator
Staff member
Moderator
Steel Soldiers Supporter
5,970
8,323
113
Location
Papalote, TX
81A carries the 24V to the EESS box, it basically feeds power to everything but the starter
 

Mogman

Moderator
Staff member
Moderator
Steel Soldiers Supporter
5,970
8,323
113
Location
Papalote, TX
I put my spare on the bench and the clearances and throw are identical to yours, the wear pattern is a bit wider but not significantly so.

Looking at the "damage" to your flywheel it looks "old" not new as the area is not shiny like "new" damage would look so I am assuming that is from days gone by.
You may have simply damaged the over-running clutch in the bendix when it was accidentally activated while running and that is what is causing all the grief, and since you said that was a turning point in starter performance that would make sense, I have done that at least a hundred times in the last 50 years but fortunately I never had to pay a price for it.

Yes RWH says a shim is not necessary but the engineers put one there for a reason and you have one anyway so that would not be the issue.
 

gringeltaube

Staff Member
Super Moderator
Moderator
Steel Soldiers Supporter
6,886
2,269
113
Location
Montevideo/Uruguay
:ditto: what Mogman said...

To me, that bendix has seen much better days... They aren't that expensive, so I would definitely install a new replacement, before reassembly.

Besides that I'm wondering why that stop collar has to be so thick? That looks like at least 1/2" (?)
If this was mine and I had the same issue with not enough travel, I would put that part in a lathe, remove a few mm and then see what happens.
 

Mogman

Moderator
Staff member
Moderator
Steel Soldiers Supporter
5,970
8,323
113
Location
Papalote, TX
:ditto: what Mogman said...

To me, that bendix has seen much better days... They aren't that expensive, so I would definitely install a new replacement, before reassembly.

Besides that I'm wondering why that stop collar has to be so thick? That looks like at least 1/2" (?)
If this was mine and I had the same issue with not enough travel, I would put that part in a lathe, remove a few mm and then see what happens.
That is why I wanted to get one on the bench, that collar looks much thicker than it needs to be but my spare is the same, there is a wire spring that rides in a groove on the shaft and holds that collar in place.
 
  • Like
Reactions: OBX

jake20

Well-known member
431
839
93
Location
Illinois
Hm wow lots of good info. I can go ahead and order a bendix to swap then, looks like they’re about $25. Anything else under that bendix cover that I need to be mindful of when removing?
 

Mogman

Moderator
Staff member
Moderator
Steel Soldiers Supporter
5,970
8,323
113
Location
Papalote, TX
You will not be able to simply push the collar down as in the video as the collar is locked in place by the spring clip.
You will have to stand the armature on its end and use a socket to drive the collar towards the bendix.
Then remove the spring clip and collar to be able to slip the bendix off the armature shaft.
When going back together, it is sometimes a PITA to drive the collar onto the spring clip, it is important that the collar be correctly locked in place, this keeps the armature from moving too far forward. (or rearward as it is installed in the vehicle)
Put a little moly grease where the fork goes into the bendix and on the helix on the shaft and even though the bushings are impregnated with oil I usually put a very small amount of moly grease on the front and rear bushing.
And of course inspect the brushes and bushings for excessive wear.
 
Last edited:

Mogman

Moderator
Staff member
Moderator
Steel Soldiers Supporter
5,970
8,323
113
Location
Papalote, TX
Also pay close attention to the shims, there is usually an insulated shim directly against the commutator and then there may be bronze shims between the insulated one and the rear bushing and there is a bronze shim between the collar and the nose piece.
Do not use emery cloth on the commutator if you feel you must clean it up use sand paper but unless it looks pretty bad just leave it alone.
If you get stuck load it up and see if your local starter shop will be helpful.
I have hauled several 200A and 60A alternators to my local shop, they of course test alternators for free to bring in business but know when I walk in the door it is going to be heavy and not lead to any business but they still test them for free, I always try to slip the guy a 20 when the boss is not looking.
 

jake20

Well-known member
431
839
93
Location
Illinois
I clearly have no idea what I’m doing 😆

A deuce brake booster rebuild was a piece of cake compared to this lol

Anyway, I think I’ll buy a used take-out for now and slowly rebuild this one as a learning experience. That little spring clip holding the collar was beating me for a while too haha.

I mainly can’t seem to be able to remove the bendix side from the motor side, there’s a few rubber pieces also dry rotted pretty badly on it.
 

Attachments

  • Like
Reactions: OBX

jake20

Well-known member
431
839
93
Location
Illinois
Alright so my issue was that this thing had to come apart much further than I thought to remove the bendix. I'm close to having it removed, but I'm a little confused with the solenoid/fork removal, as this is where the existing precision adjustments have to be made?

It's neat seeing how this all works though, you see all the tiny spot welds on the contactor plate from all that current heh

If I'm going to rebuild this thing, it's becoming obvious that I'll need a few new special seals/gaskets. I did some initial googling but wasn't able to find much in terms of it, other than the cork ones. The main one that really needs replacing is the solenoid seal.
 

Attachments

Last edited:

gringeltaube

Staff Member
Super Moderator
Moderator
Steel Soldiers Supporter
6,886
2,269
113
Location
Montevideo/Uruguay
I'm close to having it removed, but I'm a little confused with the solenoid/fork removal, as this is where the existing precision adjustments have to be made?
That bendix should have come out easily. Did you not remove the pin (#10), where the fork pivots?

1661515487147.png
1661515600688.png
 

jake20

Well-known member
431
839
93
Location
Illinois
Clearly I have done this all backwards and the hard way so far, I removed the spring clip and collar from the armature shaft while it was still in the housing.

I did remove the two hex plugs and pivot pin for the fork, but my fork is still connected at the top. I'll pull up this procedure in the TM, didn't know that it was available this in-depth. I assume this procedure is for depot-level repair people, rather than the normal mechanics?
 
Top
AdBlock Detected

We get it, advertisements are annoying!

Sure, ad-blocking software does a great job at blocking ads, but it also blocks useful features of our website like our supporting vendors. Their ads help keep Steel Soldiers going. Please consider disabling your ad blockers for the site. Thanks!

I've Disabled AdBlock
No Thanks